DME Arc
A DME arc is a curved course flown at a constant distance from a VOR/DME or via GPS, used as a transition (feeder) on some instrument approaches. You fly the arc by making a series of small heading changes and re-centering the bearing pointer — the classic "turn 10°, twist 10°" technique — keeping the DME pegged at the arc distance.
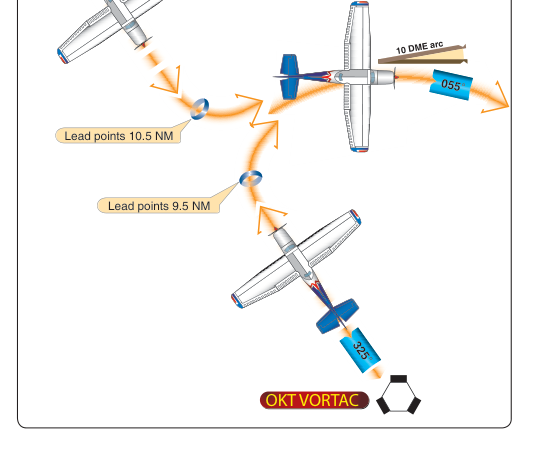
Step by step
- 1Brief the arc: the DME distance, the radial it begins/ends on, the direction of turn, and the altitude.
- 2Lead the turn onto the arc (begin the turn about 0.5 NM before reaching the arc distance) and roll out perpendicular to the station with the bearing pointer on the wingtip reference.
- 3Fly a constant heading; as the DME increases slightly above the target, turn about 10° toward the station to re-intercept the arc.
- 4After turning, "twist" the OBS/expected radial about 10° to keep the next reference radial set (turn 10°, twist 10°).
- 5Repeat the small turns to hold the DME within tolerance, correcting for wind by using a slight lead/lag in heading.
- 6Anticipate the lead radial to turn off the arc onto the final approach course.
Tips & common errors
- Keep the station off the wingtip — the bearing pointer should sit near the 90° (wingtip) reference as you fly the arc.
- "Turn 10°, twist 10°": small heading changes plus re-setting the reference radial keep you on the arc.
- A GPS makes arcs much easier — but you should still understand the raw-data VOR/DME technique.
- Lead the turn onto and off the arc (≈0.5 NM) so you do not overshoot.
ACS completion standards
The commonly-tested tolerances for this maneuver. Always confirm the current ACS for your certificate.
- Maintain the arc within ±1 NM of the specified DME distance (keep within tolerance).
- Maintain altitude ±100 feet and airspeed ±10 knots.
- Properly transition onto and off the arc using the correct technique and lead.
FAA source
FAA-S-ACS-8 (Instrument Rating ACS), Task: Intercepting and Tracking / Approaches (DME arc transition); Instrument Flying Handbook FAA-H-8083-15, Chapter 9.
This is an original, plain-English study summary grounded in the public-domain FAA Airman Certification Standards and FAA handbooks cited above. It is a study aid, not flight instruction, and not a substitute for the official ACS, the handbooks, your aircraft’s POH/AFM, or a certificated flight instructor.
Related maneuvers
- Attitude Instrument Flying & the Instrument ScanAttitude instrument flying is the foundation of all instrument flight: you control the airplane by interpreting the instruments instead of looking outside. You set an attitude on the attitude indicator (control), verify the result on the other instruments (performance), and trim. A disciplined cross-check (scan) prevents fixation and keeps every parameter in tolerance.
- Constant-Airspeed Climbs & DescentsOn instruments you frequently change altitude at a constant airspeed. You set a pitch and power for the desired airspeed, hold it with the scan, and lead the level-off so you roll out exactly on the new altitude and back at cruise airspeed.
- Rate Climbs & Descents (Constant Vertical Speed)Sometimes you must hold a specific vertical speed (for example to meet a crossing restriction or to fly a constant descent rate on an approach). You adjust pitch and power to pin the VSI to a target rate while still controlling airspeed, then lead the level-off.
- Steep Turns (Instrument)On instruments, a steep turn (typically a sustained 45° bank) tests your cross-check and control as the higher bank increases the back-pressure and power needed to hold altitude. With no outside horizon, you must control everything by the attitude indicator and supporting instruments.
Keep studying
Turn maneuver knowledge into a passing checkride
Drill ACS-aligned questions and ask the AI tutor, Ace, anything — free to start, no account needed.
Take a free practice test →