Sheet metal repair is one of the most common tasks an Aviation Maintenance Technician (AMT) performs on airframe structures. At the heart of every riveted joint lies a series of holes that must be drilled, deburred, and often reamed to exacting tolerances. A hole that is too large, too small, out of round, or rough-edged can reduce joint strength dramatically, accelerate fatigue cracking, and ultimately compromise airworthiness. Understanding why each step matters — not just how to do it — is what separates a skilled technician from someone who merely completes the motions.
The FAA's Aviation Maintenance Technician Handbook — Airframe (FAA-H-8083-31) covers rivet installation procedures in detail, and the principles discussed here are grounded in that text. Whether you are preparing for the AMT Airframe knowledge test or heading into your first sheet metal repair, mastering hole preparation is the foundation on which every strong, lasting rivet joint is built.
Drilling the Rivet Hole
The drilling process begins well before the drill bit touches metal. Proper layout, material selection, and drill speed all determine whether the finished hole will meet engineering standards.
Selecting the Correct Drill Size
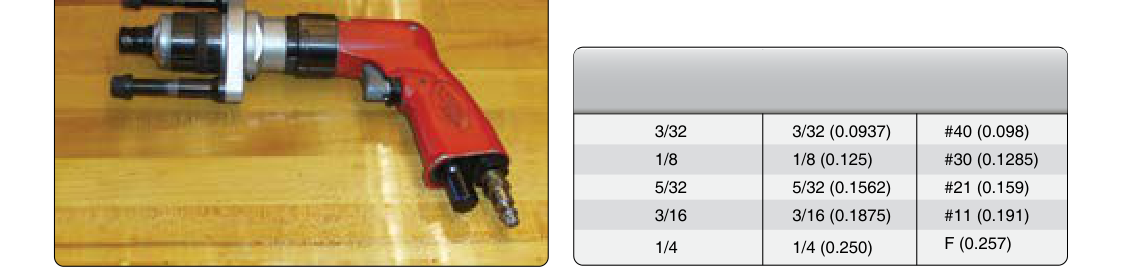
Rivet holes are drilled to a close-tolerance fit relative to the rivet shank diameter. The general rule is that the finished hole diameter should be 0.003 to 0.004 inches larger than the nominal rivet diameter for most standard solid shank rivets. This close fit ensures the rivet fills the hole completely when driven, maximizing shear strength and preventing the rivet from rocking or working loose in service. Number-drill sizes are commonly used in aircraft sheet metal work; for example, a 3/32-inch (AN470 or AN426) rivet typically uses a No. 40 drill, a 1/8-inch rivet uses a No. 30, and a 5/32-inch rivet uses a No. 21.
Drill Speed and Feed Rate
Cutting speed must be matched to the material being drilled. Aluminum alloy — the most common airframe sheet metal — is a relatively soft material and can be drilled at higher RPM than steel. However, excessive speed with insufficient feed pressure generates heat, which can work-harden aluminum, produce an oversize or out-of-round hole, and cause drill bit chatter. The correct technique is to apply steady, firm feed pressure so the cutting flutes are continuously removing material, while keeping the drill perpendicular to the surface. A drill that wanders even a few degrees produces an elongated hole that will not properly support the rivet head.
Pilot Holes and Step Drilling
When drilling through thick stacks of material or hard alloys, technicians use a pilot hole — a smaller hole drilled first to guide the final-size drill and reduce the chance of the bit walking off the layout mark. For very thick sections or stainless steel, step drilling progresses through two or three intermediate sizes before reaching the final diameter. This technique reduces heat buildup, extends bit life, and produces a rounder, more accurate hole.
Drilling Composite and Bonded Structures
When drilling through fiber-reinforced composite panels bonded to metal substructure, special carbide or diamond-coated bits are required. Standard high-speed steel bits dull rapidly in composite material, producing delamination around the hole edge — a condition that is invisible from the surface but creates a stress concentration that can propagate into a crack. Feed rates in composite must be carefully controlled; too slow a feed causes the resin to heat and burn, while too fast a feed tears fibers rather than cutting them cleanly.
Deburring the Hole
Every drilled hole in sheet metal produces a burr — a thin ring of raised, deformed metal on both the entry and exit faces of the sheet. Burrs must be removed completely before rivets are installed. This is not optional; it is a structural requirement.
Why Deburring Matters
A burr under a rivet head or between mating sheets creates a small void in the joint. Under flight loads, this void allows the sheets to flex slightly, initiating fatigue cracks at the hole edge — the most common site of fatigue failure in riveted structure. Burrs also prevent sheets from lying flush against each other, creating gaps that trap moisture and promote corrosion. The FAA handbook is explicit: mating surfaces must be clean and flat before final assembly.
Deburring Tools and Technique
The most common deburring tool for rivet holes in thin sheet is a countersink deburring bit — essentially a very shallow countersink (sometimes called a microstop countersink or simply a deburring countersink) rotated lightly by hand or with a slow-speed drill. The goal is to remove only the burr, leaving a barely perceptible chamfer. Removing too much material creates a countersink-like depression that weakens the hole edge and is easy to do accidentally if power tools are used at speed. Other acceptable deburring methods include a fine-cut hand file, a deburring blade designed to swivel inside the hole, or fine abrasive cloth wrapped around a dowel. The inside of the hole (the bore itself) should also be inspected and any raised material removed; a rolled burr inside the bore prevents the rivet shank from seating fully.
Reaming the Hole to Final Size
Reaming is the process of enlarging and truing a drilled hole to its precise final diameter using a reamer — a multi-fluted cutting tool designed for accurate sizing, not material removal in bulk. Not every rivet hole requires reaming, but the process is essential in specific situations.
When Reaming Is Required
Reaming is required when: (1) holes in mating sheets must be perfectly aligned and sized consistently for close-tolerance or interference-fit fasteners; (2) a hole has been drilled slightly undersize and must be brought to final diameter without the size variation that a drill bit can introduce; or (3) special high-strength fasteners such as Hi-Lok or NAS close-tolerance bolts are being installed. These fasteners require a hole tolerance of +0.000 / -0.001 inch or tighter, tolerances that a drill bit alone cannot reliably achieve.
Reamer Types
Straight-fluted reamers work well in materials that produce a continuous chip, while spiral-fluted reamers are preferred for softer aluminum because they pull chips away from the work rather than pushing them back into the hole. Reamers must be kept sharp and clean; a dull or contaminated reamer produces a rough bore that can actually introduce the stress concentrations it is meant to eliminate. Always use cutting fluid or a light lubricant when reaming aluminum or steel.
Reaming Technique
A reamer must enter the hole perfectly square to the surface and should be fed through at a slow, steady rate. Never reverse a reamer while it is in the hole — the cutting edges are designed to cut in only one direction, and reversing dulls them immediately and can leave a rough spiral pattern inside the bore. After reaming, the hole must be deburred again because the reamer produces its own small burr at the exit face.
Key Numbers and Rules
- Hole clearance for solid rivets: 0.003 to 0.004 inch over nominal rivet shank diameter for standard fit.
- Common drill-to-rivet pairings: 3/32-in rivet → No. 40 drill; 1/8-in rivet → No. 30 drill; 5/32-in rivet → No. 21 drill; 3/16-in rivet → No. 11 or letter A drill.
- Minimum edge distance: rivet centers must be placed at least 2D from any sheet edge (where D is the rivet diameter), with 2.5D preferred/optimum, and spacing between rivets is typically 3D minimum.
- Close-tolerance fastener fit: hole tolerance generally +0.000 / -0.001 inch or per the manufacturer's data sheet.
- Drill perpendicularity: drill must be held within approximately 1 degree of perpendicular to the work surface to produce a round, properly sized hole.
- Never reverse a reamer while the tool is inside the hole — always turn in the cutting direction only.
- Composite drilling: use carbide or diamond-coated bits; inspect every hole for delamination before closing out.
Common Test Traps
- Hole tolerance confusion: The FAA test may ask whether a slightly oversize hole can still be used. A hole that exceeds the maximum allowable clearance must be drilled to the next rivet size up or repaired — it cannot simply be used with the original rivet size, as the rivet will not fill the hole properly when driven.
- Deburring depth: Test questions sometimes imply that a visible countersink chamfer is the goal of deburring. It is not — deburring removes only the burr. Cutting a deep chamfer is an error that reduces sheet thickness at the stress-critical hole edge.
- Reamer direction: Examinees often confuse the rule about reversing. You may back a drill out slowly in reverse to clear chips, but you must never reverse a reamer inside the work.
- Drill size vs. rivet size: The drill number does not equal the rivet diameter. Memorize the common pairings; confusing a No. 30 drill with a 3/32-inch rivet (instead of the correct 1/8-inch rivet) is a classic test mistake.
- Composite hole inspection: Test questions on composite structures frequently focus on delamination — which is not always visible from the surface. Any sign of delamination around a drilled hole requires the repair to be evaluated per the Structural Repair Manual (SRM) before the fastener is installed.