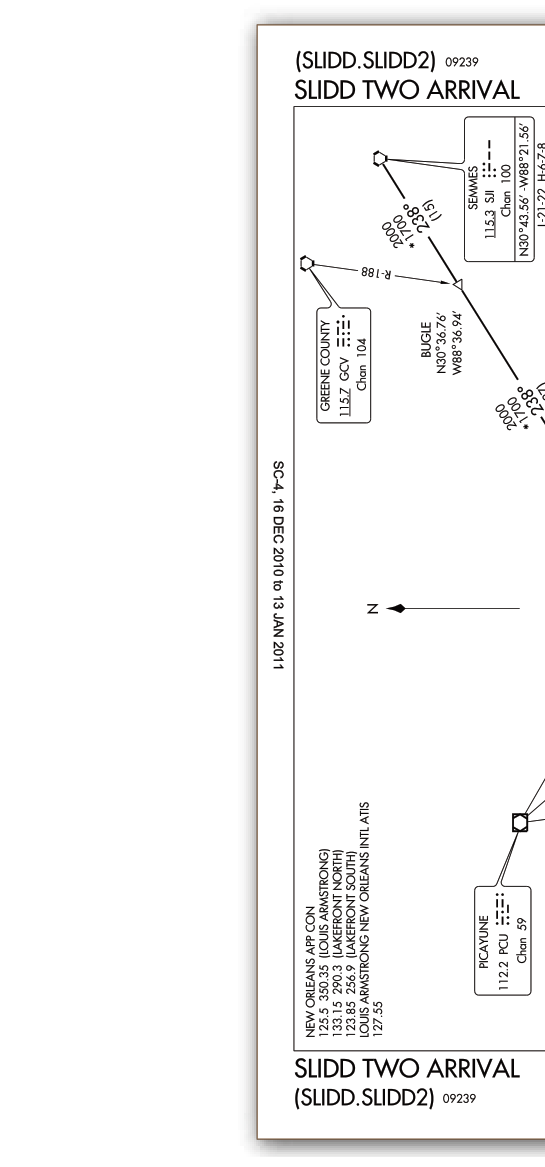
A Standard Terminal Arrival Route (STAR) is a published instrument flight procedure that provides a standardized, ATC-approved routing for aircraft descending from the en route structure into a terminal area. Just as a Standard Instrument Departure (SID) gets you organized leaving an airport, a STAR organizes the flow of arriving traffic — reducing radio workload, minimizing pilot/controller confusion, and helping sequence multiple aircraft onto the same approach corridors. For instrument-rated pilots, reading a STAR chart accurately is not optional: misreading an altitude restriction or transition route can lead to a controlled flight toward terrain or a runway incursion. This article walks through every layer of STAR chart symbology, explains how to decode the chart, and highlights the exam traps that trip up even well-prepared students.
STARs are published by the FAA in the Terminal Procedures Publication (TPP), the same bound volumes (or digital equivalents) that contain instrument approach procedures. Each STAR is identified by a name and number — for example, HAWKZ TWO ARRIVAL — and covers one or more destination airports in a terminal area. Pilots flying IFR are not required to accept a STAR, but if ATC assigns one, you must comply unless you specifically request No STARs in your flight plan remarks.
Anatomy of a STAR Chart
A typical STAR chart contains several distinct zones of information. Learning to read them in order — from the header, through the plan view, to the textual route description — gives you a reliable mental workflow during preflight and in the cockpit.
Header Block
The top of every STAR chart displays the procedure name, the associated airport(s), and the effective date of the chart cycle (charts publish on a 28-day AIRAC cycle). The transition altitude or level may also appear here if it varies from the standard. Always verify the chart is current before using it — an expired procedure can have wrong altitudes or decommissioned fixes.
Plan View (Bird's-Eye Map)
The plan view is the large overhead depiction of the routing. Key elements include:
- Fixes and waypoints: Named fixes appear as triangles (fly-over) or four-pointed stars (fly-by). A fly-by fix means the aircraft begins turning before reaching the fix to roll out on the next course. A fly-over fix (filled triangle) requires the aircraft to cross directly over the point before turning. Confusing these two types is an extremely common error.
- Transitions: Many STARs have multiple transition routes — feeder routes from different en route fixes or airways that all converge onto the common STAR backbone. Each transition is labeled with its name (e.g., BOSSS TRANSITION) and its own set of routing fixes. In the plan view, transitions are typically depicted with lighter lines feeding into the heavier main route line.
- Course lines and magnetic tracks: Arrows on each segment indicate the direction of flight, and the magnetic course (e.g., 185°) is printed along the line. Distance in nautical miles between fixes also appears along each segment.
- Minimum En Route Altitudes (MEAs) and crossing altitudes: Altitude constraints are printed adjacent to fixes or segments. These are the most operationally critical items on the chart.
- Holding patterns: Published holding patterns appear at certain fixes on a STAR, depicted with a standard racetrack symbol. These may be used for sequencing or for weather holds and define the protected airspace for that hold.
- Navigational aids (NAVAIDs): VORs appear as hexagons with their identifier, frequency, and Morse code. GPS/RNAV waypoints appear as five-pointed stars. DME arcs, if part of the arrival, are depicted as curved lines with associated distances.
Altitude Restrictions — The Most Critical Symbology
Altitude constraints on a STAR use a specific notation that the FAA knowledge test frequently exploits:
- An altitude printed above a fix with no modifier means mandatory — cross at exactly that altitude.
- An altitude with the notation "or above" (sometimes shown as a line above the number, like an overline) means the aircraft must cross at or above that altitude — it is a minimum crossing altitude (MCA).
- An altitude with the notation "or below" (sometimes shown as a line below the number, like an underline) means the aircraft must cross at or below that altitude — it is a maximum crossing altitude.
- When two altitudes appear at a single fix — one above the other — the upper value is the maximum and the lower value is the minimum. The aircraft must cross within that window (between the two values).
ATC may issue a clearance to descend via the STAR, which is the critical phrase that authorizes the pilot to follow all published altitude restrictions on the procedure. Without a "descend via" clearance, you must maintain your last assigned altitude until ATC provides a new one. This distinction is heavily tested on the instrument knowledge exam and has direct safety consequences.
Speed Restrictions
Speed restrictions may also appear on STAR charts, printed adjacent to fixes or segments. Like altitude constraints, they use the same "at," "at or above," and "at or below" notation. A speed restriction printed without a modifier means cross at exactly that speed. These published speeds are part of the procedure and must be complied with unless ATC issues a different speed instruction. Forgetting to slow down at a published speed fix can upset the sequencing of arrival traffic and may trigger a conflict with slower aircraft ahead.
Textual Route Description
Below or beside the plan view, most STAR charts include a written route description listing each fix in sequence, with associated altitudes and courses. This text is your cross-check against the graphical plan view. If the plan view ever seems ambiguous — for instance, in a cluttered terminal area with many overlapping transitions — the text description is authoritative. Read both sections during preflight to build a complete mental picture of the routing.
Why STARs Matter: Safety and Efficiency
The primary safety benefit of a STAR is terrain and obstacle clearance. Altitude restrictions are designed to keep aircraft above the Minimum Vectoring Altitude (MVA) or minimum sector altitudes in the area, providing obstacle clearance while ATC sequences the arrival flow. Complying with every altitude restriction — especially the "at or above" minimums near mountainous terrain — is a direct CFIT (Controlled Flight Into Terrain) prevention tool.
From an efficiency standpoint, STARs reduce the sheer volume of ATC radio transmissions needed to move traffic. Instead of issuing individual routing instructions to every inbound aircraft, approach control can simply say "Cleared HAWKZ TWO ARRIVAL, descend via," and both the pilot and controller share a common mental model of exactly where the flight is going and at what altitudes. This shared situational awareness reduces the chance of misunderstandings, especially during high-traffic periods.
Key Numbers and Rules
- "Descend via" clearance: Authorizes compliance with all published lateral and vertical restrictions on the STAR; without it, hold last assigned altitude.
- Chart currency: STARs publish on a 28-day AIRAC cycle; always verify the effective date.
- Fly-over vs. fly-by: Fly-over fixes are filled triangles; the aircraft must cross the fix before turning.
- Speed and altitude compliance: Published speed and altitude constraints are mandatory unless ATC amends them verbally.
- No STARs request: Pilots may file No STARs in remarks if they cannot or prefer not to accept complex procedures, but ATC may still vector you in a similar path.
- RNAV STARs: Many modern STARs are RNAV-based, requiring GPS or FMS capability; aircraft not equipped must inform ATC so they can provide alternate routing.
Memory Aid: "CRAFT" for Clearance Components
When ATC issues your STAR clearance, you will typically receive the full clearance read-back in the CRAFT format: Clearance limit, Route, Altitude, Frequency, and Transponder code. Knowing CRAFT keeps you organized so you never miss capturing a STAR name or a crossing altitude in the clearance. Write it down in order as ATC speaks — especially the altitude, because "descend via" versus a specific altitude assignment changes everything about how you manage your descent.
Common Test Traps
- "Descend via" versus assigned altitude: The exam will present a scenario where the pilot receives a STAR clearance without the words "descend via" and ask what altitude to maintain. Without that phrase, you hold your last assigned altitude — do not follow the published descents on the STAR automatically.
- Mandatory vs. minimum vs. maximum altitude notation: The test loves to present an altitude restriction and ask whether it is "at," "at or above," or "at or below." Study the overline/underline convention carefully and know that a plain number means mandatory.
- Fly-over vs. fly-by fix symbols: Students frequently mix up filled and unfilled triangles. Remember: filled (solid) triangle = fly-over — you must cross it before turning.
- Transition routes vs. the main STAR: A question may ask which fix marks the beginning of a specific transition versus where the common STAR backbone starts. Trace the lighter lines (transitions) to the heavier main route line in the plan view.
- RNAV requirement: Not all aircraft can fly every STAR. If a STAR is labeled (RNAV) in the title, GPS or FMS equipment meeting the required navigation specification (e.g., RNP or RNAV-1) is mandatory. Attempting an RNAV STAR without proper equipment is both illegal and dangerous.