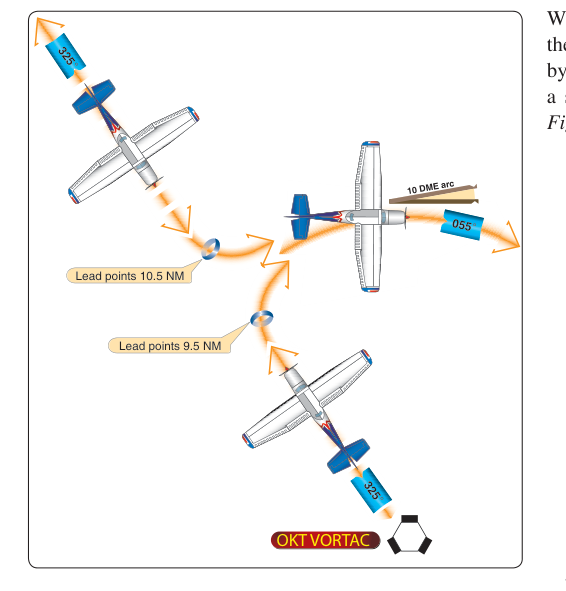
Distance Measuring Equipment (DME) arcs are curved flight paths that maintain a constant slant-range distance from a VORTAC or VOR/DME ground station. Unlike straight-line airways or radials, a DME arc traces a circle — or, more commonly, a portion of a circle — around the navaid. Instrument pilots encounter DME arcs most often as transitions from the enroute structure to an instrument approach procedure, but arcs can also appear on departure procedures and occasionally as stand-alone routing segments. Understanding how to fly an arc precisely and efficiently is a core instrument-rating skill and a frequent topic on the FAA Instrument Rating knowledge test.
This article breaks down the geometry behind arcs, the step-by-step cockpit technique for flying them, the navigation tools involved, and the rules and limitations the FAA expects every instrument pilot to know.
The Geometry of a DME Arc
A VOR/DME or VORTAC station broadcasts both directional radial information and a DME signal. The DME measures slant range — the straight-line distance from the aircraft's antenna to the ground station antenna, which includes the vertical component of the aircraft's altitude. At typical en-route or approach altitudes above the station, slant range is very close to ground distance, so the effect is negligible for practical arc flying. The arc radius is the published DME distance shown on the instrument approach plate or enroute chart, commonly anywhere from 7 to 30 nautical miles.
Because the arc is a circle segment, at every point along the arc the aircraft is simultaneously on a unique VOR radial. This fact is the foundation of the entire arc-flying technique: you use radials to track your angular position around the station while the DME reading tells you how well you are holding the radial distance. Drifting inside the arc means your DME reads less than published; drifting outside means it reads more.
How to Fly a DME Arc — Step by Step
Joining the Arc
The chart will identify a lead radial or a fix at which you intercept the arc. As you approach the intercept fix, calculate a lead distance to begin your turn onto the arc. A commonly accepted rule of thumb is to start the turn approximately 0.5 nautical miles before reaching the arc radius at normal approach speeds, though the actual lead varies with groundspeed and bank angle. At higher speeds — 150 knots or more — pilots sometimes use a 1 NM lead. The goal is to roll out already on the arc rather than overshooting inward or outward.
To join from inside the arc (flying outbound on a radial away from the station), turn toward the arc when your DME reads the arc distance and then turn 90° to the appropriate direction. To join from outside (flying inbound on a radial toward the station), turn 90° when the DME counts down to the arc distance.
The Lead-Radial Technique
Once established on the arc, the standard cockpit method is the lead-radial technique, sometimes called the 20° twist method. Here is the sequence:
- Set the Omni Bearing Selector (OBS) to a radial that is 10° ahead of your current position in the direction of arc travel. This is called the lead radial.
- Fly a heading that keeps the CDI centered (needle deflection corrects you back to the arc). Your heading will be roughly perpendicular to the current radial — pointing 90° away from the station.
- When the CDI centers, meaning you have reached that lead radial, twist the OBS another 10° in the direction of arc travel and repeat.
- Continue in 10° increments all the way around the arc until you reach the published exit point or next fix.
The 10° increment keeps you close to the arc. If you are flying a large-radius arc at high speed in strong winds, you may need to update more frequently (every 5°) to stay within tolerance. The FAA considers an acceptable arc deviation to be within ±1 nautical mile of the published radius.
Correcting Arc Deviations
If the DME reading is greater than the arc distance (you drifted outside), turn toward the station — decrease your heading to point slightly inbound — until the DME counts back down, then resume the arc heading. If the DME is less than the arc distance (you drifted inside), turn away from the station. Small, smooth corrections are better than large heading swings that cause oscillation around the arc.
Leaving the Arc
Approach plates and enroute charts publish a lead radial — a specific radial printed on the chart that serves as a cue to begin the final turn off the arc, usually toward an approach fix or an airway. The lead radial accounts for the aircraft's turning radius at normal approach speeds. When the CDI begins to center on the lead radial, turn toward the inbound course. Failing to begin this turn early enough is one of the most common errors students make, resulting in an overshoot of the inbound track.
Navigation Equipment for DME Arcs
You need both a functional VOR receiver and a DME to fly a published DME arc. The VOR gives radial position; the DME gives distance. Without DME, the arc is not authorized. GPS can substitute for DME on many instrument procedures under certain conditions when the GPS database includes the procedure and the aircraft is properly equipped, but the underlying technique may differ. When flying with a Flight Management System (FMS) or RNAV GPS that has the arc coded in the database, the system will often fly the arc automatically — but the pilot must still monitor progress and understand what the system is doing.
When using a traditional VOR/DME setup with a single-needle CDI, you will be chasing the needle continuously. A Horizontal Situation Indicator (HSI) makes arc flying significantly easier because the bearing pointer and course pointer both update continuously, giving an intuitive picture of your position relative to the station and the desired radial.
Why DME Arcs Matter
DME arcs allow procedure designers to route aircraft efficiently around terrain, obstructions, or conflicting traffic flows while providing a precise, instrument-guided path. Without arcs, pilots would need a series of straight-line course changes to accomplish the same task, each requiring a fix and associated airspace. From a safety standpoint, staying on the arc ensures obstacle clearance — the published Minimum Obstruction Clearance Altitude (MOCA) or Minimum Enroute Altitude (MEA) is predicated on flying within the charted corridor, which for an arc is the ±1 NM band.
From an exam standpoint, the FAA tests whether you understand that an arc is NOT a radial — it is a locus of equal distance — and that maintaining arc integrity requires active DME monitoring, not just VOR tracking.
Key Numbers and Rules
- Arc tolerance: Stay within ±1 NM of the published arc radius to maintain obstacle clearance and remain within the protected airspace corridor.
- Lead radial twist: Update the OBS in 10° increments in the direction of travel; some pilots use 5° increments at high speeds or tight radii.
- Turn lead: Begin the intercept turn approximately 0.5 to 1 NM before reaching the arc, depending on groundspeed.
- Equipment required: A functional VOR receiver AND DME (or RNAV/GPS with the arc coded and the appropriate approvals) are required to fly a DME arc.
- Slant range error: DME measures slant range, not ground distance. The error is greatest when the aircraft is directly overhead (low altitude above the station) and negligible at typical arc radii and normal altitudes.
- Minimum arc radius: Charted DME arcs are typically no less than 7 NM to ensure adequate turning room, though specific procedures vary.
Common Test Traps
- Confusing radials with distance: The FAA frequently asks what piece of equipment tells you where you are on the arc — the VOR receiver (for angular position via radials) — versus what keeps you on the arc — the DME (for distance). Students mix these up.
- Forgetting slant range: DME always measures slant range. A question may describe a scenario near the station at high altitude and ask whether the DME over-reads or under-reads ground distance. It always over-reads ground distance due to the altitude component.
- Missing the lead radial: Questions may present a scenario where the pilot is approaching the exit radial at high speed. The correct action is to start the turn at the lead radial, not when the inbound course needle centers. Waiting too long causes an overshoot.
- Arc tolerance confusion: Some students think any deviation is acceptable as long as they return to the arc. In reality, exceeding ±1 NM removes obstacle clearance protection and can place the aircraft outside the charted airspace corridor.
- Assuming GPS always substitutes for DME: GPS may substitute for DME on many procedures, but only when the aircraft and avionics meet specific authorization requirements and the arc is in the GPS database. The FAA tests whether students know this is not automatic or universal.