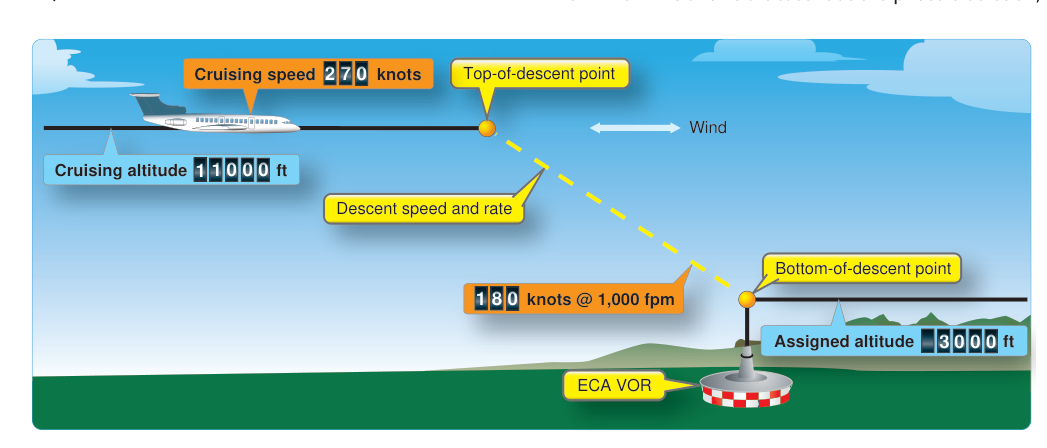
One of the most reliable signs of a polished instrument pilot is the ability to arrive at every fix on the arrival exactly as planned: on altitude, on speed, and never scrambling to lose a thousand feet in the last two miles. That outcome is not luck—it is the result of methodical descent planning that begins well before the top of descent (TOD). Whether you are flying a complex STAR into a major hub or a simple direct clearance into a smaller airport, the math and the thinking are the same. This article walks you through the complete process: how to compute your TOD, how to manage energy during the descent, and the common traps that the FAA Instrument Rating knowledge test loves to exploit.
What Is the Top of Descent?
The top of descent is the geographic point along your route where you should begin a continuous descent so that you arrive at a specified lower altitude exactly at a specified fix or waypoint. Think of it as the mirror image of the top of climb: just as climb planning tells you where you will level off, TOD planning tells you where to begin going down. The goal is a smooth, stabilized descent—not a last-minute dive. The FAA's Instrument Flying Handbook (FAA-H-8083-15) emphasizes that energy and altitude management during the arrival phase are fundamental to flying stabilized approaches and maintaining positive aircraft control.
The Standard 3° Descent Rule and the 3:1 Ratio
Commercial airliners and instrument-rated pilots alike use a simple rule of thumb built on the 3:1 ratio: for every 1,000 feet of altitude to lose, you need approximately 3 nautical miles of horizontal distance (assuming a standard 3° glide angle). This ratio comes directly from the geometry of a 3° descent angle, which is the same angle used by most ILS glide slopes.
The formula is straightforward:
- Distance to descend (NM) = Altitude to lose (in thousands of feet) × 3
For example, if you are cruising at 10,000 feet MSL and need to cross a fix at 3,000 feet MSL, you must lose 7,000 feet. Multiply 7 × 3 = 21 NM. Your TOD is 21 NM before that fix. If you are 60 NM from the fix when you compute this, you have 39 NM of cruise flight remaining before you need to begin the descent.
A complementary way to frame the same math: at a groundspeed of 120 knots descending at 3°, you lose approximately 300–320 feet per nautical mile. At 90 knots, the numbers are similar because the 3:1 ratio is geometric, not speed-dependent. What does change with speed is your rate of descent in feet per minute, which leads to the second calculation.
Computing Vertical Speed for a 3° Descent
Knowing your TOD is not enough—you also need to set the right vertical speed (VS) on the flight instruments so the descent actually follows that 3° path. The rule of thumb here is equally simple:
- Required VS (fpm) = (Groundspeed ÷ 2) × 10
This formula is equivalent to multiplying groundspeed (in knots) by 5. At 120 knots groundspeed, the required VS for a 3° descent is approximately 120 × 5 = 600 fpm. At 90 knots it is 90 × 5 = 450 fpm. At 150 knots it is 750 fpm. These are starting points—you refine them in the cockpit based on whether you are high or low on your planned profile.
A more precise version of the formula, also accepted by the FAA, is groundspeed × 5.24 for an exact 3° slope, but the ×5 shortcut is accurate enough for practical cockpit use and for the knowledge test.
Putting It All Together: A Complete Example
Suppose ATC has cleared you to cross a fix 45 NM ahead at 6,000 feet, and you are currently at 11,000 feet MSL indicating 140 knots true airspeed with a 10-knot headwind (groundspeed = 130 knots).
- Altitude to lose: 11,000 − 6,000 = 5,000 feet
- Distance needed: 5 × 3 = 15 NM
- TOD: 45 − 15 = 30 NM before the crossing fix, meaning begin descent now if you are already 30 NM out, or continue at cruise altitude for another 15 NM if you are 45 NM out.
- Required VS: 130 × 5 = 650 fpm (round to 650 fpm on the VS indicator)
Set 650 fpm on the VS mode, monitor your altitude against distance remaining, and adjust by 100–200 fpm as needed to stay on profile. If you are consistently high, increase the descent rate; if low, reduce it or level briefly and re-plan.
STARs, Crossing Restrictions, and ATC Expectations
On a Standard Terminal Arrival Route (STAR), crossing restrictions appear at multiple fixes—each one is essentially a mini TOD problem. You may need to cross Fix A at or above 8,000 feet and Fix B at or below 5,000 feet. The technique is to work backwards from the most restrictive fix:
- Identify the fix with the tightest altitude restriction first.
- Calculate the TOD for that fix as above.
- Check whether complying with that restriction still allows you to meet any earlier restrictions. If not, you may need to request a different routing or altitude from ATC.
The Instrument Flying Handbook notes that descending via a STAR—using the DESCEND VIA clearance—means you are responsible for meeting all published altitude restrictions on the STAR without individual ATC altitude assignments. This clearance requires meticulous TOD planning because there is no controller reminding you of each crossing altitude. Failure to comply with a DESCEND VIA restriction is a deviation from an ATC clearance under 14 CFR Part 91.
Wind and Temperature Corrections
The 3:1 rule is based on geometry, not groundspeed, so it remains valid regardless of winds—as long as you use groundspeed (not airspeed) in the VS calculation. A strong tailwind means you will cover the 15 NM much faster, so your 650 fpm descent rate must increase proportionally. If groundspeed jumps to 160 knots, required VS becomes 160 × 5 = 800 fpm.
Cold, dense air affects true airspeed and, more critically, altimetry. In temperatures significantly below ISA standard, true altitude is lower than indicated altitude—the classic IFR cold-temperature correction. The FAA's instrument flying guidance reminds pilots that cold temperature errors can be significant at low altitudes and that corrections published in the AIM or provided by ATIS/AWOS may be needed to ensure terrain clearance on approach. This is especially important during descent planning in mountainous or elevated terrain.
Why Descent Planning Matters for Safety
The consequence of poor TOD planning is almost always the same: the pilot arrives too high and too fast, leading to a destabilized approach. Every major safety organization—and the FAA's own risk management guidance—identifies non-stabilized approaches as a leading precursor to approach-and-landing accidents. A rushed, steep descent from too close in degrades situational awareness, increases workload, and makes it nearly impossible to meet approach gate criteria (typically 1,000 feet AGL on an instrument approach at the final approach fix or earlier). The correct response to a high/fast situation is a go-around, not an attempt to salvage the approach—but the correct response to poor planning is to plan better from the outset.
Key Numbers and Rules
- 3:1 ratio: 3 NM of distance for every 1,000 feet of altitude to lose (3° descent).
- VS rule of thumb: Groundspeed (knots) × 5 = approximate fpm for 3° descent.
- ILS glide slope: Standard 3°, consistent with the 3:1 planning ratio.
- DESCEND VIA: Pilot is responsible for all STAR crossing restrictions without individual ATC altitude assignments (14 CFR 91.123 applies to clearance compliance).
- Stabilized approach gate: Typically 1,000 feet AGL in IMC; if not stabilized, execute a missed approach.
- Cold temperature correction: Below ISA conditions cause true altitude to be lower than indicated—critical during descent in cold weather.
Memory Aid
For TOD math, remember "3 Miles per Thousand, times 5 for fpm":
- 3 miles per thousand feet → distance needed to descend (the 3:1 ratio)
- Times 5 → multiply your groundspeed by 5 to get the vertical speed in fpm
Run these two calculations every time you get a crossing restriction and you will always know exactly when to start down and how fast to descend.
Common Test Traps
- Using airspeed instead of groundspeed in the VS formula. Always use groundspeed; a headwind shrinks it, a tailwind grows it, and your required fpm changes accordingly.
- Forgetting to work backwards on STARs. Students often plan for the first fix and ignore a more restrictive lower fix that requires an earlier start to the descent.
- Misunderstanding DESCEND VIA. A common test question implies that ATC will issue individual altitude instructions on a DESCEND VIA STAR—they will not. Pilot owns all restrictions.
- Ignoring cold temperature corrections. In well-below-standard temperatures, the altimeter reads high; true altitude is lower than indicated. Descending to a charted minimum without correction can violate obstacle clearance.
- Assuming a steeper angle saves time. A 6° descent covers half the distance but doubles the VS, dramatically increases airspeed management difficulty, and often produces an unstabilized approach. The 3° standard exists for good reason.