Understanding Runway Markings and Lighting
Why Runway Markings and Lighting Matter for Every Pilot
Whether you're taxiing at a towered airport for the first time or preparing for your FAA written test, understanding runway markings and lighting is one of the most essential skills you can develop. These visual systems are the language of the airport surface environment—they tell you where you are, where you're allowed to go, and when stopping is non-negotiable. Misreading a marking or misunderstanding a light signal can have serious consequences, which is why the FAA dedicates significant attention to this topic in every Airman Certification Standards (ACS) document, from the Private Pilot all the way through instrument ratings and beyond.
📖 Studying for the written test? See the full reference in our library: Runway Threshold Markings and Displaced Threshold →
In this guide, we'll break down the most important runway markings and lighting systems in plain language, so you can build genuine situational awareness—not just memorize answers for a test.
Decoding Runway Markings
Runway markings are painted in white (on paved surfaces) and follow standardized FAA formats. The type and complexity of markings you'll find depends on the runway type: visual, non-precision instrument, or precision instrument. Here's what each major marking means.
Runway Designation Markings
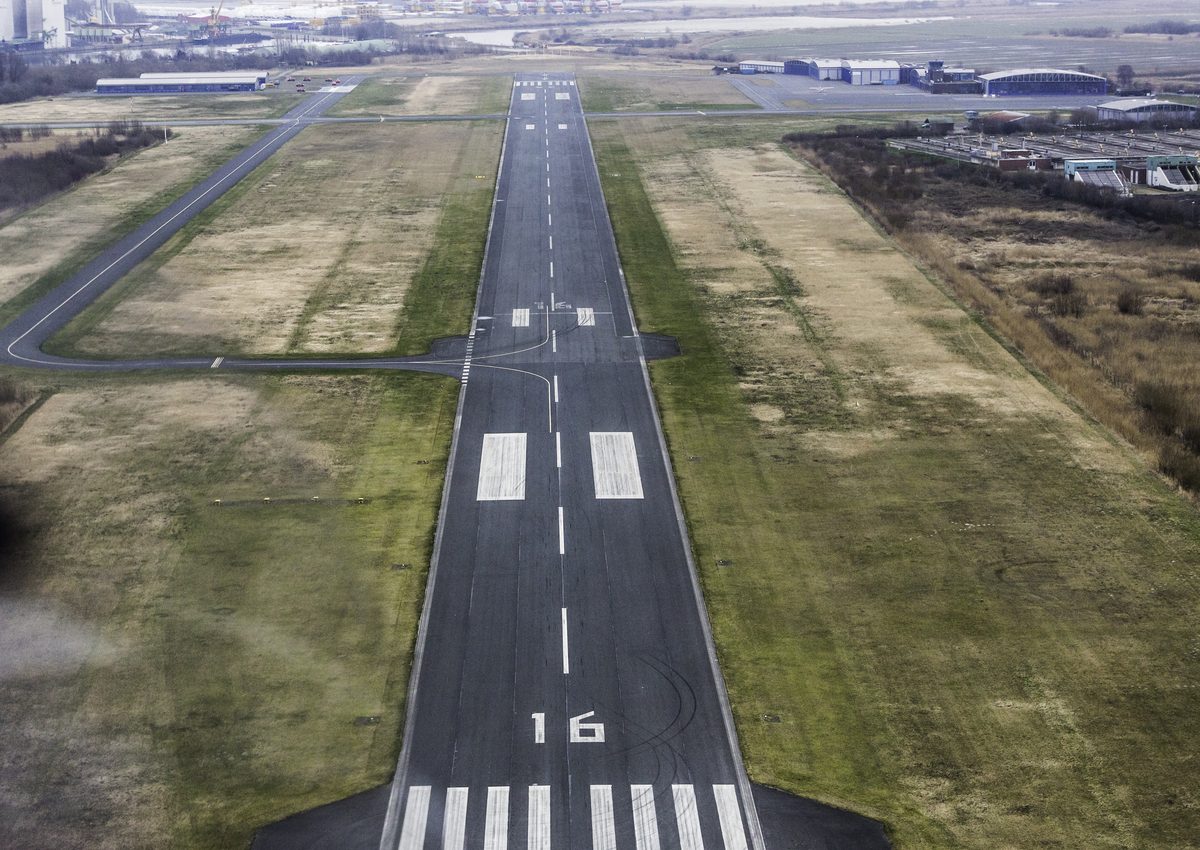
The large numbers painted at the threshold of every runway indicate the runway's magnetic heading rounded to the nearest ten degrees, with the last zero dropped. So Runway 27 points approximately 270 degrees—due west. Parallel runways add letters: L (left), R (right), or C (center) to distinguish them. Understanding this numbering system is a staple topic on FAA written tests, and for good reason: it directly affects how you read an ATIS, how ATC issues clearances, and how you orient yourself on an unfamiliar field.
Threshold Markings
The threshold is the beginning of the runway available for landing. It's marked by a series of parallel white stripes arranged symmetrically about the runway centerline—the number of stripes varies with the runway width, so wider runways have more stripes. A displaced threshold is indicated by arrows along the centerline leading up to it, with a solid yellow line across the full runway width at the point where landing begins. The area before a displaced threshold may be used for taxiing and takeoff roll, but not for landing—a critical distinction the FAA tests frequently.
Centerline and Aiming Point Markings
The dashed white centerline runs the full length of the runway and guides you during takeoff and landing rollout. On instrument runways, you'll also see aiming point markings—two large rectangular white bars located roughly 1,000 feet from the threshold. These serve as a visual touchdown target and help pilots maintain a stabilized approach. On precision instrument runways, touchdown zone markings (pairs of rectangular bars) extend further down the runway to indicate the first 3,000 feet of landing surface.
Holding Position Markings
Few markings are more safety-critical than runway holding position markings. These consist of four yellow lines—two solid and two dashed—running across a taxiway perpendicular to the runway. The solid lines are always on the side where you must stop. You do not cross these lines onto an active runway without explicit ATC clearance (at towered airports) or a thorough visual scan (at non-towered airports). Getting this wrong is one of the leading causes of runway incursions, so expect the FAA to test your knowledge here.
You may also encounter enhanced taxiway centerline markings—a row of yellow dashes alongside the solid centerline—as a warning that you're approaching a holding position. Some airports also use runway guard lights (flashing amber lights embedded in the taxiway or mounted on elevated fixtures) to add an additional layer of alerting.
Closed Runway and Taxiway Markings
A large yellow X painted on a runway or taxiway signals that it is closed and must not be used. These markings may also be accompanied by NOTAMs (Notices to Air Missions), so always cross-reference the painted surface with current NOTAMs before flight.
Understanding Runway Lighting Systems
Lighting transforms an airport from a daytime-only facility into a round-the-clock operation. FAA-standardized lighting systems use specific colors and configurations so that pilots always know exactly what a light is telling them—regardless of what airport they're visiting.
Runway Edge Lights
White lights line both edges of the runway along its usable length. Importantly, the last 2,000 feet of runway (or the last half of shorter runways) transition from white to yellow (amber) on the approach end—these are the caution zone lights telling you that your available landing distance is running out. At the far end of the runway, red lights face the landing pilot, indicating the end of the runway surface. Remember the color logic: white means runway ahead, yellow means caution, red means stop.
Threshold and End Lights
Runway threshold lights are green as seen by an approaching pilot—green means go, or in this case, the beginning of the landing surface. The same light fixtures display red toward the runway interior, indicating the runway end to a departing aircraft. This dual-color design is an elegant, cost-effective safety feature.
Approach Lighting Systems (ALS)
Extending beyond the runway threshold, approach lighting systems provide a visual transition from instrument meteorological conditions (IMC) to the visual environment needed for landing. The FAA uses several configurations—MALSR, ALSF-1, ALSF-2, and others—each offering progressively more guidance for lower visibility operations. For your written test, you don't need to memorize every variant, but you should understand that ALS serves as a bridge between your instruments and the runway environment.
Visual Glide Slope Indicators: VASI and PAPI
The Visual Approach Slope Indicator (VASI) and Precision Approach Path Indicator (PAPI) use colored lights to tell you whether you're on, above, or below the correct glide path. The classic mnemonic for a standard two-bar VASI is: red over white, you're alright; red over red, you're dead; white over white, you're high as a kite. PAPI systems use a single row of four lights—the ratio of red to white lights indicates your position relative to the glide slope. These systems are tested on virtually every FAA written exam that covers airport operations.
In-Pavement and Taxiway Lighting
Blue lights line taxiway edges, making it easy to distinguish taxiways from runways at night. Some airports also feature green centerline lights along taxiways and lead-off lights that guide you from the runway. Knowing that blue equals taxiway is a quick, reliable orientation tool when everything else looks similar in low-light conditions.
Pilot-Controlled Lighting (PCL)
At many non-towered airports, runway lighting is activated by the pilot via radio transmissions on a designated Common Traffic Advisory Frequency (CTAF). Clicking the microphone a specified number of times within a short window activates the lights, often at different intensity levels. Always check the Chart Supplement (formerly Airport/Facility Directory) or the approach plate for the specific frequency and click sequence before arriving at an unfamiliar airport at night.
How Runway Markings and Lighting Appear on the FAA Written Test
The FAA written test will present scenarios involving displaced thresholds, holding position markings, light colors, and glide slope indicators. Questions are mapped to specific ACS codes, and understanding why each marking or light exists—not just what it looks like—is the key to answering correctly under pressure. You can explore the specific ACS codes tied to airport operations at
Ready to pass your FAA written exam?