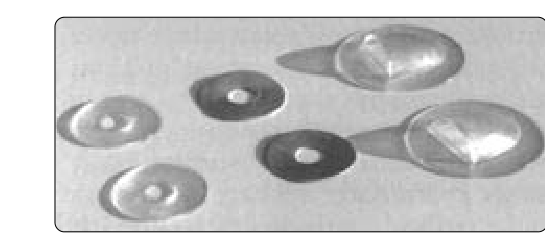
When an aircraft's airframe is covered in fabric — whether cotton, linen, or one of the modern synthetic alternatives such as polyester — the fabric itself is only part of the story. Hidden beneath that smooth, taut surface lies a network of structural members, control cables, pulleys, and fittings that must be inspectable without tearing the covering apart every few years. At the same time, any moisture that finds its way inside a fabric-covered fuselage or wing bay must have a way to escape before it promotes rot, corrosion, or fungal growth. Two small but critically important pieces of hardware solve both problems: the inspection ring and the drain grommet. Understanding how and why these items are installed is essential knowledge for any AMT working on fabric-covered aircraft, and it is a topic specifically addressed in the FAA's Aviation Maintenance Handbook for Airframe.
This article explains the purpose of each component, the materials and standards governing their use, the step-by-step installation process, and the inspection criteria you must satisfy before an aircraft returns to service. Whether you are recovering a classic Piper Cub or maintaining an aerobatic biplane, the fundamentals here apply across fabric systems.
Inspection Rings: Purpose and Design
An inspection ring — sometimes called an inspection hole reinforcement ring — is a fabric-covered, annular (donut-shaped) reinforcement that surrounds a deliberately cut hole in the aircraft's outer covering. The ring serves two purposes simultaneously. First, it prevents the fabric from fraying or tearing outward from the hole edge under the tension and vibration loads that flight imposes. Second, it creates a neat, reinforced boundary to which an inspection plate or cover can be attached and removed repeatedly without damaging the surrounding fabric.
Inspection rings are typically fabricated from the same fabric used in the aircraft's covering system, or from a compatible reinforcing fabric. They are constructed as a series of concentric fabric layers laminated with dope (or the equivalent adhesive in modern systems), building up a stiff, load-distributing collar around the hole perimeter. The inner diameter of the ring corresponds exactly to the inspection opening, while the outer diameter provides enough surface area for the adhesive bond to distribute stress into the surrounding panel without creating a stress concentration at the cut edge.
The locations where inspection rings are installed are specified by the aircraft's Type Certificate Data Sheet (TCDS) and the covering system's Supplemental Type Certificate (STC) or the manufacturer's instructions. Common locations include: access to aileron and elevator bellcranks, control cable inspection points, pulley brackets, fuel line fittings, and wing-strut attachment fittings. The FAA's AC 43.13-1B (Acceptable Methods, Techniques, and Practices — Aircraft Inspection and Repair) provides guidance on acceptable ring dimensions and installation methods for aircraft not covered by a specific STC.
Drain Grommets: Purpose and Design
A drain grommet is a small, open-ended fitting installed at the lowest point of each enclosed fabric bay or compartment to allow water, condensation, and cleaning solvents to escape. Without drain grommets, moisture becomes trapped inside the airframe where it cannot evaporate. Over time, even small amounts of standing water will cause wooden spars and ribs to swell and rot, promote corrosion on steel tube fuselage frames, and degrade the adhesion of dope or fabric cement to structural members.
Traditional drain grommets are typically metal (often brass) grommets fitted with a fabric flange or patch, installed at the low point of the bay. The flange is bonded to the fabric surface with dope or compatible adhesive, and the grommet projects through a small hole cut in the fabric at the lowest available point of the bay. The opening faces downward and outward so that gravity pulls moisture out without allowing rain or wash water to enter during normal operations. Some modern synthetic covering systems use a rubber or plastic grommet form-fitted to the same function.
Drain grommets are also installed at the trailing edge of wings near the root, at the bottom of fuselage bays between former stations, at the lower skins of control surfaces, and at any enclosed cavity where the wing or tail fabric creates a pocket. The specific locations and minimum number of grommets are again dictated by the TCDS, STC, or the applicable maintenance manual and AC 43.13-1B.
Installation Process
Preparing the Fabric
Before cutting any hole, the technician must verify the correct location against the aircraft documentation. The panel must already have received its initial coats of dope or finishing treatment appropriate to the covering system — the surface should be taut and the fabric fully attached to the underlying structure. Mark the center of the hole with a felt-tipped marker or pencil, then use a compass or circle template to scribe the intended hole diameter. For inspection rings, the hole diameter is determined by the access required and the applicable TCDS, STC, or manufacturer's data rather than a single standardized dimension. For drain grommets, the hole is typically no larger than the outer diameter of the grommet — often three-eighths to one-half inch.
Cutting the Hole
Use a sharp, fine-pointed knife or, for round cuts, a purpose-made punch or hollow drill bit. The cut must be clean and circular; a ragged edge will fray and create stress concentrations that the ring or grommet cannot fully control. Lightly apply a thin coat of dope or adhesive to the cut edge immediately after cutting to seal the raw fibers and prevent fraying while the ring or grommet is being prepared.
Installing the Inspection Ring
Pre-cut fabric rings to the required inner and outer diameter. Apply a wet coat of dope or compatible cement to both the underside of the fabric ring and the surface of the panel surrounding the hole. Center the ring carefully over the hole and press it firmly, working outward from the inner diameter to eliminate air bubbles and ensure full contact. Apply additional coats of dope over the ring, feathering the edges into the surrounding panel surface. Multiple reinforcing fabric layers are typically applied, with each layer being slightly larger than the previous one to distribute load progressively into the panel, per the applicable STC or manufacturer's instructions. The finished ring should be smooth, firmly bonded, and free of lifted edges or bubbles. Allow full cure time per the system's instructions before cutting the final opening to size.
Installing the Drain Grommet
Thread the grommet through the hole from the outside so the flange seats against the outer fabric surface. Apply a ring of dope or compatible adhesive under the flange before seating it. Press the flange firmly and apply a dope-saturated fabric patch over the flange on the outside surface, then apply finishing coats. The opening must remain unobstructed and project outward. Never plug or paint over a drain grommet — doing so defeats its entire purpose and is an airworthiness defect.
Why This Matters for Airworthiness
The FAA requires that fabric-covered aircraft be maintained in accordance with the covering manufacturer's instructions and AC 43.13-1B. An aircraft lacking required inspection openings cannot be properly inspected during annual or progressive inspections, which means hidden structural damage may go undetected. An aircraft lacking functional drain grommets will accumulate moisture damage silently, compromising structural members long before any outward sign appears on the fabric surface. Both conditions are grounds for determining that an aircraft is not airworthy.
During a fabric condition inspection, the IA or AMT must verify that every required inspection ring location is present, that the covers fit and seal properly, and that every drain grommet is open, unobstructed, and free of damage. This check falls within the scope and detail of items covering condition of fabric and accessibility of structure that inspectors must examine under 14 CFR Part 43, Appendix D, even though Appendix D does not name inspection rings or drain grommets specifically.
Key Numbers and Rules
- Inspection ring hole diameter: Determined by the TCDS, STC, or manufacturer's data based on the access required — there is no single FAA-standardized dimension.
- Drain grommet opening diameter: Typically three-eighths to one-half inch; must remain fully open at all times.
- Reinforcing layers: Multiple fabric layers are typically applied for inspection rings, each progressively larger, per the applicable STC or manufacturer's instructions.
- Curing: Full adhesive/dope cure must be achieved before the opening is cut to final size to avoid delamination of the ring.
- Location authority: Always verify grommet and ring locations against the aircraft's TCDS, STC documents, or manufacturer's maintenance manual — not just common sense or neighboring aircraft.
- 14 CFR Part 43, Appendix D: Specifies the scope and detail of items to be examined during an annual inspection, including condition of fabric and accessibility of structure for inspection, though it does not name inspection rings or drain grommets specifically.
Common Test Traps
- Confusing ring function with grommet function: Inspection rings provide access and structural reinforcement around openings; drain grommets provide moisture drainage. They serve different purposes and are installed differently.
- Painting or coating over drain grommets: A very common real-world error that creates an airworthiness defect. Grommets must remain open; any finish coat applied over the opening must be removed.
- Skipping intermediate dope coats: Each layer of a multi-layer inspection ring must be bonded with dope or adhesive between coats. Stacking dry fabric layers and applying a single top coat will not create an adequate bond and the ring may delaminate in service.
- Wrong location determination: Test questions may ask who determines where inspection openings are required. The answer is the TCDS, STC, or manufacturer's maintenance manual — not the technician's judgment alone.
- Cutting the hole before the ring cures: The inspection ring must be fully cured and bonded before the center is cut open to its final size. Cutting first and then trying to bond the ring around a raw hole edge is incorrect procedure and produces a weaker installation.