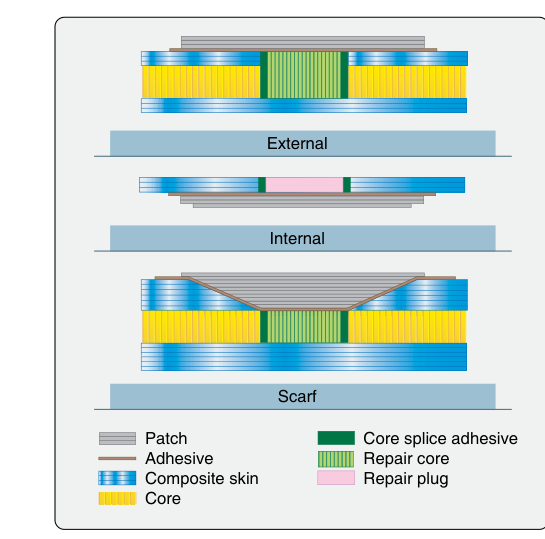
Honeycomb sandwich structures are among the most weight-efficient designs in modern aircraft construction. By bonding thin, high-strength face sheets (skins) to a lightweight cellular core, engineers create panels that rival solid metal in stiffness and bending strength while saving significant weight. You'll find these panels throughout transport-category and general aviation aircraft: floor panels, control surfaces, fairings, engine nacelles, and fuselage liners. Because the structural performance of a honeycomb sandwich depends entirely on the adhesive bond between face sheet and core, any repair that compromises that bond—or that replaces core material incorrectly—can silently degrade the panel's load-carrying ability. Understanding bonded repair procedures is therefore not just a test requirement for the AMT Airframe certificate; it is a genuine airworthiness issue.
This article walks through the complete repair sequence: assessing damage, removing damaged material, fitting replacement core, applying adhesive, and curing the repair. It also covers the critical differences between wet lay-up and pre-cured doublers, and why cure temperature and pressure uniformity matter so much in bonded structures.
How Honeycomb Sandwich Structures Work
A honeycomb sandwich panel has three primary components: two face sheets (also called skins or facings), a core, and the adhesive film that bonds them together. The face sheets carry the in-plane tensile and compressive loads generated by bending, just as the flanges of an I-beam do. The core resists shear loads that transfer bending stresses from one face sheet to the other, analogous to the web of an I-beam. Because the core keeps the face sheets separated, it dramatically increases the panel's moment of inertia—and therefore its bending stiffness—without adding proportional weight.
Core materials vary by application. Aluminum honeycomb is common in metal-skinned panels where weight and stiffness are paramount. Nomex (aramid fiber) honeycomb is used where corrosion resistance and dielectric properties matter, and is standard in composite-skinned panels. Fiberglass honeycomb appears in secondary structures. The cell size, foil thickness, and density of the core are all specified in the structural repair manual (SRM) or manufacturer's component maintenance manual (CMM); substituting the wrong core density or cell size will alter the panel's stiffness and strength in ways that may not be visible externally.
The adhesive film is equally critical. Structural film adhesives—typically epoxy or modified epoxy systems—are stored frozen to arrest the cure reaction and have a defined out-time (the maximum time they may remain at room temperature after removal from frozen storage before they must be used or discarded). Using out-of-date or improperly stored adhesive is one of the most common causes of bond failure in repaired panels.
Damage Assessment and Inspection
Before any repair begins, the technician must determine the full extent of damage. Visual inspection alone is rarely sufficient for honeycomb structures because the core can be crushed, delaminated, or moisture-saturated beneath a skin that looks superficially intact. Standard non-destructive inspection (NDI) methods used before and after bonded repairs include:
- Tap testing (coin test): Tapping the surface with a coin, tap hammer, or dedicated tap tester and listening for a change from a clear ring (bonded) to a dull thud (disbonded or delaminated). Effective for detecting disbonds near the surface, but limited in depth sensitivity.
- Ultrasonic inspection: Through-transmission or pulse-echo ultrasonics can locate disbonds, voids, and moisture inclusions with greater accuracy and depth sensitivity than tap testing.
- Thermographic inspection: Flash thermography uses a heat source to create a thermal front; disbonds, moisture, and voids alter heat flow and show as anomalies on an infrared camera. Increasingly common in production and repair environments.
- Radiographic (X-ray) inspection: Used to detect core corrosion, water ingress, and internal damage in metal-core panels where other methods are inconclusive.
The SRM defines allowable damage limits—typically expressed as maximum damaged area, depth of dents, and permissible disbond size. Damage within these limits may require only a cosmetic filler repair; damage exceeding them requires structural core replacement and a flush or stepped repair.
Core Removal and Preparation
For a structural repair, the technician cuts away the damaged face sheet and removes the compromised core material. The cut is made in a geometric shape—usually square, rectangular, or circular—with rounded corners to minimize stress concentrations. The SRM specifies the required step distance for face-sheet doublers and the exact depth of core removal.
Core removal is accomplished with a router, end mill, or sharp hand tool, being careful not to damage the opposite face sheet. Any remaining adhesive from the original bond line must be removed, and the bondline surface must be clean, dry, and properly prepared for the new adhesive. Surface preparation is arguably the most important step in a bonded repair. For aluminum skins, this typically means abrading with fine sandpaper, solvent wiping (using an approved solvent such as MEK or acetone, applied and wiped in one direction to avoid recontaminating the surface), and in some cases applying a corrosion-inhibiting primer (such as a chromate or non-chromate primer approved by the manufacturer). For composite skins, the process involves sanding to expose fresh resin and removing any peel ply that has been co-cured with the laminate.
Moisture is the enemy of bond quality. If the core shows signs of moisture saturation (visible water, white residue from corrosion, or elevated moisture readings), the panel must be dried in an oven at a controlled temperature before proceeding. The SRM specifies the drying temperature and duration; exceeding the temperature can degrade the adhesive in surrounding areas or warp the panel.
Core Replacement and Fitting
Replacement core must match the original in material type, density, cell size, and ribbon direction. The ribbon direction of honeycomb core (the direction in which the cells are bonded in long, parallel rows) is the stronger axis and must be aligned as specified on the engineering drawing. Orienting the core incorrectly reduces shear strength in the critical load direction.
The replacement core plug is cut slightly oversized and then trimmed to achieve a snug fit in the repair cavity, with the maximum allowable gap determined by the applicable SRM or CMM for that specific structure and adhesive system. Excessive gaps allow adhesive to bridge the joint with a thick, resin-rich fillet that is brittle and can crack under load. For curved panels, the core must be contoured (scarfed or beveled at the edges) to match the panel curvature.
Film adhesive is applied to both the core edges and the bond surfaces. In many repairs, a foaming adhesive is used at the core-to-skin interface because it expands during cure to fill minor gaps and wets out the cell walls, while a non-foaming structural film adhesive is used for the face sheet doublers where uniform thickness control is required.
Lay-Up, Bagging, and Cure
After placing the core plug and adhesive, a doubler or patch—either pre-cured (machined from a cured laminate) or wet lay-up—is applied over the repaired area. Pre-cured doublers offer dimensional accuracy and reproducibility; wet lay-up doublers allow the repair to conform to complex contours but require careful control of fiber orientation and resin content.
A vacuum bag assembly is built over the repair area to apply consolidation pressure during cure. A typical bagging sequence includes: a perforated release film over the repair, a bleeder layer to absorb excess resin (for wet lay-up repairs), a breather layer to distribute vacuum, and an outer vacuum bag sealed with sealant tape. The required vacuum level is specified by the applicable SRM or adhesive manufacturer's process specification and can vary considerably between repairs; there is no single FAA-mandated minimum. Adequate pressure consolidates the adhesive into a void-free bondline of correct thickness.
Cure temperature is just as critical as pressure. Many structural film adhesives used in aircraft repair cure at temperatures such as 250°F (121°C) or 350°F (177°C), but the actual cure temperature and cycle for any given repair are dictated entirely by the specific adhesive system and the applicable SRM instructions. Under-curing leaves the adhesive brittle and weak; over-curing can damage surrounding structure or alter the temper of aluminum skins. Heat blankets, heat lamps, or oven cure are used depending on the repair location and SRM authorization. Thermocouples must be placed at multiple locations across the repair to verify temperature uniformity throughout the cure cycle.
Post-Repair Inspection
After cure, the vacuum bag is removed and the repair is inspected. Tap testing and/or ultrasonic inspection confirm that the bondline is void-free and that no disbonds have formed at the periphery of the patch. The repair surface is checked for correct contour and finish. Any NDI findings must be compared against the SRM allowable limits; if the repair does not meet those limits, it must be reworked or the panel replaced.
Key Numbers and Rules
- Core gap limit: The maximum allowable replacement core fit gap is set by the specific SRM or CMM for the structure and adhesive system involved—always check the applicable manual rather than assuming a universal figure.
- Adhesive out-time: Film adhesives have a defined out-time at room temperature, measured from removal from frozen storage (commonly 10–30 days depending on the adhesive system); this is distinct from shelf life, which is measured from date of manufacture while the adhesive remains frozen. Out-of-date adhesive must be discarded and never used in structural repairs.
- Vacuum pressure: Required vacuum level for a bonded repair is set by the applicable SRM or adhesive process specification; there is no single FAA-mandated minimum, so always confirm the value in the governing manual.
- Cure temperatures: Common cure temperatures for many structural film adhesives are 250°F (121°C) or 350°F (177°C), but the actual required temperature depends entirely on the adhesive system specified in the SRM.
- Core ribbon direction: Must be oriented per the engineering drawing; incorrect orientation reduces shear strength in the primary load direction.
- NDI before and after: Both pre-repair damage mapping and post-repair verification inspection are required; tap testing is the minimum; ultrasonic inspection is preferred for structural repairs.
Common Test Traps
- Confusing foaming and non-foaming adhesive applications: Foaming adhesive is used at the core-to-skin interface to fill cell walls and minor gaps; non-foaming film adhesive is used for face-sheet doublers where thickness control is critical. Using the wrong type in the wrong location is a common error.
- Ignoring ribbon direction: Test questions often describe a core plug installed 90° to the specified ribbon direction and ask whether the repair is acceptable. It is not—the shear strength is compromised.
- Skipping or inadequate surface preparation: The most frequent cause of bonded repair failure is poor surface preparation, not faulty adhesive. Contaminated surfaces prevent adhesion regardless of adhesive quality.
- Using out-of-date adhesive: Film adhesives stored beyond their out-time or exposed to temperatures above their storage limit must be discarded. The test may present a scenario where adhesive is close to its out-date and ask if it is acceptable; the answer depends on whether the out-time clock, measured from removal from frozen storage, has expired.
- Assuming tap testing is sufficient for structural repairs: Tap testing is a quick screening tool, but ultrasonic or thermographic inspection is required to verify the full bond quality in a structural repair. The FAA and most SRMs require quantitative NDI confirmation.