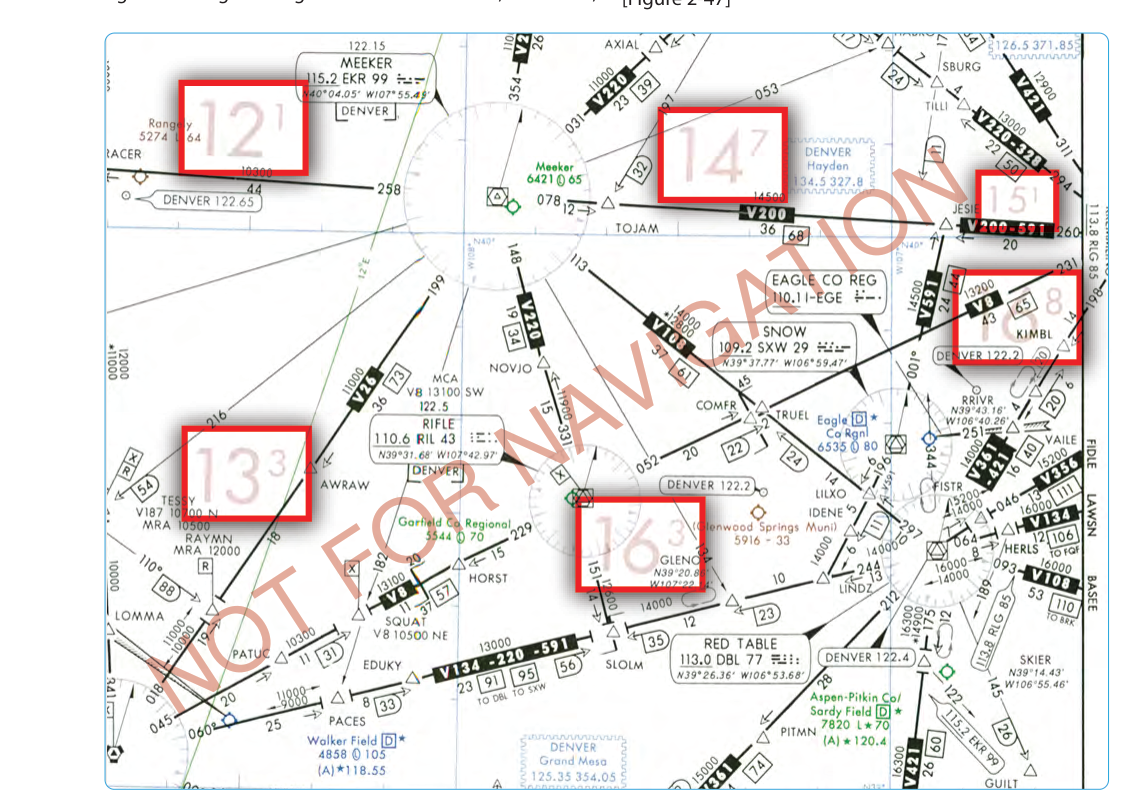
When flying enroute on a published airway, the Minimum Enroute Altitude (MEA) or Minimum Obstruction Clearance Altitude (MOCA) tells you exactly how high to stay to clear terrain and obstacles while remaining within the protected airway corridor. But what happens when you deviate off-route — perhaps to avoid weather, fly a direct routing, or navigate in an emergency? Two closely related values answer that question: the Off-Route Obstruction Clearance Altitude (OROCA), found on FAA enroute charts, and the Grid Minimum Off-Route Altitude (Grid MORA), found on Jeppesen charts. Understanding both values — what they protect, where they come from, and how to use them in the cockpit — is essential for any instrument-rated pilot and is a recurring topic on the FAA Instrument Rating knowledge test.
What OROCA Is and Where It Comes From
The Off-Route Obstruction Clearance Altitude (OROCA) is published in large blue numbers on FAA IFR enroute low-altitude and high-altitude charts. Each enroute chart is divided into a grid of one-degree latitude by one-degree longitude quadrangles (sometimes called "quadrants"), and each quadrangle carries its own OROCA value. The OROCA for a given quadrangle guarantees that if you fly at or above that altitude anywhere within the quadrangle, you will clear all terrain and man-made obstacles within the quadrangle by the following margins:
- 1,000 feet in non-mountainous areas (areas where the terrain does not exceed 5,000 feet MSL within the quadrangle).
- 2,000 feet in designated mountainous areas (as listed in 14 CFR Part 95).
These buffers are identical to the buffers used when computing MEAs over non-mountainous and mountainous terrain, which makes intuitive sense — both are designed to keep you safely above the highest obstacles in the area. The OROCA value is rounded up to the next 100-foot increment above the highest obstacle (plus the clearance buffer), so the number you see on the chart already has the margin built in.
A critical limitation: OROCA provides no assurance of navigation signal reception, communication coverage, or ATC radar coverage. If you are navigating off-route using OROCA as your altitude reference, you may be outside the VOR service volume, unable to reach ATC on the assigned frequency, or invisible to radar. OROCA is purely an obstruction-clearance tool — nothing more.
Grid MORA: The Jeppesen Equivalent
Jeppesen charts use a parallel concept called the Grid Minimum Off-Route Altitude (Grid MORA). Like OROCA, Grid MORA values are printed in each one-degree-latitude by one-degree-longitude quadrangle on Jeppesen enroute charts. The obstruction clearance philosophy is the same: the value guarantees terrain and obstacle clearance within the quadrangle. However, Jeppesen's Grid MORA buffers differ slightly from FAA OROCA buffers:
- 1,000 feet above the highest obstacle in terrain up to 5,000 feet MSL elevation.
- 2,000 feet above the highest obstacle in terrain above 5,000 feet MSL elevation or in mountainous areas.
In practice, the values are usually very similar (sometimes identical) to the corresponding OROCA for the same quadrangle, because the underlying obstacle data and clearance philosophy are alike. The key difference is chart source and certification: OROCA appears on official FAA charts (NOS/FAA enroute charts), while Grid MORA appears on Jeppesen charts. On the FAA knowledge test, questions will specifically reference OROCA. In real-world operations with Jeppesen products, Grid MORA serves the same role.
One additional Jeppesen distinction: if a Grid MORA value is printed in italics, it means Jeppesen has not been able to independently verify the accuracy of the terrain data for that quadrangle — a useful caution to the pilot to add extra vigilance in that area.
How OROCA Differs from Other Altitude Minimums
Students commonly confuse OROCA with several related altitude values. Keeping them straight is vital for both the test and for safe flight planning.
- MEA (Minimum Enroute Altitude): Published for specific airways; ensures obstacle clearance and navigation signal reception along the entire airway segment. OROCA does neither of those last two things off-route.
- MOCA (Minimum Obstruction Clearance Altitude): Also published per airway segment; ensures obstruction clearance along the full segment but guarantees navigation signal reception only within 22 NM of the VOR. OROCA provides no signal guarantee at all.
- MRA (Minimum Reception Altitude): The lowest altitude at which an off-course NAVAID or intersection can be received — unrelated to obstruction clearance.
- MSA (Minimum Safe Altitude): A 25-NM radius emergency altitude published on approach plates — applicable only in the terminal area around a specific fix, not across broad enroute quadrangles.
- MORA (Route MORA): Also a Jeppesen concept — this value applies along a specific Jeppesen-charted airway segment (not the quadrangle-based Grid MORA). Route MORA provides 1,000-foot or 2,000-foot clearance within 10 statute miles of the airway centerline, including a specified distance before and after turn points.
Practical Application in the Cockpit
OROCA is most useful in two broad scenarios. First, when operating under an IFR clearance that includes a direct routing or off-airway segment, you may want to confirm that your assigned altitude provides terrain clearance along the entire off-route path. Scan the OROCA values for every one-degree quadrangle your route crosses, take the highest one, and verify that your cleared altitude meets or exceeds it. Remember that ATC is responsible for separation when issuing IFR clearances, but understanding OROCA lets you serve as an intelligent second check.
Second, OROCA is the go-to reference during an in-flight emergency or lost-communication situation requiring off-route deviation. If you need to turn away from your cleared routing to avoid embedded thunderstorms or you lose communication and must navigate direct to an alternate, OROCA values across your path tell you the minimum safe altitude to maintain. In a lost-comm scenario, the regulations (14 CFR 91.185) specify certain altitude requirements; OROCA helps you determine the highest applicable MEA/MOCA/expected altitude — and if you're deviating off-route, OROCA fills the gap where no MEA exists.
When crossing multiple quadrangles, always use the highest OROCA along your route — do not descend to a lower quadrangle's OROCA until you have completely exited the higher-OROCA quadrangle. The boundaries fall on whole-degree latitude and longitude lines, which are depicted on the chart.
Key Numbers and Rules
- OROCA is depicted in blue on FAA enroute charts, in each one-degree × one-degree quadrangle.
- Non-mountainous clearance buffer: 1,000 feet above the highest obstacle in the quadrangle.
- Mountainous area clearance buffer: 2,000 feet above the highest obstacle in the quadrangle (mountainous areas defined by 14 CFR Part 95).
- OROCA does not guarantee navigation signal reception, communication coverage, or radar contact.
- Grid MORA (Jeppesen) uses the same clearance philosophy; italic Grid MORA values indicate unverified terrain data.
- Quadrangle boundaries fall on whole-degree lines of latitude and longitude.
- When crossing multiple quadrangles, apply the highest OROCA value until fully clear of that quadrangle.
Common Test Traps
- Assuming OROCA guarantees NAVAID reception. It does not. Students who confuse OROCA with MEA often answer incorrectly that OROCA ensures VOR reception along an off-route segment. Only MEA makes that guarantee.
- Forgetting the 2,000-foot buffer in mountainous areas. Many questions set the scene in a mountainous region and expect you to know the clearance buffer doubles from 1,000 to 2,000 feet — applying the non-mountainous number will get you the wrong answer.
- Confusing Grid MORA with Route MORA. On Jeppesen charts, Route MORA applies to a specific airway segment with a 10-statute-mile corridor; Grid MORA applies to the entire one-degree quadrangle. Mixing these up leads to wrong altitude minimums.
- Applying OROCA only to the quadrangle you start in. If your off-route path crosses multiple quadrangles, you must check each one and fly at the highest applicable OROCA until you exit the highest-valued quadrangle — not just the one where you begin the deviation.
- Treating OROCA as ATC-assigned separation. OROCA is a pilot-reference tool for obstruction clearance awareness; it is not a substitute for an ATC clearance or a guarantee of IFR separation from other aircraft.