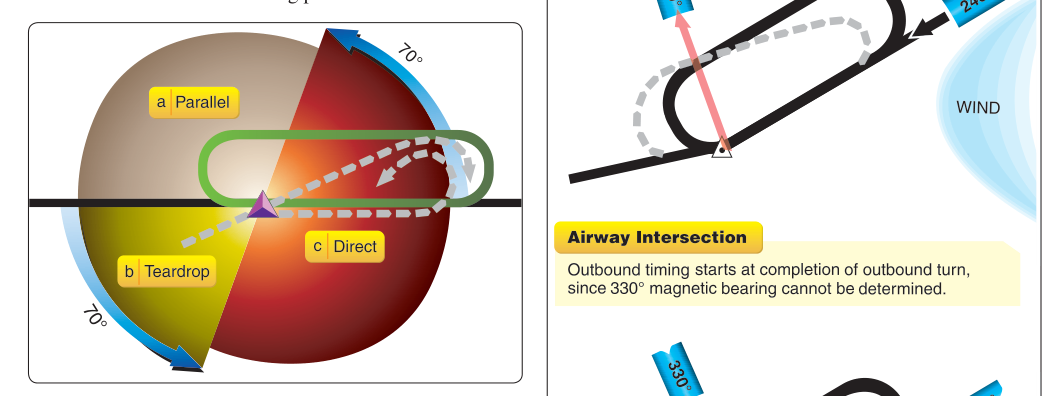
A holding pattern is a racetrack-shaped flight maneuver that keeps an IFR aircraft within a defined airspace while the crew awaits a clearance, traffic spacing, or weather improvement. At its core, a hold is deceptively simple — fly to a fix, turn, and repeat — but executing it with precision requires understanding three distinct entry methods, correct timing for the straight legs, and a thorough familiarity with the ATC clearance components that define every hold. Both the FAA Instrument Rating knowledge test and the practical test demand fluency with holding pattern procedures, and instrument pilots encounter real holds far more often than many students expect.
This article walks through the mechanics of how a holding pattern works, the geometry behind each of the three FAA-prescribed entry procedures, timing rules for non-radar and high-altitude environments, and the test traps that catch unprepared candidates.
Anatomy of a Standard Holding Pattern
The FAA defines a standard holding pattern as one with right-hand turns. A non-standard pattern uses left-hand turns and will be explicitly stated in the clearance. The holding fix is the reference point — it may be a VOR, NDB, intersection, waypoint, or a DME fix — and the aircraft crosses the fix on the inbound leg heading toward it. After crossing the fix, the pilot turns (right in a standard pattern) to a parallel outbound heading, flies the outbound leg, turns inbound again, and crosses the fix once more to complete one circuit.
An ATC holding clearance will include five key pieces of information, often remembered as the 5 Ts or through the acronym AFTN EAT (though many instructors simply list them): fix (where to hold), radial/course/bearing (the inbound course to the fix), direction of turns (left or right; right is assumed standard if omitted), leg length or DME distance, and the expect further clearance (EFC) time. The EFC time is critical — it is the time the pilot should depart the hold if two-way communications are lost, and forgetting it has real safety consequences.
The Three Entry Procedures
When you arrive at the holding fix from an arbitrary direction, you will not always be headed straight down the inbound leg. The FAA recognizes three entry procedures based on your aircraft's heading at the fix relative to the holding pattern's geometry. To determine the correct entry, picture the holding pattern drawn in space and mentally divide the airspace around the fix into three sectors using two lines: one drawn along the inbound course (extended outbound through the fix) and one drawn at approximately 70 degrees from the inbound course on the holding side.
1. Direct Entry
If your heading when crossing the fix falls within the sector that puts you on the non-holding side, roughly on or near the outbound leg heading, you perform a direct entry. You simply turn immediately in the direction of the pattern (right for standard) to fly the outbound leg. This is the most intuitive entry and requires no special maneuvering — you are already on the correct side of the pattern to join the racetrack naturally.
2. Teardrop Entry
When arriving from a direction that places you inside the pattern on the holding side but within approximately 70 degrees of the outbound course, you use a teardrop entry. Cross the fix, turn to a heading that is approximately 30 degrees toward the holding side of the outbound course, fly outbound for the appropriate timing or distance, then make a turn in the direction of the pattern to intercept the inbound course. The teardrop shape keeps you within protected airspace on both the outbound and inbound portions without overshooting the fix.
3. Parallel Entry
If your arrival heading puts you on the non-holding side of the pattern near or above the inbound course, you use a parallel entry. Cross the fix, turn to fly a heading parallel to the inbound course but in the outbound direction (i.e., fly outbound on the non-holding side of the pattern), then after the appropriate time make a left turn (for a standard right-hand pattern) more than 180 degrees to intercept the inbound course and return to the fix. Although you briefly fly outside the protected area on the non-holding side, the maneuver keeps you within the overall holding airspace.
A practical tip many instrument instructors teach: when you are in the cockpit and uncertain of your sector boundary, err toward the direct entry. The FAA's primary objective is that the aircraft remains within protected airspace; a well-executed direct entry from a borderline heading is always acceptable.
Timing Rules for the Holding Pattern
Proper timing prevents you from flying an oversized pattern that busts airspace or an undersized one that creates traffic conflicts. The rules differ by altitude:
- At or below 14,000 feet MSL: The inbound leg should be 1 minute in length. Start timing when you cross the fix inbound (wings level after the final turn).
- Above 14,000 feet MSL: The inbound leg should be 1.5 minutes in length. The same timing trigger applies — wings level on the inbound course.
- DME or GPS holds: Leg length is defined by a stated distance in nautical miles rather than time, so timing is not used to judge leg length, though timing of the outbound leg still helps maintain situational awareness.
Because the outbound leg is flown into any winds that would compress or stretch your inbound leg, you must adjust outbound timing to achieve the target inbound time. If the inbound leg took only 45 seconds due to a headwind, extend your outbound leg before turning. After a complete circuit, reassess and adjust again. The goal is a consistent, protected inbound leg — not a rigid, unadjusted outbound leg.
Wind Correction in the Hold
Wind does not care about holding pattern geometry, so the pilot must actively correct for it. On the inbound leg, apply a wind correction angle (WCA) just as you would on any course. On the outbound leg, triple the inbound WCA to pre-correct for the drift you will experience during the turns and the outbound leg. For example, if you need 10 degrees of inbound correction to the right, apply 30 degrees to the right on the outbound leg. This rule of thumb comes from practical instrument flying experience and is referenced in the Instrument Flying Handbook as a workable approximation that keeps the pattern from drifting.
Why Holding Patterns Matter in Real IFR
In practice, holds are assigned when the destination airport is below minimums and improving, when traffic sequencing requires spacing, or when an approach must be repeated after a missed approach. After a missed approach, you will often be directed to a published holding pattern printed on the approach plate — the fix, inbound course, and turn direction are all depicted. If ATC assigns an unexpected hold over a fix, you have one of the most cognitively demanding moments in IFR flight: copy the clearance, identify the fix, determine your entry, set up your avionics, brief the EFC time, and fly precisely — all at once. Practicing entries on the ground until they become automatic dramatically reduces workload when it counts most.
Key Numbers and Rules
- Standard pattern = right-hand turns; left-hand must be explicitly assigned.
- Inbound leg timing: 1 minute at or below 14,000 ft MSL; 1.5 minutes above 14,000 ft MSL.
- Start timing the inbound leg when the aircraft is wings level after the inbound turn is complete.
- Triple the inbound WCA on the outbound leg to compensate for drift.
- The EFC time is the departure time if communications are lost — never depart without it or without logging it.
- Entry sector boundaries are approximately 70 degrees from the outbound course on the holding side (dividing teardrop from parallel).
- Bank angle for pattern turns: use standard rate (3°/sec) or 30° bank, whichever requires the lesser bank.
Common Test Traps
- Confusing the inbound and outbound timing start points. Timing the inbound leg begins when wings are level inbound after the turn — not when you start the turn. Timing the outbound leg begins when wings are level outbound after the fix crossing turn.
- Forgetting that non-standard = left turns. The FAA test frequently presents a left-hand hold and expects you to mirror the entry sector geometry. The sector logic is identical, but the holding side is now on the left, which flips the location of the teardrop and direct sectors.
- Applying standard altitude timing at high altitude. Questions that specify an altitude above 14,000 feet MSL require 1.5-minute inbound legs. Using the 1-minute rule at high altitude is a very common error.
- Ignoring the EFC time. The knowledge test may ask what a pilot should do after a communications failure in a hold. The correct answer involves holding until the EFC time and then proceeding with the approach — not departing immediately or waiting indefinitely.
- Selecting the wrong entry from a borderline heading. When an aircraft's heading falls right on a sector boundary, many students freeze or guess wrong. Remember: the purpose of the entries is to keep the aircraft in protected airspace; when in doubt, the direct entry is the safest and always acceptable choice from the holding side boundary.