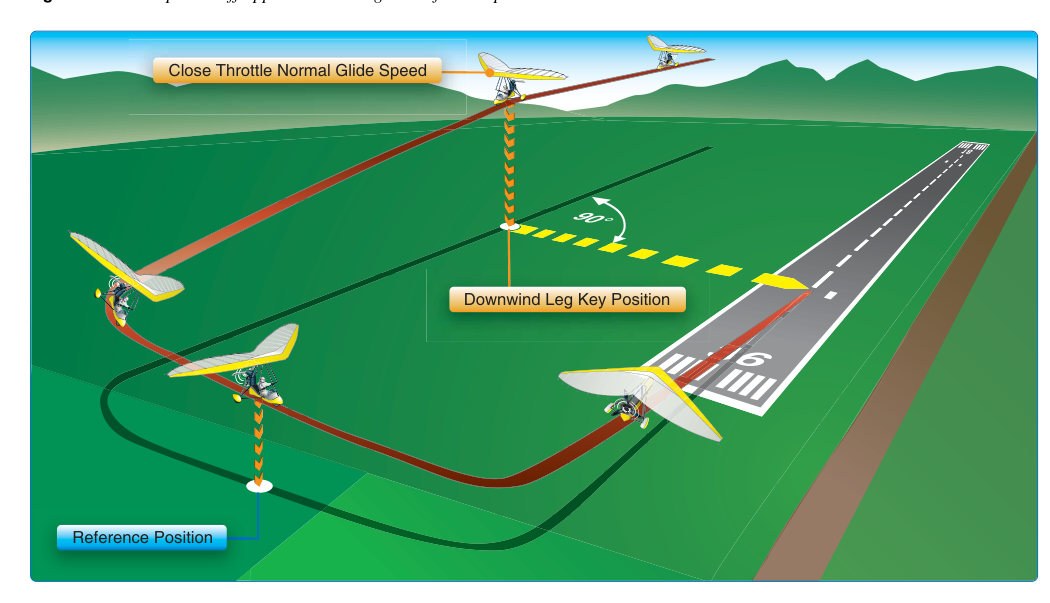
The power-off 180-degree accuracy approach and landing is one of the most demanding — and most revealing — maneuvers on the commercial pilot certificate. When the throttle comes to idle abeam the intended touchdown point, the pilot must glide the aircraft through a continuous 180-degree arc, from downwind through base to final, and touch down within 200 feet beyond a designated ground target without adding power. No safety net of a quick burst of thrust exists; pure judgment, energy management, and precise aircraft control determine success or failure. The FAA Airplane Flying Handbook (FAA-H-8083-3) treats this maneuver as a practical demonstration of a pilot's ability to accurately estimate and control glide distance — a skill with undeniable real-world emergency significance.
What the Maneuver Actually Tests
At its core the power-off 180 is an exercise in fixed energy budget management. The moment the throttle reaches idle, you possess a finite combination of altitude and airspeed — kinetic and potential energy — that must be converted into exactly enough glide distance to reach a precise point on the runway. Carry too much energy and you overshoot; arrive with too little and you undershoot. Unlike normal traffic-pattern flying, where a touch of power can rescue a short final, here every altitude foot and every knot of airspeed must be spent deliberately.
The Commercial Pilot Airman Certification Standards (ACS) specify the tolerances clearly: the main wheels must touch down at or beyond the designated point and within 200 feet beyond it. Landing short of the target — even by one foot — is a failure just as surely as landing long. The evaluation also covers entry, the base turn, alignment, and airspeed control throughout, so the entire approach must be purposeful and coordinated.
The Real-World Emergency Connection
The FAA did not include this maneuver arbitrarily. A complete engine failure on downwind — with the runway behind and below you — is precisely the scenario the power-off 180 replicates. Pilots who have drilled accurate power-off 180s under normal conditions build an intuitive mental model of their aircraft's glide ratio and approach angle. When a real engine failure occurs, that muscle memory can mean the difference between a controlled landing on the runway and an off-airport mishap. The Airplane Flying Handbook explicitly connects proficiency in this maneuver to emergency preparedness, noting that the ability to judge the "key position" and manage glide path without power is fundamental to engine-out survival.
How the Maneuver Works — Phase by Phase
The Key Position: Entry Abeam the Touchdown Point
The maneuver begins when the aircraft is abeam the intended touchdown point on downwind at normal traffic-pattern altitude — typically 1,000 feet AGL, though the specific altitude is determined by the POH and local procedures. At this moment, throttle is smoothly reduced to idle, the nose is pitched to best-glide speed, and the pilot establishes the glide. This position is called the key position, and it is the foundational judgment call of the maneuver. If you set up incorrectly here — too close, too far, too high, or too low — recovery becomes progressively harder with every passing second. Know your aircraft's best-glide speed from the POH; it is the most efficient use of altitude per unit of horizontal distance.
Downwind: Maintaining the Correct Track and Speed
After power reduction, maintain a normal downwind track and hold best-glide speed. Resist the temptation to turn base immediately — a rushed base turn from too close-in results in an overshoot on final because the aircraft is still high and has too much lateral distance remaining. Conversely, drifting too far from the runway eats up glide distance on the perpendicular base leg. Wind awareness is critical: a strong headwind on final means you can afford to turn base earlier; a tailwind component will require more altitude cushion, so a slightly later base turn preserves options.
The Base Turn: Where the Approach is Won or Lost
When the touchdown point is approximately 45 degrees behind the wing, initiate the base turn. This reference angle is a starting point, not a fixed rule — it must be adjusted for wind and aircraft performance. On base, evaluate your position honestly. If you appear high, consider partial flap extension, a gentle forward slip, or a combination. If you appear low, do not steepen the descent further; shallowing the bank to lengthen the base leg buys time and distance. The most dangerous situation is being low on base with no options — recognize it early and commit to a safe landing area short of the target if necessary.
Final Approach: Configuration and Aim Point
Roll wings level aligned with the runway centerline. At this point, assess your energy precisely. If high, add remaining flaps to steepen the glide path — flaps dramatically increase drag and decrease the glide ratio, effectively "spending" altitude faster. A full forward slip is another powerful tool: it increases drag significantly without accelerating the aircraft, allowing a steep descent while maintaining airspeed control. If you are on profile, add flaps progressively and stabilize on speed. Aim for a point slightly before the target to allow for a normal flare, which will carry the aircraft to the target itself.
Touchdown: Stick the Landing
Arrive at the runway threshold on speed — typically approach speed as defined by the POH, often 1.3 times the power-off stall speed in landing configuration — and execute a smooth, normal flare. The objective is for the main wheels to contact the surface at or beyond the designated point and no more than 200 feet beyond it. A greased touchdown matters less than a precise one; the ACS tolerates a firm but on-target landing over a smooth but long one.
Energy Control Tools: Your In-Flight Toolkit
- Pitch for airspeed: Flying above best-glide burns altitude faster; flying below best-glide wastes altitude for zero additional distance. Hold best-glide precisely.
- Flap extension: Each increment increases drag and steepens the descent. Delay flap addition when low; add flaps early when high.
- Forward slip: Legal and effective. Crossed controls with coordinated bank into the slip produce high drag and a steep descent without gaining airspeed. Always remove the slip before the flare.
- S-turns on final (use sparingly): A shallow S-turn can dissipate a small amount of excess altitude without a full slip; however, it complicates alignment and should be avoided near the runway.
- Base leg length: Widening or tightening the base leg adjusts the final approach distance flown — a longer base burns more altitude and gives more time to configure.
Wind Correction and Aircraft Differences
Wind is the variable that makes every power-off 180 unique. A quartering headwind on final is forgiving — the aircraft covers less ground per unit of altitude and tends to arrive high rather than low. A tailwind component on final is insidious: ground speed is higher, the approach angle appears normal, but altitude is consumed faster relative to the target. Always mentally account for the wind component and adjust your key position accordingly. Additionally, high-wing versus low-wing geometry affects sight lines to the touchdown point — practice in your specific aircraft type to calibrate the visual picture.
Key Numbers and ACS Standards
- Touch down at or beyond the designated point — no earlier.
- Touch down no more than 200 feet beyond the designated point.
- Power may only be added to prevent an accident, not to correct a poor approach.
- Maintain coordinated flight throughout; uncoordinated turns near the ground with flaps extended increase stall risk.
- Best-glide speed is aircraft-specific — always reference the POH; do not guess.
Common Test Traps
- Landing short is an automatic failure. Many applicants fixate on not overshooting and unconsciously let the approach go low. A touchdown before the target fails the standard regardless of distance.
- Power is not a rescue option. The ACS is explicit: adding power to salvage a poor approach is unacceptable during evaluation. Only an imminent accident justifies power addition.
- The key position shifts with wind. Treating it as a fixed 45-degree reference without wind adjustment leads to consistent overshoots or undershoots depending on conditions.
- Slipping a slow, flapped aircraft in gusty conditions. A full-flap, forward-slip configuration on a gusty day places you close to the stall margin. Fly the POH-recommended approach speed and add a gust factor if appropriate.
- Confusing the 200-foot window with a landing zone. The 200-foot limit is a maximum overshoot tolerance, not a target box. Aim to land as close to the designated point as possible while still touching down at or beyond it.
Memory Aid
Use the phrase "High — Flap and Slip; Low — Lengthen the Trip" to organize your base-to-final options. When you are high, steepen the descent with flaps or a forward slip. When you are low, widen the base or shallow the bank to cover more horizontal distance before turning final — buying every foot of altitude you can.