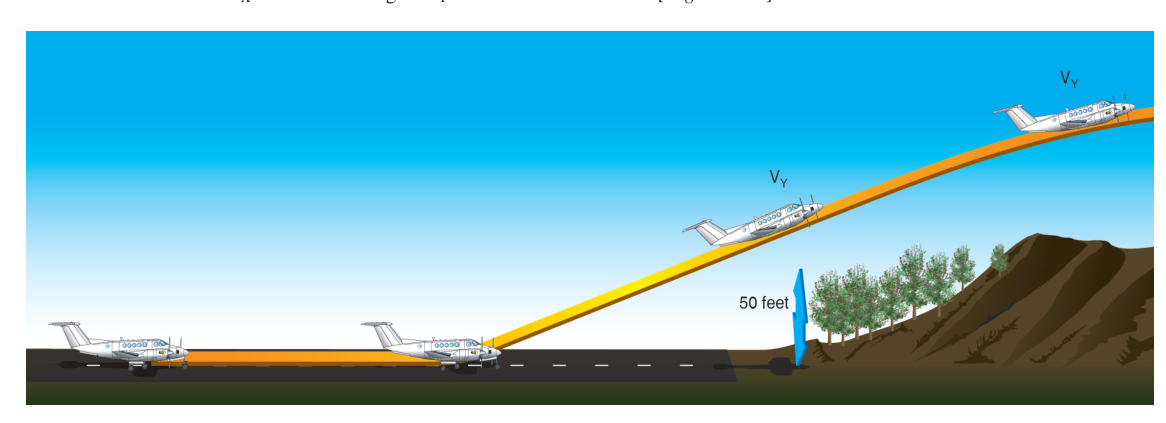
A short-field takeoff and maximum-performance climb is one of the most demanding and precisely sequenced maneuvers in the Commercial Pilot Airman Certification Standards (ACS). Its purpose is unambiguous: get the airplane airborne in the shortest possible ground roll, then climb at the steepest possible angle to clear any obstacle in the departure path. Every phase — from brake application to flap retraction — must be executed in the right order, at the right speed, with the right control inputs. A deviation of even a few knots can add dozens or even hundreds of feet to your required runway or obstacle-clearance distance. Understanding the physics behind the technique is what separates a pilot who merely passes the checkride from one who can apply this skill safely at an unfamiliar backcountry strip.
The Physics Behind Maximum Performance
Two distinct performance goals drive the short-field departure: minimizing ground roll and maximizing climb angle. These goals are related but not identical, and each demands a specific airspeed once airborne.
VX (best angle of climb speed) produces the greatest altitude gain per unit of horizontal distance. The airplane is trading forward progress for vertical progress at the steepest possible ratio. This is what clears the pine trees at the end of the runway. VY (best rate of climb speed), by contrast, produces the greatest altitude gain per unit of time — it climbs fastest in feet per minute but covers more ground horizontally. Using VY when a close-in obstacle exists can result in the airplane reaching obstacle height only after passing over the obstacle's position — a potentially fatal geometry. The Airplane Flying Handbook (FAA-H-8083-3) makes this distinction explicitly, and the FAA knowledge test exploits it constantly.
It is also worth noting that VX and VY are not fixed numbers across all altitudes. As density altitude increases, VX increases slightly and VY decreases slightly. At the aircraft's absolute ceiling, the two speeds converge. This is an important edge case for mountain or high-altitude operations and is sometimes tested on the written examination.
Pre-Takeoff Planning and Configuration
Maximum performance begins on the ground — actually, it begins during preflight planning. Before taxiing, the pilot must consult the Pilot's Operating Handbook (POH) or FAA-approved Airplane Flight Manual (AFM) for three critical data points: the recommended flap setting, the rotation speed (VR), and the obstacle-clearance climb speed (VX). These values are aircraft-specific and were established through actual flight test, representing performance achievable by a competent, current pilot flying a new aircraft in top condition under the test conditions. Real-world performance by an average pilot in service-worn equipment will typically be worse than these published figures, though this is a practical benchmark rather than an absolute regulatory floor — actual results still depend on aircraft condition, pilot technique, and environmental factors.
Many trainers specify a partial flap setting — commonly 10 degrees — for the short-field technique. This setting increases lift and lowers VR enough to shorten the ground roll without adding so much drag that climb performance is critically degraded. Some aircraft specify zero flaps if the wing generates sufficient lift; always follow the POH for your specific make and model.
Density altitude is the most important environmental variable to compute before any short-field operation. Using the performance charts in the POH, calculate both ground roll distance and obstacle-clearance distance for the current conditions: pressure altitude, temperature, wind component, and runway slope. The FAA's Airplane Flying Handbook emphasizes that pilots must apply these charts correctly and factor in conditions that are not covered by the charts — such as wet grass or soft turf — which can increase ground roll by 15 percent or more beyond the published paved-runway figures.
Executing the Takeoff Roll
Position the aircraft at the very beginning of the usable runway surface. Using every available foot of pavement is not optional — it is fundamental to the technique. Taxi all the way to the threshold, align with the centerline, and set the parking brake or hold the toe brakes firmly. Advance the throttle smoothly to full power and verify that all engine instruments — manifold pressure or RPM, fuel flow, oil pressure, and CHT — are within normal operating range before releasing the brakes. This brake-hold technique allows the powerplant to develop maximum available thrust from a standing start. Releasing the brakes before full power is established wastes runway while the engine is still spooling up to peak output.
Once the brakes are released, maintain directional control primarily with rudder. In a single-engine airplane, left-turning tendencies — propeller torque, gyroscopic precession, asymmetric thrust (P-factor), and spiraling slipstream — all conspire to pull the nose left during the takeoff roll, and right rudder corrects this. Keep the nosewheel lightly on or just above the runway surface; an exaggerated nose-high attitude during the roll increases drag and extends the ground roll unnecessarily. Allow the airplane to accelerate to the published VR, then apply smooth, deliberate back pressure to rotate. A firm but controlled rotation — not a yank — is the correct technique. An abrupt over-rotation can cause the tail to strike the runway and may also produce a higher-than-intended pitch attitude that causes the airplane to lift off before it has reached a safe flying speed.
The Climb Profile: VX to VY
Immediately after liftoff, establish and hold the pitch attitude that corresponds to VX. Do not chase the airspeed indicator; instead, establish the attitude you have practiced that places the nose at the correct reference point on the horizon, then cross-check the airspeed. Over-pitching above VX increases angle of attack dangerously close to stall, while under-pitching below VX reduces climb angle and may not clear the obstacle.
The airplane must remain in ground effect briefly after liftoff — typically within one wingspan of the surface — and the pilot should resist the temptation to level off and accelerate during this phase. Maintain VX resolutely. Once the obstacle is cleared, or once a safe maneuvering altitude is established if no specific obstacle exists, lower the nose to the attitude that produces VY. The transition from VX to VY should be smooth and deliberate, not abrupt. From VY, continue climbing to a safe traffic pattern or enroute altitude before reducing power per the POH.
Flap Retraction
Flap retraction after a short-field departure is one of the most commonly mishandled steps. The general principle from FAA-H-8083-3 is to retract flaps incrementally after reaching a safe altitude and a sufficient airspeed so that the aircraft does not settle back toward the ground. In many aircraft, a partial flap setting (such as 10 degrees) produces relatively little drag penalty, so retraction can occur soon after obstacle clearance — but only above a specified minimum altitude and airspeed. Retracting from a larger flap setting (such as 30 degrees) at a low airspeed can cause immediate and significant lift loss. Always follow the POH sequence. On the commercial checkride, the examiner is specifically watching for whether you retract flaps at an appropriate altitude and in an appropriate stage, not all at once at low altitude and low airspeed.
Memory Aid
"X before Y when obstacles are high." The X in VX visually suggests crossed trees you must climb over. Once you are over them, transition to VY for the fastest climb away from the surface. This sequence — brake-hold, full power, rotate at VR, establish VX, transition to VY, retract flaps incrementally — is the backbone of the maneuver.
Key Numbers and Rules
- Use every inch of runway: Position at the threshold before applying power. The ACS evaluates this explicitly.
- Full power before brake release: Verify all engine instruments in the green, then release brakes simultaneously.
- VR: Rotate smoothly at the POH-published speed — not earlier, not later.
- VX: Best angle of climb; hold until obstacle cleared or safe altitude reached.
- VY: Best rate of climb; transition to VY once clear of all obstacles.
- Density altitude: Always compute using POH charts; performance degrades significantly in high, hot, and humid conditions.
- Flap retraction: Incremental, above safe altitude and airspeed per POH — never all at once at low altitude.
- VX and VY converge at absolute ceiling: An important edge case for high-altitude departures.
Common Test Traps
- Confusing VX and VY: VX is best angle (clears obstacles, slower, nose higher). VY is best rate (fastest climb in fpm, slightly higher airspeed). The FAA Private and Commercial Pilot Knowledge Tests exploit this distinction frequently.
- Skipping the brake-hold: Simply rolling into the takeoff without holding brakes while advancing to full power is not the short-field technique and will be noted by the examiner as a non-standard procedure.
- Premature or improper flap retraction: Retracting all flaps at once at low altitude and low airspeed can cause the aircraft to settle — a dangerous error. Follow the POH sequence.
- Using VY with a close-in obstacle: VY covers more horizontal distance before reaching a given altitude than VX does. If an obstacle is present, VX is mandatory until clearance is assured.
- Ignoring density altitude: Published short-field distances assume standard conditions. Failing to compute density altitude and apply the appropriate chart corrections can result in significantly longer actual ground rolls and obstacle-clearance distances than expected.
- Over-rotating at liftoff: An abrupt or excessive rotation can raise the nose above the VX pitch attitude, dangerously increasing the angle of attack at a very low altitude and slow airspeed with little margin for recovery.