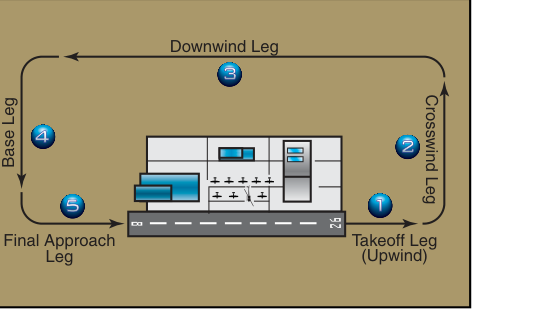
Every time you fly into or out of a towered or non-towered airport, you join an invisible highway in the sky called the airport traffic pattern. The pattern is a rectangular course that organizes arriving and departing aircraft so everyone knows where to look for traffic and what to expect next. Learning the five legs of the pattern — their names, directions, and proper altitudes — is one of the first skills the FAA tests student pilots on, and it is also one of the most safety-critical habits you will build as a pilot.
This article walks through every leg of the standard left-hand traffic pattern, explains how altitude and spacing are maintained, covers why the pattern is designed the way it is, and highlights the exam traps that catch unprepared students.
The Five Legs of the Traffic Pattern
The FAA's Pilot's Handbook of Aeronautical Knowledge (PHAK, FAA-H-8083-25) and the Airplane Flying Handbook (AFH, FAA-H-8083-3) both describe the standard traffic pattern as a rectangle with five distinct segments. Visualize the runway running left to right in front of you; a standard left-hand pattern then wraps around the runway counterclockwise when viewed from above.
1. Departure Leg (Upwind Leg)
The upwind leg begins the moment the aircraft lifts off and extends straight ahead along the centerline of the runway in the direction of takeoff. It is sometimes called the departure leg. You climb to a safe maneuvering altitude — typically climbing through at least 300 feet above ground level (AGL) before making any turns — and continue upwind until reaching the appropriate point to turn crosswind. At a non-towered airport, that turn is generally made when you are 300 feet below traffic pattern altitude (TPA), allowing you to be level on the crosswind leg before turning downwind. The upwind leg also serves as the path for aircraft that must fly a straight-out departure rather than entering the pattern rectangle.
2. Crosswind Leg
After the upwind leg, the pilot turns 90 degrees — to the left in a standard left-hand pattern — onto the crosswind leg. This segment runs perpendicular to the runway centerline and carries the aircraft away from the airport on the side from which the wind is blowing. On the crosswind leg you complete your climb to traffic pattern altitude and begin leveling off. Spacing on crosswind determines how long your subsequent downwind leg will be; the crosswind leg is typically extended far enough to allow a smooth turn onto a downwind leg roughly one-half to one mile from the runway, though no FAA-published standard distance exists for this leg.
3. Downwind Leg
The downwind leg is the longest segment and runs parallel to the runway in the direction opposite to landing. It is flown at traffic pattern altitude — typically 1,000 feet AGL for piston-powered aircraft at most airports, though some airports publish different altitudes in the Chart Supplement. On downwind you complete the before-landing checklist, configure the aircraft for landing (carburetor heat, first increment of flaps, airspeed reduction), and begin monitoring for traffic both ahead of you on downwind and on base and final behind you. The downwind leg is flown roughly one-half to one mile from the runway edge; too close makes the base turn cramped and dangerous, too far makes it difficult to judge the final approach angle.
4. Base Leg
When approximately 45 degrees past the approach end of the runway, the pilot turns 90 degrees onto the base leg, which again runs perpendicular to the runway centerline but now on the approach side. On base you continue descending, apply additional flaps as appropriate, and adjust power to control your rate of descent. The base leg also requires vigilance for aircraft on final approach that may not have called their position — a collision on base-to-final is one of the most common pattern accidents. The length of the base leg is adjusted so that the turn to final lines you up with the runway centerline with adequate distance to stabilize.
5. Final Approach Leg
The last turn brings the aircraft onto the final approach leg, aligned directly with the runway centerline and heading into the wind. On final you establish your target approach airspeed, set full flaps if appropriate, and manage the glide path to touch down at or near the intended aiming point. The Airplane Flying Handbook stresses that the final approach should be stabilized — meaning on speed, on centerline, on glide path — well before touchdown. A go-around decision should be made early and decisively if anything is not right.
Left-Hand vs. Right-Hand Patterns
The standard traffic pattern uses left turns at every corner. This convention places the pilot — seated in the left seat — on the inside of every turn, giving the best possible view of the runway throughout the pattern. When obstacles, terrain, noise-sensitive areas, or other operational factors make a left-hand pattern impractical, the FAA may designate a right-hand pattern for a particular runway. A right-hand pattern is indicated on aeronautical charts with the notation RP (right pattern) next to the runway, and it is listed in the Chart Supplement (formerly Airport/Facility Directory). At towered airports, ATC will instruct you to use the appropriate pattern. At non-towered airports, the segmented circle and wind indicators on the airport surface also indicate the traffic pattern direction.
Traffic Pattern Altitude
The standard TPA for piston-powered aircraft is 1,000 feet AGL. Turbine-powered (jet or turboprop) aircraft typically fly a pattern at 1,500 feet AGL to accommodate higher approach speeds and longer gear/flap extension sequences. Ultra-light aircraft may fly lower patterns. Always check the Chart Supplement for the specific airport's published TPA — some airports in mountainous terrain or with noise abatement procedures have non-standard altitudes. TPA is measured above the airport elevation, not above sea level, so you must add the airport's field elevation to TPA to get the proper indicated altitude on your altimeter.
Entering the Traffic Pattern
The AIM recommends that arriving aircraft enter the downwind leg at a 45-degree angle to the midpoint of the downwind leg, on the same side as the traffic pattern. This entry angle gives the entering pilot a clear view of any aircraft already on downwind and allows a smooth merge into the flow. If arriving from the opposite side of the airport, the pilot should fly to the upwind end of the runway and cross over at or above pattern altitude, then descend on the far side and enter on the 45-degree downwind entry. The key principle is never to cut across the final approach path at low altitude.
Why the Traffic Pattern Matters
Airports without control towers rely entirely on pilot self-separation. When every pilot flies the same rectangular pattern at the same altitude, makes position calls on the Common Traffic Advisory Frequency (CTAF), and expects other traffic to do the same, the system works remarkably well. When one pilot short-cuts a leg, skips a radio call, or flies at the wrong altitude, the entire collision-avoidance system breaks down. The PHAK notes that mid-air collisions are disproportionately concentrated in the airport traffic pattern environment, which is why mastering and respecting the pattern conventions is not just a test topic — it is a direct safety imperative.
Key Numbers and Rules
- Standard TPA: 1,000 feet AGL for piston aircraft; 1,500 feet AGL for turbine aircraft.
- Standard pattern direction: Left turns (counterclockwise when viewed from above).
- Right-hand pattern indicator: Chart notation "RP" and Chart Supplement listing.
- Crosswind turn: Generally initiated when 300 feet below TPA during climb-out.
- Downwind spacing: Approximately one-half to one mile from the runway edge.
- Stabilized approach gate: Aircraft should be stabilized (speed, centerline, glide path) by 500 feet AGL on final.
- Pattern entry angle: 45 degrees to the midpoint of the downwind leg, as recommended by the AIM.
- TPA on altimeter: Always add field elevation to the AGL TPA to get the correct MSL altitude to read on your altimeter.
Common Test Traps
- AGL vs. MSL confusion: TPA is always stated in AGL, but your altimeter reads MSL. If an airport is at 800 feet MSL and TPA is 1,000 feet AGL, you fly 1,800 feet MSL. Many students forget to add field elevation.
- Assuming all patterns are left-hand: Always check the Chart Supplement and sectional chart for RP notations. Flying a left-hand pattern on a right-hand runway puts you directly in conflict with properly-operating traffic.
- Mixing up leg names: The upwind leg goes in the direction of takeoff (into the wind); the downwind leg goes opposite to the landing direction (with the wind behind you). The names describe your wind relationship, not your position relative to the runway.
- Turbine TPA: FAA test questions sometimes ask about jet aircraft patterns. Remember that turbine aircraft fly 1,500 feet AGL, not the piston standard of 1,000 feet AGL.
- Pattern entry: The recommended entry is a 45-degree angle to the midpoint of the downwind, not to the base or final. Entering straight-in or cutting across final are not recommended procedures at non-towered airports unless conditions specifically warrant it.
Understanding the traffic pattern is more than memorizing five leg names for a test. It is the foundation for every airport arrival and departure you will ever make. Build these habits correctly from the start, fly the standard altitudes, make your radio calls, and keep your eyes scanning — those practices will protect you and every other pilot sharing the pattern with you.