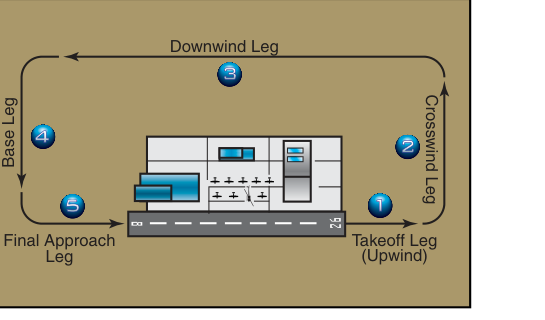
The traffic pattern is one of the first real-world skills a student pilot encounters, and it remains one of the most frequently tested topics on the FAA Private Pilot Knowledge Test. More than just a rectangle in the sky, the traffic pattern is a carefully choreographed sequence of legs, turns, and checklist steps designed to bring aircraft into the runway environment in a safe, predictable, and efficient way. Whether you are flying into a towered airport or a non-towered field, understanding the standard pattern — its geometry, its altitudes, and the procedures that connect each leg — is fundamental to becoming a competent, confident pilot.
The FAA describes the standard traffic pattern in detail in the Airplane Flying Handbook (FAA-H-8083-3) and reinforces it throughout the Aeronautical Information Manual (AIM). Every pilot flying in the United States is expected to conform to established traffic pattern procedures unless otherwise directed by air traffic control or an applicable NOTAM. Let's break the pattern down leg by leg, then look at the numbers, the procedures, and the traps that show up on the knowledge test.
The Six Legs of the Traffic Pattern
The standard traffic pattern has six distinct segments, each with its own purpose, configuration, and procedures. Left turns are the standard direction unless a right-hand traffic pattern is published for that runway in the Chart Supplement (formerly the Airport/Facility Directory) or indicated by runway-end identifier lights and visual indicators at the airport.
- Departure leg (upwind leg): This is the segment flown immediately after takeoff, aligned with and in the direction of the runway. The pilot climbs straight ahead on the runway centerline extended. Most pilots continue on the upwind leg until reaching a safe maneuvering altitude — typically at or near pattern altitude — before making the first turn. If remaining in the traffic pattern, the turn is made to the crosswind leg. If departing the pattern, the AIM recommends continuing straight ahead or making a 45-degree turn in the direction of the traffic pattern after reaching pattern altitude.
- Crosswind leg: After turning 90 degrees from the upwind leg, the aircraft is now flying perpendicular to the runway, across the departure end. The pilot should complete any remaining climb to pattern altitude on the crosswind leg and begin leveling off. Configuration checks are appropriate here, and the pilot should scan for traffic on final and on the downwind leg before turning downwind.
- Downwind leg: Parallel to the runway but in the opposite direction of landing, the downwind leg is where most pre-landing preparation happens. The aircraft is flying at traffic pattern altitude — typically 1,000 feet AGL for piston aircraft — and abeam the runway. On this leg, pilots perform the pre-landing checklist, reduce power, configure the aircraft for landing (carburetor heat on if applicable, flaps as appropriate), and establish a stabilized approach airspeed. The key positional checkpoint is the abeam the runway threshold point, where power reduction typically begins and the descent is initiated. The downwind leg should be flown approximately ½ to 1 mile from the runway.
- Base leg: Turning 90 degrees from downwind, the base leg is perpendicular to the runway on the approach end. The pilot continues to descend and configure the aircraft (additional flaps as conditions allow). The base leg is where pilots must judge the relationship between altitude and distance to the runway — too high and you will overshoot final; too low and you risk an undershooting approach. Pilots should watch for traffic on final before turning.
- Final approach leg: After turning from base, the aircraft is now aligned with the runway centerline heading directly toward the touchdown zone. This is the most critical leg of the pattern. The pilot establishes the correct approach airspeed (typically 1.3 times VSO for most light aircraft), makes final flap extensions, and maintains a stabilized descent using a combination of pitch and power. The AIM recommends that final approach begin at approximately ½ mile from the runway and that the approach be stabilized by this point.
- Upwind leg (go-around): If the pilot decides to go around — due to a blocked runway, unstable approach, or any other reason — full power is applied, carb heat is turned off, flaps are retracted incrementally, and the aircraft climbs straight ahead on the upwind leg, re-entering the pattern sequence as conditions allow. A go-around should be executed decisively and without hesitation whenever any doubt exists about the safety of continuing the approach.
Pattern Altitude and Aircraft Type
Pattern altitude is measured in feet above ground level (AGL), not mean sea level (MSL). For most single-engine piston aircraft, the standard traffic pattern altitude is 1,000 feet AGL. Large aircraft, turbine-powered aircraft, and certain military aircraft typically fly a pattern at 1,500 feet AGL. These altitudes are guidelines; the actual published altitude for a specific airport may be charted differently in the Chart Supplement, and ATC may assign non-standard altitudes at towered airports. Always check the Chart Supplement entry for the destination airport before flight.
At non-towered airports, the CTAF (Common Traffic Advisory Frequency) is used for self-announcing position and intentions. Pilots should announce their position on each leg of the pattern and listen for other traffic. Even when no radio calls are heard, pilots must remain visually vigilant — not all aircraft are radio-equipped.
Entering the Traffic Pattern
The AIM recommends a specific entry procedure for arriving at a non-towered airport. The preferred method is to enter the pattern on a 45-degree angle to the midpoint of the downwind leg, on the side from which the turns are made (the left side for a left-hand pattern). This entry allows arriving aircraft to see and be seen by other traffic already in the pattern. The pilot should overfly the airport at or above pattern altitude (at least 500 feet above pattern altitude according to the AIM is suggested for the initial overfly if needed to determine runway in use), then descend to pattern altitude and enter on the 45. Straight-in approaches are sometimes flown, but they are not the FAA-recommended procedure and can conflict with standard pattern traffic.
Key Numbers and Rules
- Standard traffic pattern altitude for light piston aircraft: 1,000 feet AGL
- Traffic pattern altitude for large or turbine aircraft: 1,500 feet AGL
- Standard pattern direction: left turns (right-hand patterns are published in the Chart Supplement or indicated by airport markings)
- Recommended downwind position: ½ to 1 mile from the runway
- Recommended entry: 45-degree angle to the midpoint of the downwind leg
- Approach airspeed target: approximately 1.3 × VSO (stall speed in landing configuration)
- At towered airports, always follow ATC instructions — they supersede standard pattern procedures
- Segmented circle and wind indicators (windsock, wind tee, tetrahedron) at the airport provide traffic pattern information at non-towered fields
Memory Aid
"Upwind, Crosswind, Downwind, Base, Final" — Use the phrase "Uncle Charlie Doesn't Buy Fish" to remember the five main legs in order: Upwind, Crosswind, Downwind, Base, Final. While this is a simplified memory device, it reinforces the sequential, one-way flow of the pattern, which is exactly what keeps aircraft separated.
Why the Traffic Pattern Matters
The traffic pattern is not merely a training exercise — it is an active collision-avoidance system. By placing all aircraft in the same predictable rectangular path around the runway, pilots can anticipate where others will be at any given moment. A pilot who cuts the pattern short, enters at a non-standard point, or skips legs introduces unpredictability that can lead to mid-air collision risk. Historically, the traffic pattern environment has been one of the highest-risk zones for mid-air collisions in general aviation, making pattern discipline a genuine safety issue, not just a procedural nicety.
AC 90-48 (See-and-Avoid) underscores the fact that traffic pattern vigilance relies heavily on the see-and-avoid concept. High-wing and low-wing aircraft have different blind spots during turns, and students should practice clearing turns — looking in the direction of the upcoming turn before initiating — throughout every pattern leg.
Common Test Traps
- Confusing AGL and MSL for pattern altitude: Pattern altitude is always expressed in AGL. The FAA written test may give you an airport elevation and ask you to compute the MSL altitude at which to fly the pattern — don't forget to add the airport elevation to the 1,000-foot AGL standard.
- Assuming left-hand patterns everywhere: Right-hand traffic patterns exist at many airports, published in the Chart Supplement or indicated by markings. Always check before flying into an unfamiliar airport.
- Misidentifying the upwind leg: Students often confuse the departure leg (upwind) with the final approach leg since both are aligned with the runway. Remember: upwind = climbing away after takeoff; final = descending toward the runway.
- Forgetting the 45-degree entry: The FAA prefers the 45-degree entry to the midpoint of the downwind leg. A straight-in approach or a direct entry to the base leg is not the recommended procedure and can conflict with established pattern traffic.
- Pattern altitude for turbine vs. piston aircraft: A common distractor question asks about the pattern altitude for a turbojet aircraft — the answer is 1,500 feet AGL, not the standard 1,000 feet AGL used for most light piston aircraft.
Mastering the traffic pattern means more than memorizing the legs — it means understanding the reasoning behind each procedure and developing the situational awareness to adapt when real-world conditions don't match the textbook. Practice each leg deliberately, complete your checklists methodically, and communicate clearly on the CTAF. The pilots who do this consistently are the pilots who fly safely for a lifetime.