On a reciprocating aircraft engine, the magneto is responsible for generating and delivering high-voltage sparks to the cylinders at exactly the right moment in the combustion cycle. If that spark arrives too early or too late relative to the piston's position, the engine will lose power, run rough, overheat, or — in the worst case — cause a backfire or destructive detonation. Magneto timing is the process of synchronizing the internal electrical events of the magneto with the mechanical rotation of the engine's crankshaft, and it is one of the most safety-critical maintenance tasks a powerplant technician performs.
Timing is divided into two distinct but related procedures: internal timing, which sets the relationship between the rotating magnet, the breaker points, and the distributor inside the magneto itself; and external timing, which synchronizes the magneto's output to the correct crankshaft position on the engine. Both must be correct for the ignition system to perform as designed. Understanding the purpose, method, and verification steps for each procedure is required knowledge for the FAA Powerplant knowledge test and for safe shop practice.
How the Magneto Generates a Spark
Before diving into timing procedures, it helps to understand what the magneto is doing at the moment of spark. As the permanent magnet rotates past the pole shoes of the coil assembly, it builds a magnetic flux field. The breaker points are timed to open at the instant of maximum flux change — the point of E-gap (efficiency gap). At E-gap, the primary coil circuit is suddenly broken by the opening points, causing the magnetic field to collapse rapidly. This rapid collapse induces a very high voltage in the secondary winding, which is then routed through the distributor to the correct spark plug. Timing the points to open at E-gap is the essence of internal timing; timing E-gap to coincide with the correct crankshaft angle is the essence of external timing.
Internal Timing: Setting the Breaker Points
Internal timing establishes that the breaker points open at precisely the E-gap position of the rotating magnet. The E-gap angle is a small number of degrees — typically around 10 to 12 degrees past the neutral position of the magnet (the exact value varies by magneto model and is always confirmed in the applicable manufacturer's overhaul manual or the engine manufacturer's maintenance manual). At neutral, the magnetic flux through the coil is at its maximum steady value; a few degrees past neutral, the rate of flux change is at its maximum, making this the optimal moment for the points to open and the coil to fire.
To set internal timing, the technician removes the magneto from the engine and works on the unit at the bench. The general procedure is:
- Remove the magneto cap and inspect the distributor gear, rotor, and breaker assembly for condition and wear.
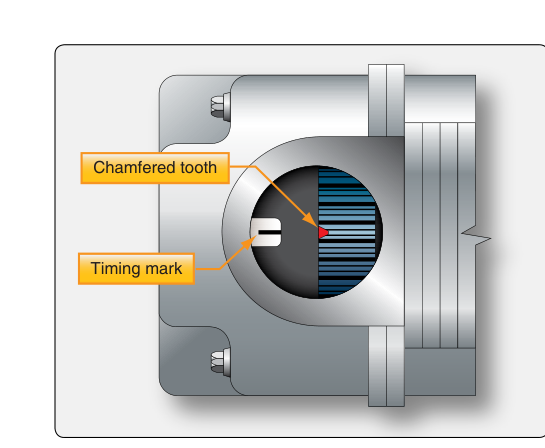
- Rotate the magneto drive shaft until the rotating magnet reaches the E-gap position. On most magnetos, a timing mark on the rotating magnet assembly or on the drive shaft flange aligns with a reference mark on the housing at E-gap. Some manufacturers supply a special timing fixture or a magneto timing tool that indexes into the distributor block to indicate E-gap precisely.
- With the magnet held at E-gap, check whether the breaker points are just opening. A timing light (often a simple battery-powered continuity tester) connected across the points will show the transition from closed (continuity) to open (no continuity). The points should open exactly at E-gap — not before, not after.
- If adjustment is needed, loosen the breaker point mounting screws and shift the point cam follower or the cam itself (depending on design) until the points open at E-gap. Re-tighten and verify.
- Check breaker point gap using a feeler gauge. The gap specification varies by magneto model — common Bendix/Slick specifications are around 0.010 inch, but always consult the specific manual. Point gap directly affects the timing of opening relative to cam position, so gap must be set before final E-gap verification.
- Install and verify the timing of the distributor. The distributor finger must be pointing to the number-one cylinder electrode in the distributor cap when the magnet is at E-gap and the points first open. This ensures the high-voltage surge goes to the correct cylinder at the correct moment.
After internal timing is complete and confirmed, the magneto is ready to be installed on the engine for external timing.
External Timing: Synchronizing the Magneto to the Engine
External timing aligns the internally timed magneto with the crankshaft so the points open — and the spark fires — at the correct number of degrees before top dead center (BTDC) on the compression stroke of the number-one cylinder. This advance angle accounts for the time it takes the fuel-air mixture to fully ignite; because combustion takes a finite amount of time, the spark must begin slightly before the piston reaches TDC so that maximum pressure develops just as the piston passes TDC and begins its power stroke.
The timing advance angle is specified in the engine's Type Certificate Data Sheet (TCDS) and the manufacturer's maintenance manual. A typical light general aviation engine might require timing in the range of 20 to 25 degrees BTDC, depending on the engine model. Always use the correct specification — an incorrect advance causes power loss, rough running, or detonation.
The external timing procedure follows these steps:
- Find TDC on the compression stroke for cylinder number one. Remove the top spark plug from the number-one cylinder and rotate the propeller (by hand, magnetos grounded) in the direction of normal rotation until compression is felt at the plug hole, indicating the compression stroke. Continue rotating until TDC is reached, verified with a piston position indicator (a simple dial indicator threaded into the plug hole) or by aligning the crankshaft timing mark (stamped on the propeller flange or flywheel) with the index mark on the engine case.
- Set the crankshaft to the specified advance angle BTDC. Back the crankshaft to the required degrees before TDC. Many engines have a second timing mark on the propeller flange or flywheel indicating the specific advance angle. If not, a degree wheel can be used with the piston position indicator.
- Install the magneto with the points at E-gap and the distributor positioned for cylinder one. Because internal timing has already been set, the magneto drive coupling can be oriented so that when it meshes with the engine accessory drive, the magnet is at E-gap and the distributor finger points to the number-one cylinder outlet.
- Verify point opening with a timing light. Connect a continuity-based timing light between the magneto primary terminal (the point at which the p-lead connects) and ground. Rotate the magneto body in its mounting as needed until the timing light indicates the points just opening. At that exact moment, the crankshaft should be at the specified BTDC position. Secure the magneto mounting.
- Check both magnetos. Aircraft engines have dual ignition. After timing the left magneto, repeat the process for the right magneto. Most engines have a small difference in timing between left and right magnetos (e.g., both may be specified at the same advance angle, or one may be slightly different); always follow the engine manual.
- Reconnect the p-leads and verify safety. After timing is complete, reconnect the p-leads, replace spark plugs, and verify the ignition switch grounds both magnetos when in the OFF position before returning the aircraft to service.
Why Magneto Timing Matters
Incorrect timing has direct consequences for engine performance and safety. Advanced timing (spark too early) causes the mixture to ignite while the piston is still rising, creating a pressure spike that opposes piston motion, can cause backfiring through the intake, and promotes detonation — a leading cause of catastrophic engine failure. Retarded timing (spark too late) means combustion peaks after the piston has already begun moving down; much of the energy is wasted as heat rather than converted to mechanical work, raising cylinder head temperatures and reducing power. A properly timed magneto produces maximum power at the lowest possible CHT, protecting engine longevity and ensuring reliable operation at altitude where mixture and density changes make precise timing even more important.
Key Numbers and Rules
- E-gap is typically 10–12 degrees past the magnet's neutral position — always confirm with the specific magneto manual.
- Breaker point gap varies by magneto model, with common Bendix/Slick specifications around 0.010 inch — must be set before final E-gap verification since gap affects point-opening timing.
- Ignition timing advance is specified in the engine's TCDS and maintenance manual — typical light GA values fall in the 20–25 degree BTDC range for the compression-ignition stroke of cylinder one.
- Always rotate the engine in the direction of normal rotation when setting external timing; reversing direction introduces backlash error in gearing.
- After timing, always verify the ignition switch grounds both magnetos in the OFF position before returning to service — a broken p-lead means a live magneto even with the switch off.
- Impulse coupling magnetos retard the spark timing during starting so the spark fires later (closer to, at, or slightly before TDC, depending on the model) to prevent kickback; the coupling disengages once the engine reaches operating speed, allowing the magneto to advance to its normal externally-timed position — do not confuse the retarded starting position with normal operating timing.
Common Test Traps
- Confusing internal and external timing. Internal timing is a bench procedure that sets point opening at E-gap inside the magneto. External timing is an engine-installed procedure that synchronizes the magneto to the crankshaft. Both must be correct — one does not substitute for the other.
- Forgetting that point gap affects timing. If the point gap is wrong, the cam follower opens the points at a different point in cam rotation, shifting the effective timing even if E-gap was correctly found. Always set point gap first, then verify E-gap.
- Assuming all engines use the same advance angle. The FAA test may present a specific engine scenario. Timing advance is always model-specific; only the TCDS and manufacturer's manual are authoritative.
- Timing at TDC rather than BTDC. A common trap is associating TDC with ignition. Spark must occur before TDC on the compression stroke to allow combustion time to develop peak pressure at TDC.
- Overlooking the dual-magneto check after timing. After any magneto timing work, a magneto drop check during engine run-up verifies both magnetos are correctly timed. An excessive drop or rough running on one magneto indicates a timing or internal problem requiring further investigation before flight.