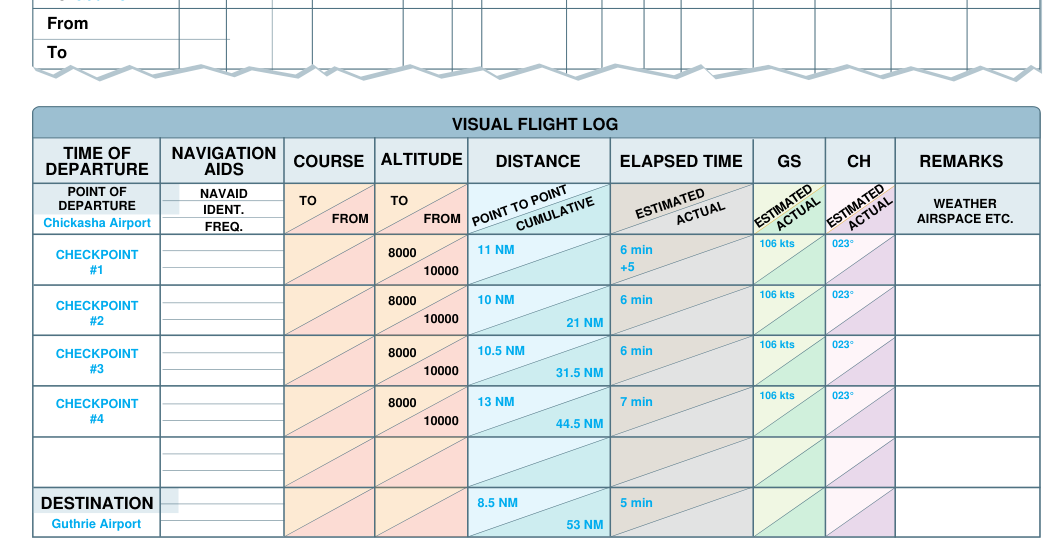
Before a single propeller blade turns, a well-prepared private pilot has already flown the trip on paper. The VFR flight log — sometimes called a navigation log or "navlog" — is the structured worksheet that translates a sectional chart route into precise headings, altitudes, fuel burns, and estimated times. The FAA expects every student to be able to construct one from scratch, and the private pilot knowledge test will test the math behind it. More importantly, the habit of thorough pre-flight planning is what keeps a VFR pilot from stumbling into deteriorating weather, exhausted fuel tanks, or restricted airspace.
This article walks through every column of a typical VFR flight log, explains the aeronautical concepts behind each computation, and highlights the traps that the FAA exam loves to set. Whether you are hand-flying a plotter across a paper sectional or using a glass EFB, the underlying math is identical — and the FAA expects you to understand it at the raw-numbers level.
Choosing the Route and Checkpoints
Begin at the sectional chart. Draw a straight line (or a series of legs if terrain or airspace demands it) from departure to destination. Then select prominent visual checkpoints roughly every 10-20 nautical miles along each leg — towns with distinctive road intersections, lakes, railroad crossings, highways, or towers that will be easy to identify from cruise altitude. Good checkpoints are unambiguous; a small reservoir surrounded by farmland might look like ten other reservoirs. An oblong lake next to a four-lane highway is almost always identifiable.
Measure the total distance of each leg with a plotter or the mileage scale on the sectional. Record this as the true course — the angle of your pencil line measured clockwise from true north. Every subsequent correction will start from this number.
From True Course to Magnetic Heading
The true course tells you the direction on the map, but the compass in the airplane responds to magnetic north, not geographic north. The correction chain has two steps.
Step 1 — Apply variation. Magnetic variation is the angular difference between true north and magnetic north at your location. Read variation from the nearest isogonic line on the sectional (the dashed magenta lines labeled, for example, "9°W"). The memory phrase "East is least, West is best" describes how to apply it: easterly variation is subtracted from true course, westerly variation is added, to give magnetic course.
Step 2 — Apply deviation. Compass deviation is the small, airplane-specific error caused by the aircraft's own magnetic fields. It is listed on the compass correction card mounted in the cockpit, usually showing corrections for headings every 30°. Add or subtract deviation from magnetic course to get magnetic heading — what you actually hold on the compass in calm air.
For planning purposes, most flight-log worksheets also ask for true heading, which is the result after correcting the true course for wind (but before applying variation). This is computed using the wind correction angle, described next.
Wind Correction Angle and True Airspeed
Wind is the biggest variable in cross-country planning. You will obtain winds aloft from the Winds Aloft Forecast (FA), issued by the Aviation Weather Center for altitudes starting at 3,000 feet MSL. The forecast is given in true direction and knots.
To find the wind correction angle (WCA) — the number of degrees you must crab into the wind to track your desired course over the ground — use the flight computer (E6B) or its electronic equivalent. The inputs are:
- True airspeed (TAS): Calibrated airspeed corrected for altitude and temperature. A simple rule of thumb adds about 2% per 1,000 feet of altitude to indicated airspeed, but the E6B gives a more precise answer using pressure altitude and temperature.
- Wind direction and speed from the forecast (converted from magnetic to true if needed — winds aloft are always given in true direction).
- True course of the leg.
The E6B slide rule or electronic calculator rotates the wind side against the course side to produce two outputs: the WCA (positive means crab right, negative means crab left) and the groundspeed for that leg. Add the WCA to the true course to get true heading, then apply variation and deviation to reach magnetic heading.
Computing Leg Time and Fuel
With groundspeed known, time over each leg is simple arithmetic:
Time (hours) = Distance (NM) ÷ Groundspeed (knots)
Multiply by 60 to get minutes. Record both on the flight log so you know when to expect each checkpoint. Accumulated time — a running total from departure — lets you check your watch at each checkpoint and assess whether you are ahead or behind the forecast winds.
Fuel burn is computed from the leg time and the fuel consumption rate found in the Pilot Operating Handbook (POH) for the planned power setting:
Fuel (gallons) = Fuel flow (GPH) × Time (hours)
Add up all leg fuel, then add the required reserves. Under 14 CFR 91.151, a VFR flight during daylight hours must depart with enough fuel to reach the first intended landing point and then fly at cruise power for at least 30 minutes more. Night VFR requires a 45-minute reserve. These are regulatory minimums — many pilots carry additional reserve, and instructors often encourage planning to a higher personal standard.
Altitude Selection
VFR cruising altitude is governed by 14 CFR 91.159. When flying more than 3,000 feet AGL on a magnetic course of 0°-179°, fly at an odd-thousand-foot MSL altitude plus 500 feet (e.g., 3,500, 5,500, 7,500). On a magnetic course of 180°-359°, fly at an even-thousand plus 500 feet (e.g., 4,500, 6,500, 8,500). Remember: this applies to the magnetic course, not the true course, and only when more than 3,000 feet AGL.
Altitude also affects TAS, groundspeed, and fuel burn — higher altitude generally means faster TAS for the same power setting, but thinner air may limit useful power. The POH cruise performance tables (usually organized by pressure altitude and temperature) provide the definitive numbers for your specific aircraft.
Completing the Flight Log Form
A standard FAA-style VFR flight log has columns in roughly this order for each leg:
- Checkpoint names (departure, each en route checkpoint, destination)
- True course
- Wind correction angle
- True heading
- Magnetic variation
- Magnetic heading (and compass deviation correction)
- Distance (leg and total)
- Groundspeed
- Estimated time en route (ETE) per leg
- Accumulated ETE
- Fuel burn per leg
- Accumulated fuel
At the bottom, sum the totals and add fuel reserve. Compare total fuel needed to usable fuel available (from the POH). If you are fuel-limited, you need a fuel stop, a shorter route, or a different airplane.
Why the Flight Log Matters Beyond the Test
A completed flight log is your primary tool for dead reckoning — the technique of estimating your position purely from known starting point, heading, speed, and elapsed time. In VFR flight, you will also use pilotage (identifying checkpoints visually), but dead reckoning provides the backbone: you know where you should be at any given minute. If a checkpoint does not appear on schedule, you have an immediate, quantified reason to cross-check your position rather than continuing into uncertainty.
The flight log also anchors your fuel awareness. By glancing at the accumulated fuel column and comparing it to the fuel gauge, you can detect abnormally high consumption before it becomes an emergency. Many fuel-exhaustion accidents are preceded by a pilot who "didn't think" the flight would take so long — a flight log eliminates that guesswork.
Key Numbers and Rules
- VFR day fuel reserve: 30 minutes at cruise (14 CFR 91.151(a))
- VFR night fuel reserve: 45 minutes at cruise (14 CFR 91.151(b))
- VFR cruising altitude rule applies: only when more than 3,000 feet AGL (14 CFR 91.159)
- Odd thousands + 500 ft: magnetic courses 0°-179° (eastbound)
- Even thousands + 500 ft: magnetic courses 180°-359° (westbound)
- Winds aloft direction: always given in true north reference, in increments of tens of degrees, with speed reported in whole knots
- Variation: read from isogonic lines on the sectional; East is subtracted, West is added
- TAS increase: approximately 2% per 1,000 ft above sea level (rule of thumb)
Memory Aid
For applying variation and deviation, many instructors teach the phrase "TVMDC — True Virgins Make Dull Company": True course → apply Variation → Magnetic course → apply Deviation → Compass heading. Work left to right when converting from true to compass (adding westerly correction), or right to left when converting from a compass reading back to a true course (subtracting). It is a reliable mental checklist to avoid sign errors.
Common Test Traps
- Confusing magnetic course with magnetic heading. The FAA frequently asks for magnetic heading, which includes both the wind correction angle and variation. Magnetic course is only the true course corrected for variation — the wind has not been applied yet.
- Applying the wrong sign for variation. Easterly variation reduces the magnetic course; westerly increases it. Flipping these is one of the most common E6B errors on the knowledge test.
- Forgetting the cruising altitude rule applies only above 3,000 ft AGL. A question may describe a flight at 2,500 ft AGL — the hemispherical rule does not apply, so any altitude is legal (subject to other minimums).
- Using indicated airspeed instead of TAS for the E6B wind triangle. Groundspeed and WCA are computed with TAS on the wind side of the E6B. Using IAS will produce an incorrect answer, especially at higher altitudes.
- Forgetting to include fuel reserve in total fuel required. The exam may give you cruise fuel and ask if you have enough for the flight — always add the reserve before comparing to usable fuel capacity.