When ATC needs to slow the flow of traffic — whether because of weather, runway congestion, or traffic sequencing — controllers issue holding instructions. A holding pattern is a precisely defined racetrack-shaped flight path that keeps an instrument-rated pilot safely airborne in a known location while waiting for further clearance. Understanding how to decode ATC holding instructions, select the correct entry procedure, and manage timing within the pattern is a core instrument rating skill that appears repeatedly on the FAA Instrument Rating Knowledge Test and is tested during every instrument checkride.
Holding instructions can arrive as a published hold depicted on an approach plate or en-route chart, or they can be issued verbally as an unpublished (non-standard) hold by ATC. Either way, the pilot must be ready to execute the pattern immediately while simultaneously writing down the key elements of the clearance. This article breaks down every component of a holding clearance, the three standard entry procedures, timing and speed rules, and the traps that catch pilots on the written exam.
Anatomy of a Holding Clearance
ATC holding instructions follow a standard word order defined in the AIM. Knowing this sequence allows you to write down each element as it is spoken. The standard order is:
- Direction of holding from the fix (e.g., "hold east")
- Holding fix (a VOR, NDB, waypoint, or intersection)
- Radial, course, bearing, airway, or route on which to hold
- Leg length in miles if DME or RNAV is used (otherwise standard 1-minute legs apply)
- Direction of turns — right turns are standard and are only mentioned if non-standard (left turns) are required
- EFC (Expect Further Clearance) time
A full example: "Cessna 34 Sierra, hold east of the Arkon VOR on the 090 radial, right turns, expect further clearance at 1530, time now 1510." Even if ATC omits some elements, a published hold on a chart provides the missing information. For an unpublished hold, if you do not receive complete instructions, request clarification — you are the pilot in command and need accurate information to fly safely.
Standard Holding Pattern Geometry
A standard holding pattern uses right-hand turns and consists of four legs: the inbound leg (toward the fix), a 180° right turn, the outbound leg (away from the fix), and another 180° right turn back to the fix. The fix itself is always at the end of the inbound leg, so the pattern is flown on the protected side of that fix.
The inbound leg is the timing reference leg. By regulation and procedure, pilots time the inbound leg: 1 minute at or below 14,000 feet MSL, and 1.5 minutes above 14,000 feet MSL. The outbound leg is adjusted in length to achieve the proper inbound timing — if the inbound takes 70 seconds, the outbound leg is shortened on the next circuit to correct. Wind correction angles applied on the inbound leg are tripled on the outbound leg (as a rule of thumb) to precompensate for wind drift.
The holding side of the fix — where turns are made — is called the maneuvering side. The inbound course defines which side is which. If you are holding east on the 090 radial with right turns, the turns are made to the south, so the pattern extends south of the inbound course.
The Three Standard Entry Procedures
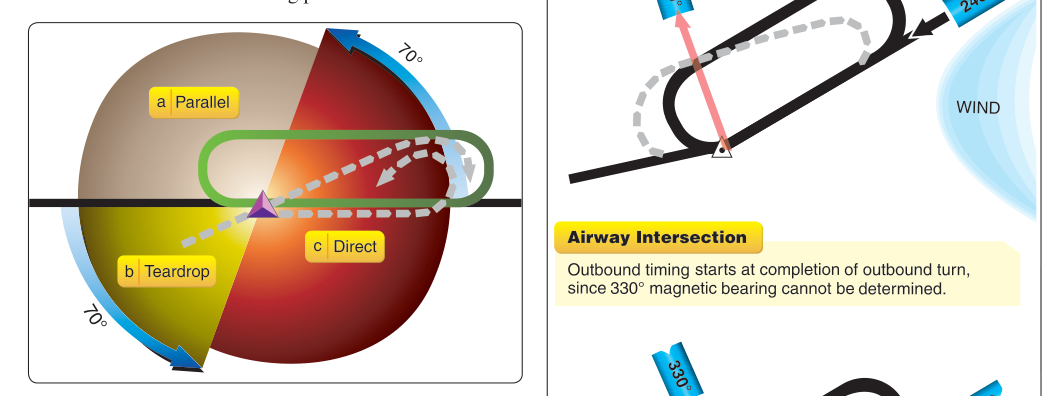
The most frequently tested element of holding patterns is determining the correct entry. The AIM identifies three entry procedures based on the aircraft's heading relative to the holding pattern when arriving at the fix. Visualizing a 70°/110° boundary from the inbound course helps categorize the arrival sector.
Parallel Entry
Used when arriving from the non-holding side (roughly parallel to the inbound course on the opposite side from where turns are made). The pilot flies outbound on a heading parallel to the inbound course for one minute, then turns in the direction of the holding pattern (toward the holding side) and intercepts the inbound course. This is often the most intuitive entry when arriving from a direction nearly aligned with the outbound leg.
Teardrop Entry
Used when arriving from the holding side and within the 70° sector on the non-turning side of the outbound course. The pilot turns to a heading approximately 30° toward the holding side of the outbound course and flies outbound for one minute, then turns in the direction of the holding pattern to intercept the inbound course. This entry naturally sweeps the aircraft toward the protected airspace.
Direct Entry
Used for all remaining arrival headings — roughly the 180° sector on the holding side of the fix. The pilot simply turns directly to the inbound course after crossing the fix and begins the standard pattern. Direct entry is the default for the broadest range of arrival headings and the easiest to execute.
To determine which entry applies, draw (or visualize) the holding pattern, then draw lines 70° on one side and 110° on the other from the inbound course at the fix. Arrivals from the 70° sector adjacent to the outbound leg on the holding side use the teardrop; arrivals from the 110° sector on the non-holding side use the parallel; everything else uses direct.
Holding Airspeeds
To stay within the protected holding airspace, pilots must comply with maximum holding speeds defined in the AIM and on charts. Exceeding these speeds can carry the aircraft outside the obstacle-protected area. The standard maximum holding speeds are:
- At or below 6,000 feet MSL: 200 KIAS
- 6,001 to 14,000 feet MSL: 230 KIAS
- Above 14,000 feet MSL: 265 KIAS
Published holding patterns on approach plates or en-route charts may specify a lower maximum airspeed in parentheses next to the holding symbol. These lower limits exist because the pattern was designed with a smaller protected area. You must slow to at or below that speed before reaching the fix if at all possible. The AIM recommends beginning the speed reduction at least 3 minutes before the fix when a speed restriction is anticipated.
Timing and Wind Correction
Start timing the inbound leg when wings are level after the turn inbound, or when abeam the fix — whichever comes first. For the outbound leg, begin timing when abeam the fix (or when wings roll level on the outbound heading if the fix cannot be identified abeam). Adjust the outbound leg on each subsequent circuit until the inbound leg is consistently 1 minute (or 1.5 minutes above 14,000 feet). A helpful tip: if the inbound leg takes 1 minute and 15 seconds on the first pass, shorten the outbound leg by 15 seconds on the next pass.
Wind correction on the inbound leg should be noted and then applied in triple on the outbound leg. For example, if you need 5° of correction into the wind on the inbound, apply 15° on the outbound. This approximation reduces but does not eliminate the need for adjustment; refine the correction each circuit.
EFC Time and Lost Communication Procedures
The Expect Further Clearance (EFC) time is not merely a scheduling convenience — it is a critical piece of IFR lost-communication procedure. Per 14 CFR 91.185, if two-way radio contact is lost while in a holding pattern, the pilot should leave the fix at the EFC time and proceed as cleared. Without an EFC, the pilot must continue as long as fuel allows, then execute the approach. Always write the EFC time down when it is issued. If ATC does not provide one, request it.
Why It Matters
Holding patterns are flown in IMC, often in turbulence, at high workload moments when other aircraft are also being sequenced. A botched entry that takes you out of protected airspace, or a speed exceedance that expands your ground track beyond the obstacle-protected area, can turn a routine delay into a controlled flight into terrain event. Moreover, the mental demand of flying a precise racetrack pattern on instruments while also copying a new clearance or briefing an approach is exactly the kind of dual-task challenge the instrument rating is designed to build proficiency for.
Key Numbers and Rules
- Standard turns: right-hand unless ATC specifies left
- Inbound leg timing: 1 minute at or below 14,000 ft MSL; 1.5 minutes above 14,000 ft MSL
- Max holding speed at or below 6,000 ft: 200 KIAS
- Max holding speed 6,001–14,000 ft: 230 KIAS
- Max holding speed above 14,000 ft: 265 KIAS
- EFC time governs lost-com departure from the hold under 14 CFR 91.185
- Bank angle in holds: standard-rate turn or 30° bank, whichever requires less bank
Common Test Traps
- Confusing inbound and outbound timing: The FAA tests specifically that the inbound leg is the reference leg — not the outbound. Adjusting the outbound to fix the inbound is the correct technique.
- Assuming all holds use right turns: Non-standard (left-turn) holds are depicted on charts with the pattern symbol reversed, and ATC will specify "left turns." Many students forget to check for this on published holds.
- Misidentifying the entry sector: The 70°/110° dividing lines are measured from the inbound course at the fix, not from any arbitrary heading. Draw it out carefully on practice problems — the teardrop and parallel entry zones are smaller than students expect.
- Forgetting speed reductions for charted restrictions: A published hold with a speed limit in parentheses requires slowing before the fix, not at it. The AIM recommends starting reduction 3 minutes out.
- Ignoring EFC time importance: Students sometimes treat the EFC as informational only. In lost-com situations it is operationally binding — leaving at the EFC is required procedure under 14 CFR 91.185.