Holding patterns look deceptively simple on a chart — an oval racetrack with a fix at one end. But making that oval work in real life requires precise timing and a firm understanding of where the outbound leg truly begins. Two details trip up students more than almost any other part of holding: knowing exactly when to start the outbound timer and knowing what the "abeam point" means and how to identify it. Get these right and your holds will be tight, predictable, and fully within protected airspace. Get them wrong and you will either eat up too much airspace or cut your pattern dangerously short.
This article breaks down the full mechanics of outbound timing and abeam point determination, explains the regulatory and practical rationale behind the rules, and flags the most common exam traps so you walk into your instrument knowledge test prepared.
The Structure of the Holding Pattern
Before diving into timing, it helps to rehearse the four legs of a standard holding pattern: the inbound leg (toward the fix), the inbound turn (turning to the outbound heading after crossing the fix), the outbound leg (flying away from the fix), and the outbound turn (the teardrop that returns you to the inbound course). Timing applies specifically to the outbound leg, and the goal is to produce a one-minute inbound leg at or below 14,000 feet MSL, or a one-and-a-half-minute inbound leg above 14,000 feet MSL. The outbound leg timing is adjusted each circuit to achieve that standard inbound leg duration.
The Abeam Point: What It Is and How to Identify It
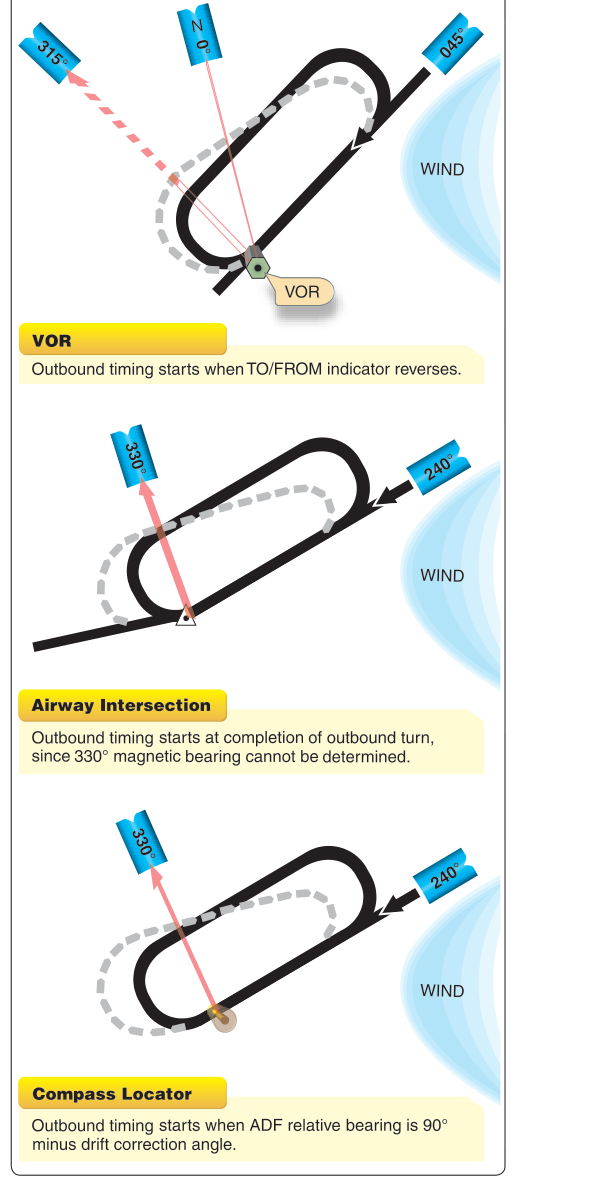
The abeam point is the moment during the outbound leg when the holding fix is directly off your wingtip — that is, the fix bears 90 degrees to your track, perpendicular to your outbound heading. This is the trigger for starting the outbound timer.
In practice, identifying the abeam point depends on your navigation equipment:
- VOR-based holds: As you complete the turn outbound and fly away from the VOR, watch the Course Deviation Indicator (CDI) or the bearing indicator. The abeam point occurs when the station bearing is 90 degrees to your heading — on a standard right-hand hold outbound on a 090-degree heading, that means the VOR bearing pointer swings to the 360 (north) or 180 (south) position. Many pilots watch the To/From indicator: when it flips from "To" to "From," that is approximately abeam, though the CDI centering is the more precise cue.
- ADF/NDB holds: The abeam point occurs when the ADF needle points directly off the wingtip — 90 degrees relative bearing (to the left or right depending on turn direction). On a right-hand pattern outbound heading of 090 degrees, the abeam point is when the ADF needle points to the 270-degree relative position (off the left wingtip toward the station).
- GPS/FMS holds: Modern avionics often provide a waypoint abeam indication or a timer that starts automatically, but you must understand the underlying concept because avionics can be set up incorrectly and because the oral exam requires you to explain it without relying on the box.
- No navigation fix available: When flying a holding pattern over a fix that does not have a 90-degree-bearing reference (for example, a fix defined by a radial intersection), the abeam point is approximated as the completion of the outbound turn. This is a recognized technique endorsed in FAA guidance when a direct abeam identification is impractical.
Starting the Outbound Timer
Once you have identified the abeam point, you start the outbound timer immediately. The Instrument Flying Handbook (FAA-H-8083-15) is explicit: the outbound timing begins at the abeam point, not at the completion of the outbound turn, and not at the fix itself. This distinction matters because the outbound turn takes time and eats into your leg. Starting the clock too early (at the fix) would make the outbound leg longer than intended; starting it too late (after the outbound turn) makes it shorter and compresses the entire pattern.
On your first circuit through the holding pattern, fly the outbound leg for the standard time — one minute below 14,000 feet MSL or one minute thirty seconds above 14,000 feet MSL — then begin the outbound turn. After completing the full first circuit and flying the inbound leg, note how long the inbound leg actually took. If the inbound leg was longer than the target, shorten the outbound leg on the next circuit. If it was shorter, lengthen the outbound leg. Adjust by adding or subtracting the difference from your outbound time. This iterative correction is how pilots chase wind effect in real holding.
Wind Correction in the Outbound Leg
Wind is the primary reason outbound timing requires active adjustment. A headwind on the inbound leg (which is a tailwind on the outbound leg) will cause the inbound leg to be short because you are burning time faster outbound and arriving at the fix sooner. Conversely, a tailwind on the inbound leg stretches it beyond one minute. The fix is always to adjust outbound time, never the turn radius.
Beyond timing, a widely taught technique is to triple the inbound wind correction angle on the outbound leg to pre-compensate for drift. For example, if you need a 5-degree left correction to track the inbound course, apply a 15-degree correction in the opposite direction (right) on the outbound leg. This is a rule-of-thumb approximation — not a rigid formula for every situation — that keeps you close to the protected corridor and reduces the number of circuits needed to stabilize the pattern. The Instrument Flying Handbook describes tripling the drift correction as a commonly used technique for wind compensation in holding, alongside adjusting outbound timing.
Why the Abeam Point and Timing Rules Matter
Holding patterns are assigned specific airspace in the National Airspace System. ATC expects aircraft to remain within a defined protected area based on published holding speeds and standard leg lengths. If you start your timer early or fly an excessively long outbound leg, you risk busting the lateral limits of the protected airspace — potentially conflicting with other traffic or terrain. The one-minute (or one-and-a-half-minute) inbound standard is not arbitrary; it represents the protected airspace corridors computed by FAA airspace designers and codified in the Instrument Procedures Handbook (FAA-H-8083-16).
From an ATC perspective, predictable holds also mean predictable sequencing. Controllers issue holding instructions with an Expect Further Clearance (EFC) time. If your pattern is inconsistent, you may miss your release window or need to request an extension, adding workload for both you and ATC.
Key Numbers and Rules
- Inbound leg target: 1 minute at or below 14,000 feet MSL; 1 minute 30 seconds above 14,000 feet MSL.
- Timer starts: At the abeam point on the outbound leg (fix is 90 degrees off your wingtip).
- First circuit: Fly the standard outbound time first; then adjust based on actual inbound leg duration.
- Outbound wind correction: Triple the inbound correction angle, applied in the opposite direction, as a rule of thumb.
- Maximum holding speeds (AIM 5-3-8): At or below 6,000 feet — 200 KIAS; 6,001–14,000 feet — 230 KIAS; above 14,000 feet — 265 KIAS. Charted holds may specify their own maximum speed.
- When abeam point is unclear: Start timing at the completion of the outbound turn.
- Turns in holding: Standard rate (3 degrees per second) or 30-degree bank, whichever requires less bank.
Common Test Traps
- Starting the timer at the fix, not at the abeam point. This is the single most common error. The fix is where you begin the outbound turn — you have not reached the abeam point yet. The timer starts when the fix is 90 degrees off your wingtip, which is after the turn is well underway.
- Confusing which leg is timed. FAA questions sometimes ask about the inbound leg versus the outbound leg. The outbound leg is what you time and adjust. The inbound leg is what you measure after the fact to see if the outbound time was correct.
- Forgetting altitude-based timing differences. Many students memorize only the one-minute rule. If a question places you above 14,000 feet, the target is one and a half minutes — worth a free answer on the knowledge test if you remember it.
- Applying wind correction in the wrong direction outbound. If you drift right inbound and need to correct left, you apply triple correction to the right outbound (opposite direction). Students often flip this and end up drifting further away from the protected area.
- Assuming GPS auto-timing is always correct. On oral and practical exams, you must demonstrate you can identify the abeam point using raw navigation data. Relying solely on the avionics without understanding the underlying concept is a common weakness examiners probe.
Solid holding technique starts with two deceptively simple habits: watching for the abeam point carefully and starting your timer exactly there. Everything else — wind correction, inbound time measurement, outbound adjustment — builds on that foundation. Practice identifying the abeam point in the simulator on different VORs and NDBs until the skill is automatic, and the timing arithmetic will follow naturally.