Every pilot eventually faces a moment when the airplane is too high, too fast, or drifting sideways toward the runway edge. Two closely related maneuvers — the forward slip and the side slip — use the same crossed-control technique to solve these problems, yet they accomplish entirely different goals. Understanding the difference between them, knowing when to use each, and executing them correctly are essential skills for the private pilot certificate and, more importantly, for real-world flying safety.
Both slips work by deliberately misaligning the aircraft so that the fuselage presents its broad side to the relative wind, dramatically increasing aerodynamic drag. That extra drag burns off energy without adding power — a useful trick when you need to descend steeply or land on a short field without a power-off dive that would build dangerous airspeed.
How Slips Work: The Physics Behind Crossed Controls
In normal coordinated flight, the pilot keeps the ball centered in the inclinometer (the slip-skid ball). The rudder and ailerons work together so that the aircraft's nose points in the same direction the airplane is actually traveling. In a slip, the pilot intentionally breaks this coordination: one control surface deflects the aircraft's heading away from its actual flight path, and the other holds the airplane from turning further. The result is a sideways or angled presentation of the fuselage to the oncoming air, which creates enormous parasite drag. This lets the pilot maintain a normal or even steep glide path while keeping airspeed under control — something a simple nose-down pitch attitude cannot accomplish without accelerating dangerously.
According to the Airplane Flying Handbook (FAA-H-8083-3), slips are particularly valuable in aircraft without flaps or with inoperative flaps, as a way to lose altitude or steepen the approach path without gaining excessive airspeed. Even in flap-equipped aircraft, slips offer a backup technique and add versatility in confined or unusual landing environments.
The Forward Slip: Losing Altitude Fast
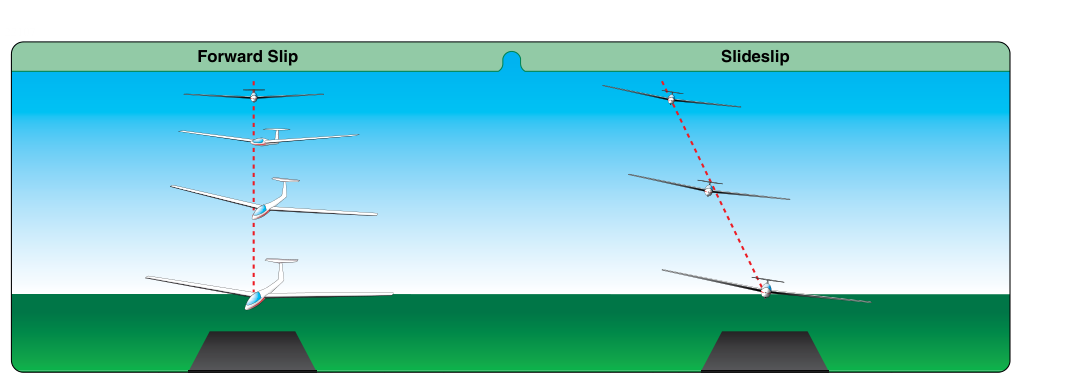
The forward slip is used when the pilot needs to lose altitude rapidly over a short horizontal distance — for example, when on final approach much too high, or when executing a power-off emergency landing in a field. The airplane's nose points significantly to one side of the actual flight path (the direction the airplane is traveling over the ground). The fuselage acts like a barn door, generating high drag and a steep descent rate.
Forward Slip Technique
- Establish a normal glide. Start from a stabilized glide at the appropriate airspeed for your aircraft.
- Lower one wing with aileron. Apply aileron to bank the aircraft — say, left aileron to bank left.
- Apply opposite rudder aggressively. Push right rudder firmly to yaw the nose to the right (opposite the bank direction). This prevents the aircraft from turning; instead, the nose points to the right while the airplane continues tracking straight ahead (or slightly left) toward the runway.
- Adjust pitch to maintain desired airspeed. The increased drag will cause the nose to want to drop, so pitch attitude adjustments are needed. Keep airspeed at the manufacturer's recommended slip speed per the POH.
- Control descent rate with bank angle and rudder deflection. More bank and more opposite rudder = more drag = steeper descent. Less bank = shallower descent.
- Recover before the flare. Simultaneously release rudder and raise the low wing with opposite aileron as you transition to the landing flare. Arrive over the threshold in coordinated flight aligned with the runway.
A critical point: in a forward slip, the aircraft's longitudinal axis (nose-to-tail) points to one side of the runway centerline, but the flight path continues straight toward the runway. The pilot is essentially flying the airplane sideways through the air while still tracking the desired ground path. Airspeed indications may be unreliable during a forward slip if the pitot tube is located on the side of the fuselage where airflow is disrupted — this effect varies by aircraft type and is not universal, so always check your Pilot's Operating Handbook (POH) for any airspeed indicator limitations during slips.
The Side Slip: Correcting Crosswind Drift
The side slip is the foundation of the wing-low crosswind landing technique. Unlike the forward slip, the side slip is used to align the aircraft's longitudinal axis with the runway centerline while simultaneously correcting for crosswind drift. The airplane's nose points down the runway, but the aircraft is banked into the wind so that the horizontal component of lift counteracts the crosswind.
Side Slip Technique
- Identify wind direction. Determine which side the crosswind is coming from. If the wind is from the left, you will bank left.
- Apply aileron into the wind. Lower the upwind wing using aileron. This banks the aircraft toward the wind source.
- Apply downwind rudder. Use the rudder opposite the bank to keep the nose aligned with the runway centerline. The rudder prevents the aircraft from turning into the wind.
- Adjust aileron to control drift. Add or reduce bank to keep the aircraft tracking straight down the runway centerline. More crosswind requires more bank.
- Maintain proper airspeed. Use pitch to hold the approach airspeed; the slip itself adds some drag but the primary pitch-power-airspeed relationship still applies.
- Touch down on the upwind main gear first. At touchdown, the aircraft lands slightly banked, so the upwind wheel contacts the runway first, preventing side-load on the landing gear.
In a side slip, unlike the forward slip, the aircraft's nose remains pointed down the runway and the flight path also tracks down the runway. The bank and opposite rudder work together to kill sideways drift. This is why crosswind landings are sometimes called the "wing-low" method — the bank angle is the defining visual cue.
Why It Matters: Safety and Real-World Application
Confusing these two maneuvers — or failing to execute either correctly — can lead to serious accidents. A forward slip done too close to the ground without timely recovery leaves the pilot in a banked, uncoordinated attitude during the flare: a recipe for a hard, asymmetrical landing or a ground loop. A failed side slip in a crosswind puts the aircraft drifting sideways at touchdown, imposing severe side-loads on the landing gear, potentially causing gear collapse or a runway excursion.
Both slips are also relevant in emergency scenarios. A power-off emergency landing into a short field often demands an aggressive forward slip to arrive on the numbers rather than overshooting into terrain. Practicing slips to a landing should be a regular part of every private pilot's skill maintenance, not just a maneuver performed once for the checkride.
Key Numbers and Rules
- Always consult the POH. Some aircraft, especially those with certain flap configurations, prohibit slips with full flaps — check before combining slips and flaps.
- Airspeed during slips: The Airplane Flying Handbook directs pilots to consult the POH for the manufacturer's recommended slip speed rather than relying on a fixed multiple of Vso. Slower speeds leave less margin in a degraded aerodynamic state.
- Pitot tube location matters: If the pitot is on the fuselage side that gets disturbed airflow in a slip, the airspeed indicator may read low — this varies by aircraft type. Know your aircraft.
- Crosswind component limits: Your aircraft's POH specifies a demonstrated crosswind component. A side slip cannot overcome a crosswind that exceeds the aircraft's rudder authority.
- Recovery timing: Begin forward slip recovery with enough altitude to re-establish coordinated flight smoothly before the flare and roundout. The Airplane Flying Handbook does not specify a fixed AGL altitude for this — the key is completing the recovery before the flare begins.
- Forward slip vs. side slip summary: Forward slip = nose offset from flight path, used to lose altitude. Side slip = nose aligned with runway, used to correct crosswind drift.
Memory Aid
"Forward = lose altitude Fast; Side = Stop the Slide."
The Forward slip is all about quickly losing altitude (think: F for Fall). The Side slip is all about stopping sideways drift — stopping the slide across the runway. This pairing links the maneuver name directly to its primary purpose and helps prevent the most common mix-up on both the written exam and the checkride.
Common Test Traps
- Confusing which maneuver does what. The FAA knowledge test often describes a scenario (e.g., "pilot is high on final with no flaps") and asks which slip is appropriate. Remember: excessive altitude loss = forward slip; crosswind correction = side slip.
- Aileron and rudder direction confusion. In both slips, the controls are crossed — aileron and rudder input opposite each other. The test may ask which way you apply each control. Visualize the goal: bank into the wind (side slip) or bank to one side while holding opposite rudder to prevent turn (forward slip).
- Assuming slips are always permitted with flaps. Many Cessna POHs and other aircraft manuals restrict slips with flaps extended beyond a certain setting. The FAA tests this as a trap for pilots who assume flaps and slips can always be combined.
- Airspeed indicator unreliability. A test question may note that airspeed appears unusually low in a slip; the correct answer involves understanding that the pitot tube may be in disturbed airflow during the maneuver, making the indication unreliable in some aircraft — this is not a universal effect, so know your specific aircraft's characteristics.
- Touchdown technique in crosswinds. The FAA expects you to know that in a side slip (wing-low) crosswind landing, the upwind main wheel touches first. Students sometimes confuse this with the crab method, where the aircraft is straightened just before touchdown and both mains contact simultaneously.