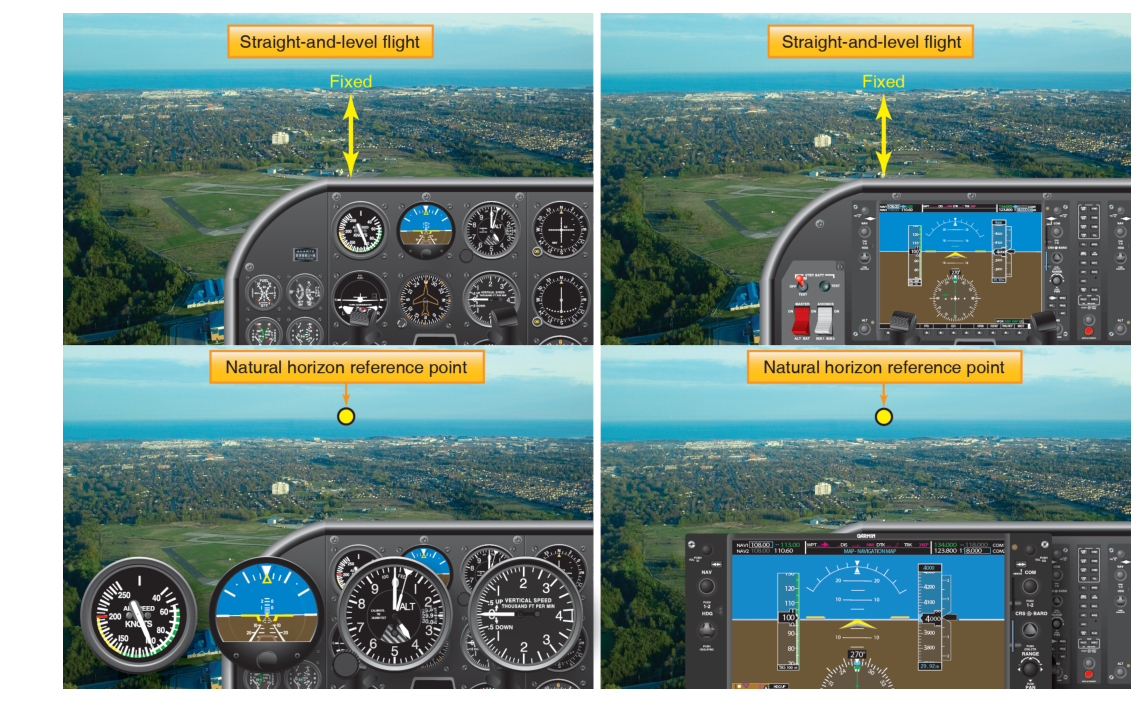
Every complex maneuver in aviation — steep turns, instrument approaches, cross-country cruise — is built on a single bedrock skill: the ability to fly straight and level. Straight-and-level flight means holding a constant heading and a constant altitude at the same time, with the wings level and the ball centered. It sounds simple, but doing it precisely and consistently requires a clear understanding of how the airplane responds to control inputs, how to read both outside references and cockpit instruments, and how to use trim effectively so the airplane practically flies itself.
This article covers straight-and-level flight as described in the Airplane Flying Handbook (FAA-H-8083-3) — the first of the four fundamentals of flight — and explains the mechanics, the scan technique, the role of trim, and the exam traps that catch students by surprise.
What "Straight-and-Level" Actually Means
"Straight" refers to wings-level, coordinated flight along a constant heading. "Level" refers to maintaining a constant altitude. Both conditions must be met simultaneously. A pilot who holds altitude but drifts left on heading is not flying straight-and-level. Neither is a pilot who tracks a compass heading while slowly climbing. The two components are equally important and interdependent because fixing one often disturbs the other if the underlying technique is sloppy.
The FAA describes flight control in terms of three axes: the longitudinal axis (nose-to-tail, controlled by ailerons for roll), the lateral axis (wingtip-to-wingtip, controlled by elevator for pitch), and the vertical axis (controlled by rudder for yaw). Straight-and-level flight requires all three axes to be in equilibrium simultaneously. Any unintended motion about one axis tends to produce motion about another — a common source of beginner struggles.
How It Works: The Four Controls
Pitch and Altitude
Altitude is primarily controlled by pitch attitude. When you raise the nose above the horizon, the airplane climbs; lower the nose, it descends. At a given power setting, there is one specific pitch attitude that produces level flight. Learning to recognize that attitude by reference to the outside horizon — the angle between the airplane's nose cowling and the actual horizon — is the foundation of attitude flying. In the cockpit, the altimeter confirms whether the pitch attitude is correct, but the primary reference should be visual.
A key concept is that pitch controls altitude, power controls airspeed in cruise flight. This is a simplification, but it is the operationally correct mental model for straight-and-level flight at normal cruise speeds. If you are at cruise power and level altitude, and you pull back on the yoke, the nose rises and the airplane climbs — airspeed decreases. The fix is to return the nose to the cruise attitude. Chasing altitude with power instead of pitch is one of the most common beginner errors.
Bank and Heading
Straight flight (constant heading) is maintained by keeping the wings level with aileron, coordinated with rudder to prevent adverse yaw and to keep the slip/skid indicator ball centered. Any sustained bank angle, however small, produces a turn, so even a 2° bank left uncorrected will slowly change your heading. Winds aloft will also push the aircraft off course; the correction is a small coordinated turn back to the desired heading, then wings level again.
When holding a specific heading, use the directional gyro (heading indicator) as your primary instrument for heading — not the magnetic compass, which is subject to oscillation errors in flight. Glance at the magnetic compass periodically to verify the heading indicator is aligned, but steer by the heading indicator during flight.
Power and Airspeed
At constant altitude and attitude, throttle setting controls airspeed. To fly at a target cruise speed, select the appropriate power setting (manifold pressure and RPM for complex aircraft; just RPM for fixed-pitch propeller trainers) and trim for the desired airspeed. Do not use power to maintain altitude in normal cruise — that is the elevator's job.
Trim — The Forgotten Fundamental
Trim is not just a convenience; it is essential to precise straight-and-level flight. The elevator trim tab (and, on many aircraft, rudder trim) relieves control pressure so that the airplane holds its attitude without constant physical input. Proper trim technique is: set the attitude, set the power, then trim away the remaining control pressure. A well-trimmed airplane will maintain altitude and heading with minimal stick-and-rudder effort, allowing the pilot to divide attention between flying, navigating, and communicating.
Students often under-trim, holding back pressure on the yoke for minutes at a time instead of turning the trim wheel. This causes fatigue, reduces precision, and distracts from other tasks. Conversely, if the airplane is out of trim and you release the controls, the nose will wander — a sign to re-trim. The Airplane Flying Handbook explicitly states that trim should be used to relieve all control pressures after a desired attitude is established.
The Outside-In Scan: Visual vs. Instrument References
Student pilots often make the mistake of staring at the instrument panel while learning straight-and-level flight. The correct technique in visual meteorological conditions (VMC) is an outside-in scan: establish and hold the attitude by visual reference to the natural horizon, then periodically cross-check the instruments to verify altitude, heading, and airspeed are on target.
A practical scan rhythm looks like this: look outside at the horizon for a few seconds to confirm pitch and bank attitude, then glance at the altimeter (altitude holding?), heading indicator (heading holding?), airspeed indicator (speed stable?), and VSI (vertical speed at zero?), then return eyes outside. The instruments confirm; the horizon controls. This keeps the pilot from being distracted by instrument fluctuations and builds the habit that is critical for transition to instrument flying later.
When small deviations occur — and they always do — apply small, smooth corrections. A 100-foot altitude deviation should be corrected with a small pitch change back toward level; do not aggressively push or pull. The FAA practical test standards (ACS) for private pilot require maintaining altitude within ±100 feet, heading within ±10°, and airspeed within ±10 knots during straight-and-level flight.
Torque, P-Factor, and Left-Turning Tendencies
Most single-engine training aircraft have left-turning tendencies that must be corrected during straight-and-level flight, particularly at higher power settings and lower airspeeds. The four left-turning tendencies are: torque (engine/propeller reaction force rolling the aircraft left), propeller slipstream (spiraling airflow pushing on the left side of the vertical stabilizer), P-factor (asymmetric propeller blade thrust at high angles of attack), and gyroscopic precession (primarily during pitch changes). In cruise flight with a properly trimmed aircraft, these tendencies are largely offset by design, but understanding them explains why right rudder trim is often pre-set on many trainers and why you may need slight right rudder input during high-power climbs transitioning to level flight.
Why It Matters
Straight-and-level flight is the baseline from which every other maneuver departs and returns. A pilot who cannot hold altitude within ±100 feet or heading within ±10° will find turns, climbs, and descents far more difficult to execute precisely. More importantly, sloppy straight-and-level flight in actual operations — cruising cross-country, flying in marginal weather, navigating a busy airspace environment — multiplies workload at the worst times. An aircraft that wanders 200 feet below cruise altitude while the pilot is talking to ATC or checking a tablet is an accident waiting to happen.
Building rock-solid straight-and-level habits early also makes the transition to instrument flight training dramatically easier. IFR straight-and-level flight is the same skill, simply performed entirely by reference to the instrument panel instead of the horizon.
Key Numbers and Rules
- ACS altitude tolerance: ±100 feet during straight-and-level flight for the private pilot practical test.
- ACS heading tolerance: ±10° of assigned heading.
- ACS airspeed tolerance: ±10 knots of target airspeed.
- Trim philosophy: Set attitude → set power → trim away all residual control pressure.
- Primary altitude reference: Outside horizon (VMC); altimeter as confirmation.
- Primary heading reference: Heading indicator (directional gyro); magnetic compass for periodic verification.
- Left-turning tendencies: Torque, slipstream, P-factor, gyroscopic precession — all require right rudder correction at high power/low speed.
Memory Aid
For the sequence of actions when establishing straight-and-level flight, remember APT: Attitude (set pitch and bank visually), Power (set throttle for target airspeed), Trim (trim away all remaining control pressure). This three-step flow keeps you from chasing the instruments and ensures the airplane is properly configured before you move on to other cockpit tasks.
Common Test Traps
- "Power controls altitude" confusion: In cruise straight-and-level flight, pitch controls altitude and power controls airspeed — not the reverse. The FAA knowledge test will present scenarios where students misidentify which control corrects an altitude deviation.
- Trim as optional: Some questions imply trim is only used for comfort. In fact, proper trim is required for precision flight; a pilot who holds constant manual back-pressure instead of trimming is not flying correctly per the AFH.
- Magnetic compass for heading: The compass is unreliable during turns and accelerations. The heading indicator is the primary steering instrument in flight; the compass is used only for periodic cross-checks.
- ACS tolerances misremembered: Private pilot straight-and-level tolerances are ±100 ft altitude and ±10° heading. Instrument rating ACS tolerances vary by task — enroute and many approach tasks call for tighter tolerances (such as ±100 ft or less and closer heading control approaching minimums), so pilots should not assume the private pilot tolerances carry over unchanged to instrument tasks. Know which standards apply to which certificate and task.
- Ignoring the VSI: The vertical speed indicator is a trend instrument — it shows whether altitude is changing before the altimeter moves significantly. A non-zero VSI reading during "level" flight is an early warning to make a small pitch correction, not a large one.