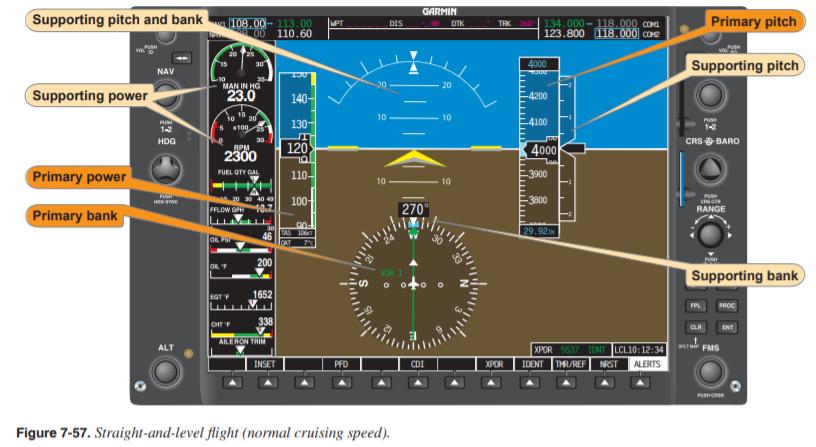
Straight-and-level flight is the single most fundamental skill in attitude instrument flying. While it sounds simple — just keep the airplane going in one direction at a constant altitude — executing it precisely inside the clouds, where visual cues from the natural horizon are absent, requires a disciplined understanding of which instruments to trust, how to read them together, and how to make smooth, coordinated corrections. Every advanced IFR maneuver — holding patterns, approaches, missed approaches — rests on this foundation. Get straight-and-level right, and everything else builds naturally on top of it.
The FAA's Instrument Flying Handbook (FAA-H-8083-15) organizes attitude instrument flying around two related concepts: the control and performance concept and the primary and supporting instrument concept. Understanding both gives you a complete picture of what each gauge is telling you and why you scan them in a purposeful pattern rather than staring at one dial.
The Control and Performance Concept
Every instrument in the panel can be classified as either a control instrument or a performance instrument. Control instruments — primarily the attitude indicator (AI) and the tachometer or manifold pressure gauge — show you the inputs you are putting into the airplane. Performance instruments — the altimeter, airspeed indicator, vertical speed indicator (VSI), and heading indicator (HI) — show you the result of those inputs.
The logic flows in one direction: you set a specific pitch and bank attitude on the attitude indicator and a specific power setting on the engine instruments, and then you verify that the performance instruments confirm the expected result. If the altimeter is unwinding, you do not chase the altimeter by staring at it — you return to the attitude indicator, adjust pitch slightly, and then re-check the altimeter to confirm the correction worked. This keeps your scan organized and prevents the fixation trap that causes a pilot to over-control.
Primary and Supporting Instruments
Within the performance instruments, the FAA further distinguishes primary from supporting instruments for each axis of control. The primary instrument for a given axis is the one that provides the most direct, precise information about performance in that axis at a particular moment in flight.
Pitch Control
During straight-and-level, unaccelerated flight, the altimeter is the primary pitch instrument. It tells you definitively whether the airplane is holding altitude. The VSI supports the altimeter by showing the trend — whether altitude is changing and at what rate — but it lags behind actual pitch changes by several seconds, so it is considered a trend instrument rather than a precise reference. The airspeed indicator also acts as a supporting pitch instrument because airspeed and pitch are closely related: a nose-high attitude in level flight will bleed airspeed, and a nose-low attitude will increase it.
Bank Control
During straight-and-level flight, the heading indicator is the primary bank instrument. If the heading is steady, the wings are effectively level relative to the desired track. The attitude indicator supports bank by showing you the angle of the wings directly, and the turn coordinator supports by indicating the rate of turn and slip or skid condition. Remember that the ball in the inclinometer must be centered for coordinated flight — a ball displaced to one side means rudder input is needed, not aileron.
Power (Thrust) Control
The airspeed indicator is the primary power instrument in straight-and-level flight. Once the desired airspeed is established, the throttle setting should produce and maintain that speed. Manifold pressure and RPM gauges (or the tachometer) serve as supporting power instruments, helping you set an approximate power without hunting on the airspeed indicator during transitions.
The Instrument Scan
The instrument cross-check — commonly called the scan — is the continuous, systematic movement of your eyes among the flight instruments. The FAA describes several scan patterns, but for straight-and-level flight the most practical is the hub-and-spoke pattern, sometimes called the selective radial scan. The attitude indicator sits at the center (the hub) because it is the only instrument that gives you immediate, simultaneous information about both pitch and bank attitude. From the AI you radiate outward to each performance instrument in turn, then return to the AI before moving on.
A typical sequence looks like this: AI → altimeter (primary pitch) → AI → heading indicator (primary bank) → AI → VSI (pitch trend) → AI → airspeed (primary power / supporting pitch) → AI → turn coordinator (bank trend/coordination) → AI … and repeat. The key discipline is that you always return to the attitude indicator between checks. The AI provides continuous, real-time mechanical display of pitch and bank via its gyro, while the altimeter and HI reflect changes with a slight lag. Returning to the AI lets you catch a developing deviation early and make a small correction before the altimeter or HI show a significant error.
Common scan errors include fixation (staring at one instrument too long), omission (skipping an instrument entirely), and emphasis (giving unequal time to one instrument because you distrust the others). Each of these errors leads to gradual deviations that grow until a significant correction — which itself upsets coordinated flight — is required.
Making Corrections
When you detect a deviation, the correction must be proportional and smooth. The FAA recommends making small, smooth pitch corrections using bar-width references on the attitude indicator rather than a fixed numeric rule, and for heading deviations, use a bank angle equal to the degrees of heading error up to a maximum of the standard-rate turn bank (approximately 15–20° at typical IFR speeds). This prevents over-banking or over-pitching in response to small errors.
For altitude deviations of 100 feet or less, a very small pitch adjustment — often just a half-bar-width change on the AI — combined with patience will return you to altitude smoothly. For larger deviations, a slightly larger pitch correction is warranted, but you should level off at the target altitude rather than letting momentum carry you through it. Similarly, never use more than standard-rate turn (3° per second) to correct heading errors; abrupt bank changes disturb both pitch and coordination.
Why Straight-and-Level Matters
Every minute of IFR flight between maneuvers is spent in straight-and-level cruise or at an intermediate segment altitude. An unstabilized, wandering straight-and-level scan is the leading cause of slow, insidious altitude deviations — the kind that produce an MSAW (Minimum Safe Altitude Warning) or a controller inquiry. In the terminal environment, being 200 feet off an assigned altitude during a radar vector to final can be the difference between a safe approach and a conflict with another aircraft. Mastery of straight-and-level is also the foundation of unusual-attitude recovery: you cannot return to straight-and-level from an unusual attitude if you do not have a precise picture of what straight-and-level looks like on the instruments.
Key Numbers and Rules
- Altitude tolerance (IFR): FAA standards for instrument rating practical tests require maintaining assigned altitude within ±100 feet.
- Heading tolerance (IFR): Maintain assigned heading within ±10°.
- Airspeed tolerance (IFR): Maintain assigned airspeed within ±10 knots.
- Standard-rate turn: 3° per second; bank angle approximated by (airspeed in knots ÷ 10) + 7. Use this as the maximum correction bank to fix heading deviations.
- VSI lag: The vertical speed indicator lags actual pitch changes by several seconds; never chase the VSI — chase the AI and let the VSI confirm.
- Ball discipline: Ball centered = coordinated. Step on the ball to correct (if the ball is left, add left rudder pressure).
- Attitude indicator is the hub: Return to the AI between every individual instrument check; it is the only instrument showing both pitch and bank simultaneously in real time.
Memory Aid
"Attitude first, performance second." This simple phrase reminds you of the control-and-performance hierarchy: always set the attitude (and power) first on the control instruments, then verify the result on the performance instruments. Never make a control input based solely on what a performance instrument is doing without first referencing and correcting the attitude indicator.
Common Test Traps
- Confusing primary vs. supporting: The VSI is often mistakenly called the primary pitch instrument. It is a supporting (trend) instrument; the altimeter is primary for pitch in straight-and-level flight.
- Forgetting power is also monitored: Many students focus entirely on pitch and bank, allowing airspeed to creep up or down. The airspeed indicator is the primary power instrument and must be included in the scan.
- Chasing the VSI: A classic error. Because the VSI lags, if you correct pitch based on the VSI, you will over-correct. Use the attitude indicator to make the correction; the VSI will confirm it shortly after.
- Mistaking the heading indicator for the primary bank instrument only during turns: The HI is primary for bank even in straight-and-level — a steady heading means the bank is effectively zero. The turn coordinator is supporting, not primary.
- Ignoring the inclinometer: The ball can drift during long straight segments, especially in turbulence. Uncoordinated flight causes both bank and pitch errors to compound. Check the ball every scan cycle.