When a pilot transitions from visual to instrument meteorological conditions (IMC), every maneuver that seemed natural outside suddenly demands a disciplined, methodical approach. Climbing and descending turns are among the most demanding of these maneuvers because they require the pilot to manage three variables at once: pitch attitude, bank angle, and power setting. A lapse in scan or an imprecise control input can quickly result in an unusual attitude, accelerated stall, or a significant deviation from assigned altitude and heading. Mastering these combined maneuvers is therefore a cornerstone of attitude instrument flying.
This article walks through the mechanics, the instrument scan, the step-by-step control sequence, and the exam traps that catch student pilots off guard. Whether you are preparing for the instrument rating knowledge test or building the scan skills you will need in the actual cockpit, understanding climbing and descending turns at a deep level will pay dividends every time you fly IFR.
The Foundation: Attitude Instrument Flying
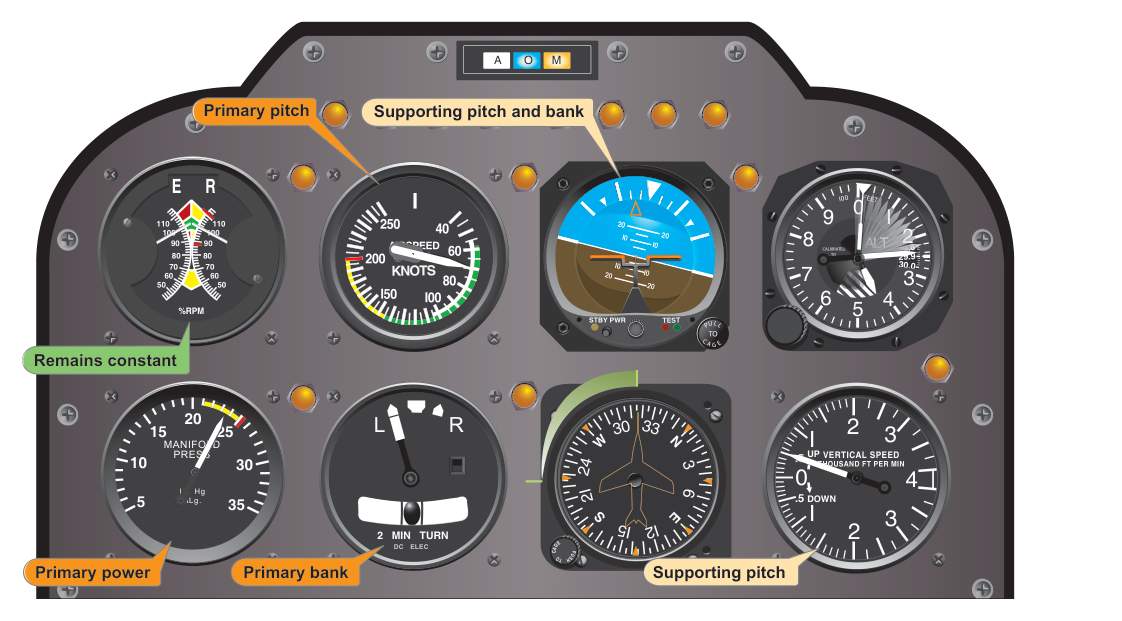
The FAA's Instrument Flying Handbook (FAA-H-8083-15) divides cockpit instruments into three functional groups: control instruments (the attitude indicator and the power indicator — manifold pressure gauge or tachometer), performance instruments (altimeter, vertical speed indicator, airspeed indicator, heading indicator, and turn coordinator), and navigation instruments (VOR, ILS, GPS displays). During any combined maneuver, the pilot uses control instruments to establish an attitude and power setting, then cross-checks the performance instruments to verify that the aircraft is actually achieving the desired outcome, making small corrections as needed.
The primary technique taught in FAA training is the control and performance method. The pilot sets a specific attitude on the attitude indicator and a specific power on the engine instrument, then confirms performance on the altimeter, VSI, and airspeed. A parallel technique, the primary and supporting method, identifies which instrument gives the most direct information for each parameter at any moment. During a climbing turn at a constant airspeed, for example, the airspeed indicator is the primary pitch instrument (pitch is being used to hold the target climb speed rather than a specific altitude), the heading indicator is the primary bank instrument (it most directly shows heading change), and the manifold pressure gauge or tachometer is the primary power instrument. Both methods are valid; the FAA handbook presents both, and many instructors blend them in practice.
How Climbing Turns Work
A climbing turn asks the aircraft to gain altitude and change heading at the same time. The challenge is that both maneuvers place competing demands on lift. In a climbing attitude, the wing is already working harder to convert thrust into altitude. Adding bank reduces the vertical component of lift, which, if uncorrected, will either slow the climb or allow the nose to drop below the climb attitude.
The recommended entry sequence for a climbing turn is: establish the climb first, then roll into the bank. This order is important. If you roll into the bank before establishing the climb attitude, the aircraft may accelerate through the target airspeed, or the reduction in vertical lift may pull the nose through the horizon before you have a stable reference. The specific steps are:
- Apply climb power smoothly (full throttle for most training aircraft, or a manufacturer-specified climb power setting).
- Pitch up to the manufacturer-recommended climb attitude on the attitude indicator — typically 7–10° nose-high for a light training aircraft at Vy, though the exact value depends on the aircraft and density altitude.
- Trim to relieve control pressure, allowing you to devote attention to the scan.
- Once the climb is stabilized, roll into the bank — no more than standard-rate (3°/sec) or a shallow bank during initial instrument training. Steep banks in a climb significantly degrade climb performance and increase stall risk.
- During the turn, maintain the climb attitude on the attitude indicator. Expect the airspeed indicator to confirm proper pitch by holding the target climb speed. The altimeter and VSI confirm the aircraft is climbing.
- Roll out on the target heading using the heading indicator. Because the aircraft is climbing and the heading indicator is your primary bank reference, lead the rollout by approximately half the bank angle in degrees (e.g., for a 15° bank, begin rollout about 7–8° before the target heading).
After rollout, continue the climb to the assigned altitude, then level off using the standard level-off procedure: lead the altitude by approximately 10% of the vertical speed (e.g., if climbing at 500 fpm, begin leveling off about 50 feet before the target altitude).
How Descending Turns Work
A descending turn is in some ways the mirror image of a climbing turn, but it introduces its own hazards. In a descent with reduced power, the aircraft is more susceptible to airspeed buildup in the turn, and students often inadvertently steepen the bank or allow the nose to drop further than intended — a combination that can lead rapidly to a dangerous spiral dive.
The recommended sequence for a descending turn entry is:
- Reduce power to the planned descent power setting (or as directed by procedure).
- Establish the descent pitch attitude on the attitude indicator. In many light aircraft, a descent at cruise power reduced to idle or partial power results in roughly 3–5° nose-low, though again the actual value is aircraft-specific and must be verified with the performance instruments.
- Trim for the descent attitude and airspeed. Confirm on the airspeed indicator that the speed is stabilizing at or below Vno (normal operating speed) and well clear of Va (maneuvering speed) if turbulence is possible.
- Once established, roll into the planned bank angle. Keep bank shallow to moderate — the FAA recommends no more than standard-rate in instrument conditions unless operationally required.
- Scan the attitude indicator continuously to prevent the nose from pitching further down during the turn. Cross-check altimeter, VSI, and airspeed to confirm the planned rate of descent.
- Lead the rollout by roughly half the bank angle before the target heading, then apply a level-off pitch change and advance power simultaneously.
The Instrument Scan During Combined Maneuvers
During a climbing or descending turn, the scan must be wider and faster than during straight-and-level flight because more instruments are active simultaneously. The attitude indicator remains the hub of the scan — it is the only instrument that simultaneously depicts both pitch and bank. However, over-fixation on the attitude indicator leads to missed performance deviations. A disciplined scan technique moves the eyes systematically: attitude indicator → heading indicator → altimeter → VSI → airspeed → attitude indicator, completing the loop every few seconds. The turn coordinator is checked periodically to confirm coordination (the ball centered in its inclinometer); uncoordinated flight in a climbing or descending turn wastes energy, degrades climb or descent performance, and increases stall risk.
Two scanning errors are especially common in combined maneuvers. Fixation — staring at one instrument while ignoring others — often happens when the pilot is chasing a heading deviation and forgets to monitor altitude trend. Omission — leaving an instrument out of the scan cycle entirely — causes surprise deviations. Both errors are addressed by deliberately practicing a structured scan pattern before moving on to combined maneuvers.
Why It Matters
The statistics behind controlled flight into terrain (CFIT) and loss of control in flight (LOC-I) accidents consistently point to imprecise attitude management during IMC turns. A nose-low descending turn that is allowed to steepen becomes a graveyard spiral within seconds, and at that point airspeed will be increasing, altimeter unwinding rapidly, and the VSI pinned at its maximum reading — all while the aircraft is heavily banked. Recovery from an incipient spiral requires reducing bank first, then pulling out of the dive, and resetting power — the opposite of an instinctive pull-back on the controls. Pilots who have practiced controlled climbing and descending turns to a high standard are far less likely to find themselves in that situation, and far better equipped to recognize and correct it if it does occur.
Key Numbers and Rules
- Standard-rate turn: 3° per second, achieved at approximately 15° bank at typical light aircraft speeds (exact bank angle varies with airspeed — the turn coordinator is the reference, not a fixed bank angle).
- Rollout lead: Begin rollout approximately half the bank angle in degrees before the target heading (e.g., 10° bank → begin rollout 5° early).
- Altitude lead for level-off: Lead by approximately 10% of the vertical speed (500 fpm climb → begin level-off at 50 feet before target).
- Bank limit in IMC: FAA recommends limiting bank to standard-rate (roughly 15–20° for most light aircraft) during routine IFR maneuvers; steeper banks increase stall speed and degrade climb/descent performance.
- Stall speed increase in a bank: In a 60° bank, stall speed increases by approximately 41% over wings-level stall speed — a critical reason to keep banks shallow in combined climbing maneuvers.
- Trim: After each attitude change, re-trim to remove control pressure so the scan can be fully allocated to instrument cross-check.
Memory Aid
Use the phrase "Power, Pitch, Bank, Trim, Check" to remember the entry sequence for any combined maneuver on instruments:
- Power — Set the appropriate power for the maneuver (climb power or descent power).
- Pitch — Establish the target pitch attitude on the attitude indicator.
- Bank — Roll into the planned bank angle after pitch is established.
- Trim — Re-trim to relieve control pressure and free the scan.
- Check — Cross-check all performance instruments to verify the aircraft is doing what you commanded.
This sequence keeps the pilot from rushing into the bank before the pitch and power are stable — the most common entry mistake in combined maneuvers.
Common Test Traps
- Confusing primary instruments: The FAA knowledge test often asks which instrument is "primary for pitch" during a climbing turn. According to the FAA's primary and supporting instrument table, during a climbing turn at a constant airspeed the answer is the airspeed indicator (pitch is being used to hold the target climb speed), not the attitude indicator. The attitude indicator is a control instrument, not a performance instrument.
- Ignoring stall risk in climbing turns: Students sometimes apply steep bank angles to climb faster toward an altitude — the opposite of what is needed. A steeper bank reduces vertical lift and increases stall speed, making the situation worse, not better.
- Forgetting rollout lead: Rolling out precisely on heading requires anticipation. Waiting until the heading indicator reads the exact target heading before rolling out will result in overshooting by several degrees, especially at higher bank angles.
- Skipping the trim step: Without trimming after attitude changes, the pilot must hold continuous back or forward pressure, which degrades the quality of the instrument scan and causes fatigue on longer approaches or holds.
- Misidentifying a spiral dive: In a descending turn that steepens, students sometimes think they are in a steep descent and pull back. Because the aircraft is banked, pulling back tightens the spiral and increases G-load rather than raising the nose to level. The correct first action is always to level the wings before pulling out.