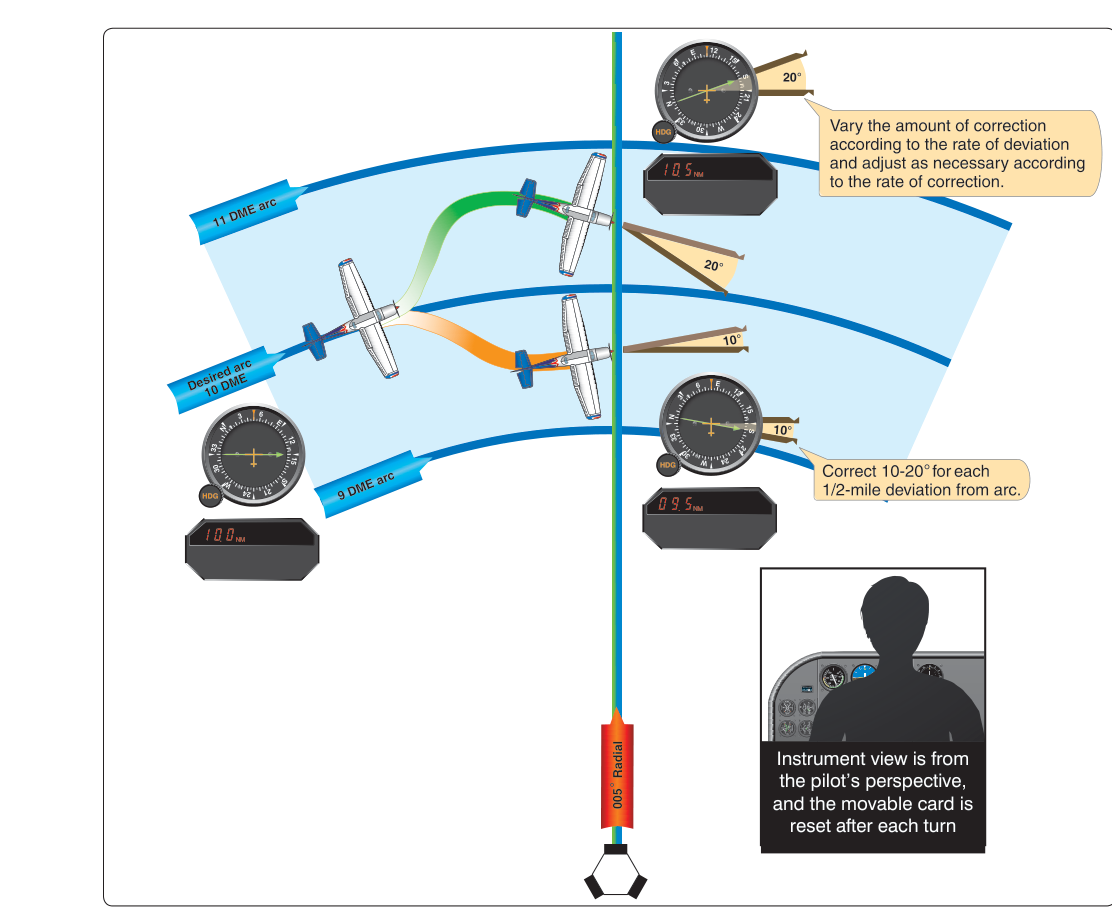
A DME arc is one of the most elegant — and initially intimidating — procedures in instrument flying. Instead of flying a straight line toward or away from a station, you fly a curved path at a constant distance from a VOR/DME or VORTAC, as measured in nautical miles by your Distance Measuring Equipment (DME). DME arcs appear on many instrument approach plates as lead-in transitions that position an aircraft onto the final approach course from various directions. Understanding how to intercept a DME arc smoothly, track it precisely, and roll out on the correct inbound course is a fundamental instrument pilot skill — and a favorite topic on the FAA Instrument Rating knowledge test.
The technique is grounded in the Instrument Flying Handbook (FAA-H-8083-15) and the Instrument Procedures Handbook (FAA-H-8083-16), both of which describe DME arc procedures in detail. The core principle is simple: keep your DME readout constant by making a continuous series of small heading adjustments. In practice, this means flying a series of short, straight legs that approximate the arc rather than trying to actually bank continuously around the station.
How DME Arcs Work
A DME arc is published on an approach chart with a specific radius — commonly 10, 15, or 20 nautical miles — measured from the co-located DME ground station. Your goal is to maintain that published distance throughout the arc. Because DME measures slant-range distance, there is a slight difference between DME distance and actual ground distance, but at typical arc radii and altitudes this error is negligible for practical purposes.
The geometry of the arc means that your desired track is always perpendicular to the bearing pointer (or CDI radial) pointing toward or from the station. As you fly the arc, your magnetic bearing to/from the station changes continuously. This is the key mental image: imagine yourself walking around the outside of a large circle, always facing sideways relative to the center. Your heading is constantly changing, but your distance from the center stays the same.
The 10° Twist-and-Turn Technique
Rather than attempting a continuously banked turn, you fly the arc using the 10-degree twist-and-turn method, described in the Instrument Flying Handbook. Here is how it works step by step:
- Monitor your bearing: Watch the OBS/CDI or bearing pointer. As you track the arc, note your current radial from the station (e.g., 090° radial).
- Twist 10°: Rotate your OBS 10° ahead of your current position in the direction of flight (e.g., to the 080° radial if flying counterclockwise).
- Turn to intercept: Turn the aircraft heading approximately 10° toward the station to re-intercept the arc. As you reach the new radial, the CDI will center.
- Repeat every 10°: Each time the needle centers, twist another 10° and turn another 10°. This process repeats around the entire arc.
The result is a series of short straight-line segments that very closely approximate the curved arc. The smaller the increment you use (5° works even better), the more precise your arc tracking will be. At typical arc radii, 10° increments produce very acceptable accuracy and are manageable in the cockpit.
Wind Correction on the Arc
Wind complicates arc flying because a crosswind component will push you inside or outside the desired radius. If the DME is increasing (you're drifting outward), you need to turn more aggressively toward the station. If the DME is decreasing (drifting inward), you should turn slightly away from the station. A practical rule: keep the station bearing pointer roughly 90° to your wing tips. If it drifts ahead of the 90° position, you're drifting inward; if it falls behind, you're drifting outward. Correct with small heading adjustments to reestablish the 90° relationship while monitoring the DME.
Intercepting the DME Arc
Before you can track the arc, you must intercept it. The procedure differs slightly depending on whether you are flying toward the arc from inside (closer to the station) or from outside (farther away).
When flying toward the arc from inside the radius — for example, after departing on a radial — you will watch your DME count up toward the arc distance. Begin your turn onto the arc lead radius early to avoid overshooting. The Instrument Flying Handbook recommends using a lead radial — a specific radial that alerts you when to begin the turn. The lead distance depends on your groundspeed and bank angle. A common rule of thumb is: lead distance (in NM) ≈ 1% of groundspeed. For example, at 150 knots groundspeed, begin your turn approximately 1.5 nautical miles early. The corresponding lead in degrees of bearing depends on the arc's radius, so many approach charts actually print a lead radial right on the plate to remove the guesswork.
When joining from outside the arc (DME greater than published radius), fly directly toward the station on a radial until the DME counts down to the arc distance, then use the same lead-radial logic to roll out on the arc heading.
Rolling Out on the Inbound Course
One of the most critical moments in a DME arc procedure is the roll-out onto the final approach course or the inbound radial. Again, a lead radial is your best friend. The chart typically publishes a lead radial for the roll-out, and you should identify it before starting the arc. When that radial is reached, initiate the turn inbound. The amount of lead depends on your bank angle and groundspeed — a 25° bank at 120 knots requires roughly 1 NM of lead, meaning you start the turn approximately 5° before reaching the final approach radial.
Failing to use a lead radial is the most common error pilots make on DME arcs, and it is specifically called out in the Instrument Flying Handbook. Overshooting the inbound course at the last moment, especially in IMC, puts you outside the protected airspace for the approach and can compromise terrain and obstacle clearance.
Why DME Arcs Matter
DME arcs provide a way to transition from en route structure to an instrument approach course from almost any direction, without requiring radar vectors from ATC. This is valuable at non-radar airports and in remote areas. The protected airspace built around a DME arc assumes you can maintain the published radius within ±1 NM. Deviating beyond that margin can take you outside the obstacle clearance area. This is not a theoretical concern — many approach charts are designed in mountainous terrain where staying on the arc is directly tied to terrain clearance.
Proficiency on DME arcs also develops broader instrument skills: cross-checking multiple instruments simultaneously, anticipating turns, and managing workload. Pilots who can fly a DME arc cleanly are generally more proficient at all curved-path instrument procedures.
Key Numbers and Rules
- Arc width protection: Obstacle clearance is predicated on staying within ±1 NM of the published arc radius.
- 10° twist-and-turn: Standard technique; twist OBS 10° ahead, turn 10° toward station, repeat.
- Lead distance formula: Approximately 1% of groundspeed in nautical miles, used to begin the turn onto or off the arc.
- DME slant range: DME measures slant range, not ground distance; at arc radii of 10+ NM and typical altitudes, the error is less than 0.1 NM and operationally negligible.
- Minimum IFR altitude: The arc segment has a published minimum altitude; do not descend below it until established on the final approach segment and cleared for the approach.
- Station passage: If the DME drops to zero briefly due to signal loss near the station, maintain last known heading and distance — this is not a normal DME arc scenario, but signal interruptions can happen.
Common Test Traps
- Forgetting lead radials: The FAA frequently tests whether you know to start the turn before reaching the arc or the inbound course, not at it. Always use the published or calculated lead radial.
- Confusing inward vs. outward drift corrections: If DME is increasing, you're going away from the station — turn toward it. If DME is decreasing, you're getting too close — turn away. Students frequently reverse this.
- Ignoring the OBS during the arc: Some students track only the DME and forget to twist the OBS ahead. Without the OBS reference, you lose the ability to use the CDI as a lead-radial alert and lose situational awareness on the arc.
- Attempting to fly the arc with autopilot HDG mode only: The autopilot heading mode flies straight legs; arc tracking still requires pilot input to sequence headings. GPS/FMS LNAV can fly a true arc, but only when the approach is loaded and the arc segment is active — not a substitute for understanding the manual technique.
- Assuming any DME can be used: The DME must be co-located with the VOR referenced on the approach chart. Using a different DME source will produce incorrect distances and invalid arc tracking.