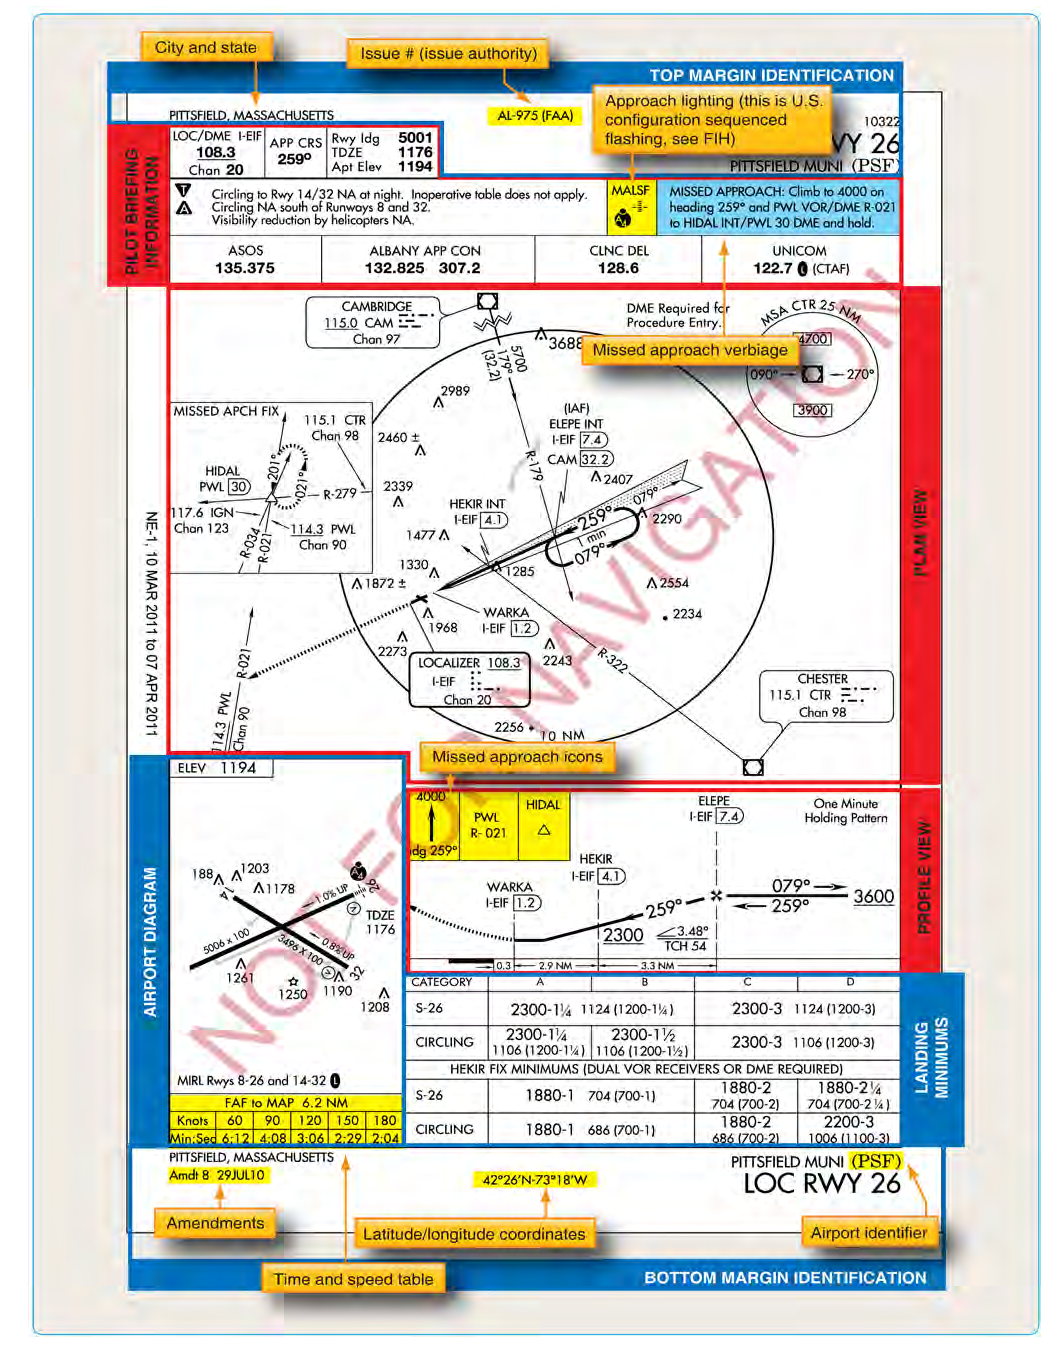
Every instrument approach begins long before the aircraft crosses the final approach fix. A disciplined briefing from the terminal procedure chart — the approach plate — gives the flight crew a mental picture of the entire approach sequence, from the initial contact with approach control all the way through a potential missed approach. When you brief early and thoroughly, you replace rushed, reactive cockpit management with deliberate, proactive airmanship. Skipping or shortcutting the briefing is one of the most common threads found in controlled-flight-into-terrain accidents during instrument operations.
The FAA's Instrument Flying Handbook (FAA-H-8083-15) and the Instrument Procedures Handbook (FAA-H-8083-16) both stress that pilots must understand every element of the approach chart before commencing the approach. This article walks through each major section of a standard NACO or Jeppesen-style terminal procedure chart in the order most pilots brief them, explains why each item matters, and highlights the traps the FAA loves to test.
Understanding the Chart Layout
Terminal procedure charts are organized into predictable zones. Familiarizing yourself with this layout means you can pull the correct data quickly, even under workload. The main sections are: the briefing strip (header margin), the plan view (overhead depiction of the approach environment), the profile view (side-on altitude picture), and the minimums section at the bottom. The airport diagram, if printed on the same chart, shows runway layout, lighting, and key ground features.
How the Briefing Works: Step by Step
1. Identification and Currency
Start by confirming you have the correct approach for the correct airport and runway. State the full approach name — for example, ILS or LOC RWY 28L — to prevent the common error of briefing the wrong chart. Verify the chart's effective date against today's date. Using an expired chart is a regulatory violation and a serious safety hazard, because procedure altitudes, frequencies, or obstacle clearance surfaces may have changed. Charts are updated on the standard 28-day AIRAC cycle.
2. Communication Frequencies
Read across the top of the chart: ATIS or D-ATIS frequency, approach control frequency (sometimes split by arrival direction), tower, ground, and any relevant clearance delivery. Pre-set or pre-identify these in your avionics before you need them. Note any notes such as CTAF for non-towered airports. On many approaches you will also find a radar required or ATC required note here — critical at airports where the procedure cannot be flown independently.
3. Navigation Frequencies and Identifiers
Identify the primary navigation aid: the ILS localizer frequency, the VOR frequency, or for RNAV approaches, confirm the correct procedure is loaded in the FMS. Tune and identify the navaid by its Morse code identifier — this is a standard operational practice emphasized throughout the AIM and the Instrument Flying Handbook and a regularly-tested knowledge area. For an ILS approach, you will also note the glideslope (co-located with the localizer frequency on ILS systems) and any DME frequency if used for stepdowns or missed approach. Identify any procedure turn or holding fixes by their associated navaids or waypoints.
4. Plan View — The Overhead Picture
Study the plan view to understand the approach environment spatially. Note the Minimum Safe Altitude (MSA) circle, which provides 1,000 feet of obstacle clearance within 25 nautical miles of the depicted navaid in each sector — useful for initial situational awareness but not an operational altitude for flying the procedure. Trace the complete route: from the IAF (Initial Approach Fix), through any intermediate fix, to the FAF (Final Approach Fix), and note where the missed approach point (MAP) is depicted. Check for special notes: restricted airspace, non-standard hold entry requirements, procedure turns, and NOTAM-sensitive equipment such as remote altimeter sources.
5. Profile View — Altitudes and Stepdowns
This is arguably the most safety-critical portion of the briefing. The profile view shows every mandatory and recommended altitude in sequence. Brief these in order:
- Initial approach altitude: The altitude to maintain from the IAF to the intermediate segment.
- Intermediate segment altitude: Establishes the aircraft in final configuration for the approach.
- Final approach fix crossing altitude: The altitude (or altitude range) at which you should cross the FAF. On a non-precision approach this is explicitly charted; on an ILS you should be established on the glideslope at the FAF.
- Stepdown fixes: Any additional fixes between the FAF and MAP that require a minimum crossing altitude before you may descend further.
- Decision Altitude/Height (DA/DH) or Minimum Descent Altitude (MDA): The key number from the minimums section, married to the profile view so you know exactly where in space you must execute a missed approach if visual references are not established.
Note the glideslope angle for precision and RNAV (LPV) approaches — typically 3.00° — and the associated threshold crossing height. For non-precision approaches, note the Visual Descent Point (VDP) if depicted; descending past the VDP without the runway environment in sight significantly increases the risk of a hard landing or runway undershoot.
6. Minimums Section
The minimums section lists DA or MDA values for each aircraft category (A, B, C, D) and each authorized approach type (e.g., ILS, LOC, circling). Brief the specific minimum applicable to your aircraft category and the equipment you have operative. Note the required visibility — expressed in statute miles or runway visual range (RVR) in hundreds of feet. Under 14 CFR 91.175, you may not operate below DA/MDA or continue an approach past the MAP unless the runway environment is in sight and the aircraft is in a position to land using normal maneuvers. Circling minimums apply when landing on a runway other than the one aligned with the final approach course; they are always higher than straight-in minimums and are associated with a specific circling radius for each aircraft category.
7. Missed Approach Procedure
Brief the complete missed approach before you begin the descent. The missed approach instructions are printed in the notes area and depicted on both the plan and profile views. Know the initial action (usually a climbing turn or straight climb to an altitude), the fix or navaid to which you will navigate, and the hold instructions if applicable. Identify the missed approach holding fix on your avionics before you need it. A missed approach executed without prior briefing often results in disorientation, altitude deviations, or navigation errors — all documented causes of accidents.
8. NOTAMs and Special Conditions
No chart briefing is complete without cross-referencing relevant NOTAMs. A NAVAID may be out of service, lighting may be inoperative, or the approach may be temporarily restricted. Check for takeoff and alternate minimums on the separate chart page (indicated by a black triangle with a T or A) if non-standard conditions apply. Verify the destination airport's weather against the applicable minimums, and confirm your fuel state supports a divert if required.
Why It Matters
The NTSB has repeatedly cited inadequate approach briefings as a contributing cause in fatal instrument approach accidents. When a pilot is busy managing ATC communications, aircraft configuration, and deteriorating weather simultaneously, there is no cognitive bandwidth left to decode an unfamiliar chart. A complete briefing — ideally completed 10 to 15 minutes before the IAF — converts reactive confusion into deliberate, rehearsed action. The Instrument Procedures Handbook (FAA-H-8083-16) specifically calls this approach planning and treats it as a required element of a safe instrument approach, not an optional nicety.
Key Numbers and Rules
- MSA circle: 1,000 ft obstacle clearance within 25 NM of the depicted navaid — for emergency use only, not a procedural altitude.
- DA (precision/APV approaches): The altitude at which you must initiate a missed approach if visual references are not established — you do not level off at DA.
- MDA (non-precision approaches): The minimum altitude you may descend to and maintain until visual or until reaching the MAP.
- Required visibility is charted in statute miles (SM) or RVR; 1 SM = RVR 5,000 ft (approximately, for planning).
- Aircraft categories are based on 1.3 × Vso at maximum certificated gross weight: Cat A <91 kt, Cat B 91–120 kt, Cat C 121–140 kt, Cat D 141–165 kt.
- Charts update every 28 days (AIRAC cycle); verify effective dates before flight.
- Under 14 CFR 91.175(c), three conditions must all be met to continue below DA/MDA: flight visibility at or above minimums, runway environment in sight, and aircraft in position for normal landing.
Memory Aid
Many instrument instructors use the mnemonic A FINE MATCH to sequence the approach briefing items:
- A — Approach name and type (confirm correct chart)
- F — Frequencies (comm and nav, tune and identify)
- I — Inbound course and final approach course
- N — NOTAMs and notes on the chart
- E — En route/initial altitudes (IAF to FAF)
- M — Minimums (DA/MDA and visibility)
- A — Airport diagram and lighting
- T — Time (if timing is required for the MAP on a non-precision approach)
- C — Circling considerations (if applicable)
- H — Hold/Missed approach procedure (full miss)
Work through each letter in order during every approach briefing until it becomes automatic. The goal is never to skip a step under pressure.
Common Test Traps
- DA vs. MDA confusion: At a DA you begin the missed approach immediately upon reaching that altitude without visual contact — you do not level off and fly along at DA. At an MDA you may level off and fly to the MAP, but may not descend further.
- MSA is not a procedure altitude: Many students assume they can fly the MSA shown in the plan view as an approach altitude. It is for emergency orientation only and does not guarantee IFR separation.
- Aircraft category is based on approach speed, not aircraft weight category: A heavy aircraft flown slowly enough could use Cat A minimums if its approach speed (1.3 × Vso) qualifies — though this is rare and must be confirmed with the POH.
- Navaid identification is required by regulation: Simply tuning the correct frequency is not enough; you must verify the Morse code identifier before relying on the navaid for navigation.
- Circling minimums always exceed straight-in minimums: If a student is tricked into applying straight-in minimums while circling, they are operating with less-than-required obstacle clearance.