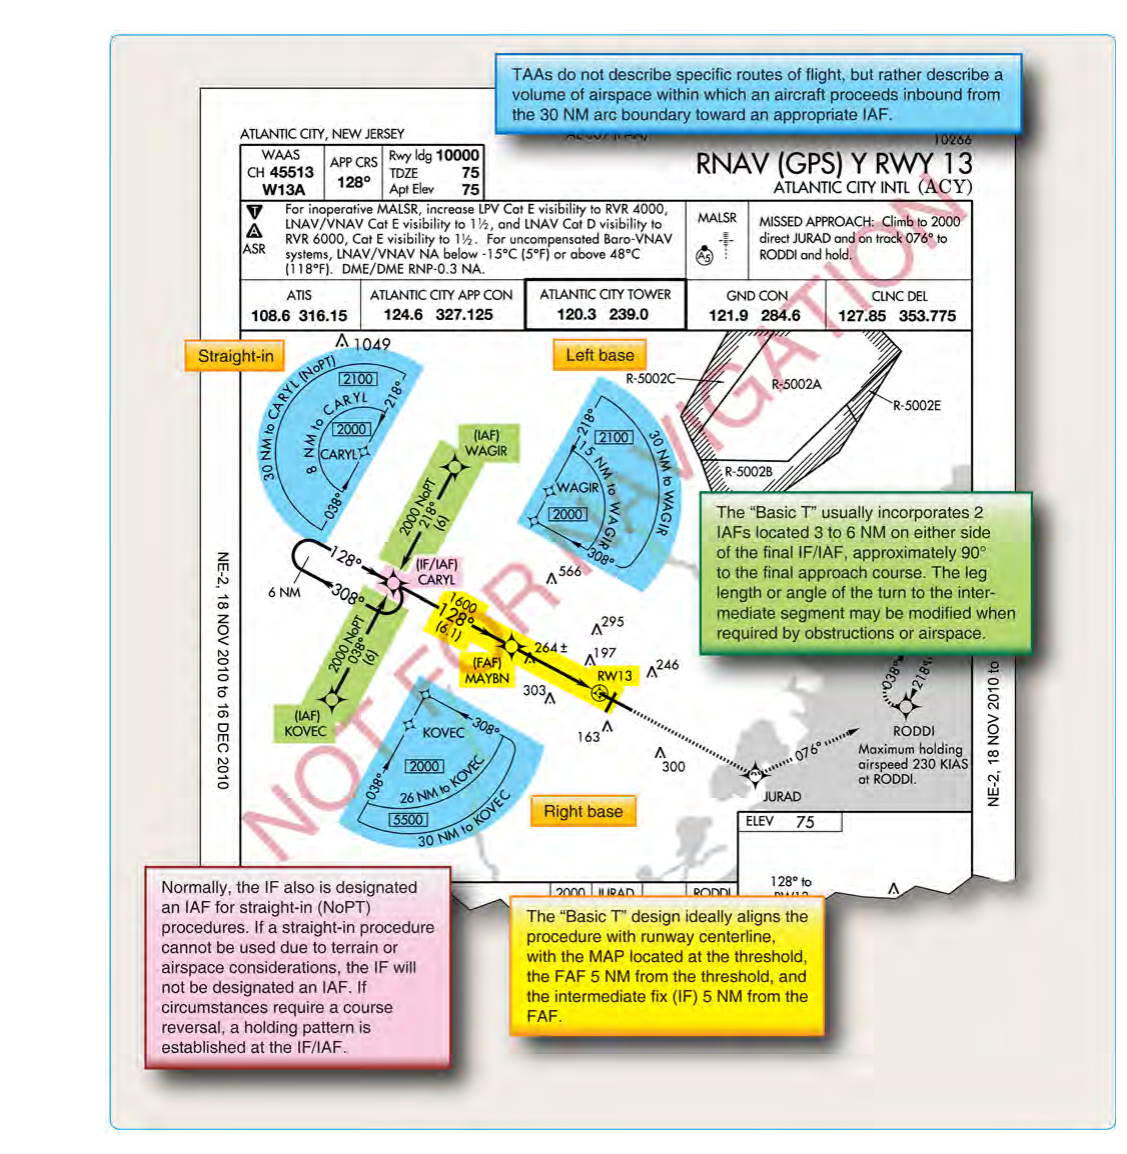
Modern RNAV (GPS) approaches frequently use a design called the Terminal Arrival Area (TAA) — a structured division of airspace surrounding the approach that tells pilots exactly what altitude to maintain when arriving from any direction. The TAA is inseparable from the Basic T (also called the "T" or modified-T) approach chart layout, a waypoint arrangement that has largely replaced older approaches built around NDB or VOR arcs and procedure turns. Understanding the TAA is not just an exam requirement; it is a foundational skill for flying modern IFR procedures safely and efficiently.
This article explains how the TAA and T-ATIS structure work together, how to read the sectors on an approach chart, what altitudes apply, and the common traps the FAA knowledge test sets for unwary pilots.
The Basic T Approach Geometry
The "T" structure gets its name from the arrangement of waypoints on an RNAV approach chart. When you look at a typical RNAV (GPS) approach plate, you will see two Initial Approach Fixes (IAFs) — one on the left and one on the right of the final approach course — connected by an Intermediate Fix (IF) directly overhead the final approach path. From the IF, the route descends through the Final Approach Fix (FAF) to the Missed Approach Point (MAP). The two IAFs and the IF form the horizontal bar of the "T," while the final approach course forms the vertical stem. A fourth waypoint, sometimes called the straight-in IAF, may be placed on the extended final approach course behind the IF, creating a base extension and allowing arrivals from behind the runway to join the procedure without executing a course reversal. This extended version is sometimes called a modified T or a π (pi) design, but the principle is the same.
The T layout is specifically designed to eliminate the need for a traditional procedure turn (PT) or holding-in-lieu-of-procedure-turn (HILPT) in most situations. Each arm of the T leads naturally into the intermediate segment, so a pilot arriving from the proper sector simply flies to the appropriate IAF and proceeds directly inbound — no teardrop or 45/180 reversal required.
The Three TAA Sectors
The TAA divides the area around the T into three distinct sectors, each centered on a different fix and each carrying its own minimum altitude. These sectors are depicted on the approach chart as pie-slice or arc-shaped regions, labeled directly on the plan view (the overhead diagram on the approach plate).
- Left Base Sector: Centered on the left IAF. Covers arrivals from the left side of the final approach course. The arc typically has a radius of 30 nautical miles from the IAF.
- Right Base Sector: Centered on the right IAF. Mirrors the left base sector for arrivals from the right. Also typically 30 NM radius.
- Straight-In Sector (Direct Sector): Centered on the IF (or the straight-in IAF if present). Covers arrivals coming from behind the approach — essentially from the runway side or from overhead. Also typically 30 NM radius.
The boundary between the left-base and straight-in sectors, and between the right-base and straight-in sectors, runs along the extended final approach course (a line drawn perpendicular to the final through the IF). This means that if you are arriving from a heading that would put you to the left of the final approach course extension, you are in the left-base sector and should head for the left IAF. Arrivals from the right go to the right IAF. Arrivals from behind (same side as the runway, i.e., you would overfly the airport to join) go to the straight-in sector fix.
TAA Altitudes and How to Apply Them
Each sector has a minimum altitude printed inside its arc on the chart. When ATC clears you for the approach and you are within the TAA, you must be at or above the altitude depicted for the sector you are currently in before proceeding to the initial fix. Think of these altitudes as the IFR equivalent of a vectored radar altitude — they provide obstacle clearance from your arrival direction into the initial approach waypoint.
Some TAA sectors are further subdivided by step-down arcs, depicted as smaller arcs inside the main 30 NM arc. A typical step-down might show one altitude from 30 NM to 6 NM, and a lower altitude from 6 NM inward to the IAF. These step-downs allow pilots to begin descending earlier than they otherwise could. The rule is simple: you may not descend to the lower step-down altitude until you are within the smaller arc's distance from the defining fix. Always identify which arc you are inside before descending.
If any portion of a TAA sector is not usable — for example, because terrain or airspace intrudes — the FAA will print a note or simply omit that sector's altitude box on the chart. A missing sector box is not a typographical error; it means that area is not authorized and you must obtain radar vectors or use another approach.
No Procedure Turn in a TAA
One of the most important operating rules for TAA approaches is that a procedure turn (PT) is not authorized when an approach is conducted within the TAA. The "NoPT" notation you may see on some approaches is effectively built into the entire TAA concept. Because each sector funnels you to the appropriate IAF on a path that naturally leads into the intermediate segment, executing an additional course reversal is neither necessary nor permitted without ATC instruction. If you arrive from a direction not covered by any TAA sector (i.e., you are outside the 30 NM radius of all three fixes), you must advise ATC and receive vectors or another clearance.
Charting Conventions and Reading the Plate
The TAA sectors are always depicted in the plan view of the approach chart. Look for the bold arc lines and the altitude values printed in each wedge. The sector boundaries along the final approach course extension are sometimes shown as dashed lines. The three fixes — left IAF, IF/right IAF, and straight-in fix — will be labeled with their waypoint identifiers (five-letter alphanumeric names, such as MAGGY or LUVRE). Step-down arcs appear as smaller concentric arcs inside the main boundary and carry their own altitude values and distance labels.
On Jeppesen charts, the TAA may be depicted slightly differently from NACO (FAA) charts, but the same three-sector principle applies. Exam questions almost always use FAA-format chart excerpts, so familiarize yourself with those conventions.
Why the TAA Matters
The TAA improves situational awareness and safety by giving every pilot a published, obstacle-clearing altitude for their specific arrival direction — without requiring ATC radar coverage. In areas without radar service, the TAA allows a pilot to self-sequence onto an RNAV approach from virtually any direction while maintaining guaranteed terrain clearance. This is especially valuable at rural or uncontrolled airports where radar vectors are unavailable. The T design also shortens track miles compared to older approaches with full-procedure turns, reducing flight time and fuel burn.
Key Numbers and Rules
- TAA sector radius: Typically 30 nautical miles from the defining fix (left IAF, right IAF, or IF/straight-in IAF).
- Three sectors: Left base, right base, and straight-in (direct).
- Step-down arcs: May subdivide any sector; descend to the lower altitude only after entering the smaller arc.
- No PT authorized within the TAA — course reversals are prohibited unless ATC specifically requires one.
- Outside TAA boundary: Obtain ATC vectors or use an alternate procedure — do not self-authorize entry.
- Sector altitude applies from the moment you are within that sector; it is not merely an enroute MEA — it is the approach entry altitude.
- Omitted sector box on the chart = that sector is not available; do not attempt to use it.
Memory Aid
A useful way to remember the three TAA sectors and which fix each one is centered on: "Left – Right – Straight", matching the three arms of the T from left to right, then the stem pointing at you. Left base goes to the left IAF, right base to the right IAF, and straight-in goes to the IF or straight-in IAF on the final course. When you know which direction you are arriving from relative to the final approach course, you immediately know which arm of the T to aim for and which altitude box governs your descent.
Common Test Traps
- Confusing the defining fix for each sector: The straight-in sector is centered on the IF (or straight-in IAF), NOT on the FAF or MAP. Many students mix up these waypoints under pressure.
- Executing a procedure turn inside the TAA: PT is never authorized within the TAA. A question may describe an arrival and ask whether a PT is required — if you are within any TAA sector, the answer is no.
- Ignoring step-down arcs: The exam may show a chart with step-down arcs and ask for the minimum altitude at a given distance. Read the smaller arcs carefully; the lower altitude is only valid inside its arc.
- Assuming all three sectors always exist: A sector can be omitted due to terrain, airspace, or other factors. An absent altitude box means that sector is unusable — you cannot interpolate or guess an altitude for it.
- Mixing up sector boundaries: The left/right sector boundary runs along the final approach course extension through the IF. A pilot arriving at an angle that is only slightly to one side may incorrectly believe they can use the other IAF — always determine which side of the extended final you are on before proceeding.