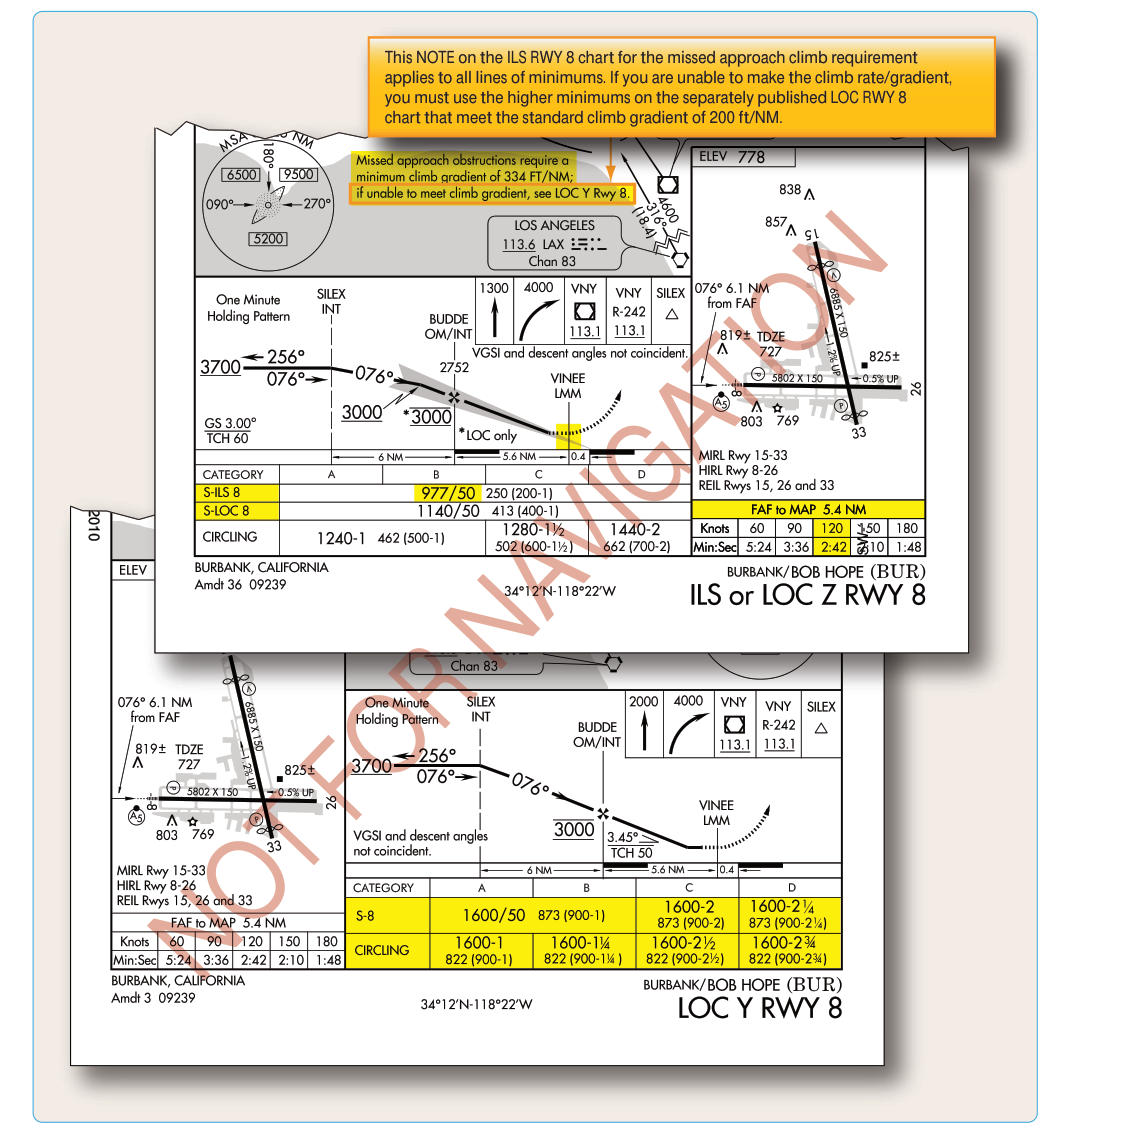
Every instrument approach plate tells two stories simultaneously: how to descend toward a runway in low visibility, and what to do if you never see the runway at all. The missed approach procedure is that second story, and on a modern Instrument Approach Procedure (IAP) chart it is told through a combination of graphic symbology, textual instructions, and altitude constraints that must be understood cold before you fly a single approach in the system. FAA examiners probe this knowledge hard because a pilot who is fuzzy on the missed approach is dangerous at exactly the moment when workload and stress are highest.
This article walks through every element of missed approach depiction found on U.S. government terminal procedure publications (TPPs), grounds each piece in the Instrument Flying Handbook (FAA-H-8083-15) and the Instrument Procedures Handbook (FAA-H-8083-16), and highlights the exam traps that catch students repeatedly.
Where the Missed Approach Lives on the Chart
A standard IAP chart produced by the FAA Aeronautical Navigation Products (AeroNav) office is divided into several distinct areas. The missed approach procedure appears in three separate places on the same chart, and understanding all three is essential.
- Plan view (top graphic): The overhead depiction of the approach shows the missed approach track as a dashed line departing from the missed approach point (MAP) or runway end. Arrows indicate the direction of turn, if any, and the routing toward the holding fix or next cleared point.
- Profile view (middle graphic): The side-view cross-section of the approach shows the missed approach climb gradient beginning at the MAP. A climbing arrow labeled with the required climb and the phrase "Climb to [altitude]" appears at or just past the MAP symbol.
- Textual instructions (briefing strip): Located in a shaded box near the top of the chart — often called the briefing strip or notes area — the written missed approach instructions spell out the complete procedure in plain language, for example: "Climb to 2,000 then climbing RIGHT turn to 3,000 direct HUBBS NDB and hold."
The three depictions must agree, and they do — but pilots who read only the text and ignore the graphics (or vice versa) miss critical nuances such as obstacle-avoidance turn timing.
Key Symbols and What They Mean
The Missed Approach Point (MAP)
For precision approaches (ILS, LPV, GLS), the MAP is located at the decision altitude/height (DA/DH). Because the glide path continuously guides the aircraft, the MAP is not a geographic point you fly over and then decide; it is the altitude at which you must initiate the missed approach if the runway environment is not in sight. The profile view marks this with a circled "M" or the word "MAP" and shows the climbing arrow beginning there.
For non-precision approaches (VOR, NDB, RNAV/LNAV, LOC), the MAP is a specific geographic fix — typically defined by a facility, a waypoint, a distance from a VOR, or a DME/GPS distance from the threshold. The profile view shows a bold vertical line at the MAP location, and the timing box (if applicable) tells you how many seconds at a given groundspeed you should fly from the final approach fix (FAF) to reach the MAP.
The Dashed Line in the Plan View
The dashed course line originating at the MAP or runway end traces the initial missed approach track. It may be a straight-out heading, a turn in a specified direction, or a combination. The line terminates at a holding pattern depicted with the standard racetrack symbol, or at a named fix where ATC will issue further clearance. The holding pattern in the plan view shows the inbound course, the fix name, the direction of turns (right turns are standard; left turns are explicitly depicted), and the charted altitude.
Altitude Designations
Altitudes in the missed approach segment are presented as mandatory (underlined), minimum (with an overline), or "climb to" values. The most common depiction is a "climb to" altitude that represents the minimum altitude to which you must climb before beginning a turn, ensuring obstacle clearance in the turn segment. The Instrument Procedures Handbook emphasizes that turns made before reaching the specified altitude can place the aircraft below the obstacle clearance surface, which is a critical safety point tested on the written exam.
Climb Gradient Requirements
Standard missed approach obstacle clearance is predicated on a 200 feet per nautical mile (ft/NM) climb gradient from the MAP to the initial missed approach altitude. This equates to roughly 3.3% — a modest but non-trivial climb that most piston singles can achieve comfortably. However, when terrain or obstacles demand more, the chart will explicitly state a non-standard climb gradient, such as "Climb gradient of 350 ft/NM required" or it will list an alternative missed approach procedure available only when a higher climb performance is achieved.
If your aircraft cannot meet a published non-standard gradient, the approach is not authorized for you under those conditions. This is a go/no-go factor in preflight planning, not a decision made in the air. The Instrument Flying Handbook notes that climb gradient requirements are particularly common at high-elevation airports or locations with rising terrain immediately beyond the runway.
Holding Patterns at the Missed Approach Fix
Most missed approach procedures terminate at a holding pattern. The plan view shows the complete holding fix, the inbound course, and the direction of turns. Charted holding speeds for the missed approach environment follow standard holding speed limits by altitude: up to 200 KIAS at or below 6,000 feet MSL, up to 230 KIAS between 6,001 and 14,000 feet MSL, and up to 265 KIAS above 14,000 feet MSL — unless a chart-specific maximum holding speed is published lower than the standard, which is common at many civil airports where the charted holding pattern is restricted to 175 or 200 KIAS regardless of altitude due to the protected airspace available.
When you enter the hold, you are expected to fly standard one-minute legs at or below 14,000 feet MSL and 1.5-minute legs above 14,000 feet MSL, unless the chart specifies otherwise. These timing standards are published in the AIM and are also reflected on holding pattern depictions that occasionally include "1 MIN" notations.
Why the Missed Approach Must Be Briefed Before Descent
The Instrument Procedures Handbook is explicit: the missed approach procedure should be reviewed and mentally rehearsed during the approach briefing, not while executing it. By the time you reach the MAP and decide to go missed, cognitive load is near its peak — you are likely in the clouds, potentially in turbulence, managing power, pitch, and possibly communication. Having a pre-briefed mental model of "climbing right turn to 3,500, then direct XYZ VOR and hold" lets you execute it as a practiced flow rather than reading the chart from scratch under pressure.
Practically, a thorough briefing includes: the MAP location and how you will identify it, the initial heading or course to fly, the altitude to climb to before turning (if a turn is required), the direction of turn, the holding fix identification and inbound course, and any non-standard climb gradient requirements.
Key Numbers and Rules
- Standard climb gradient: 200 ft/NM from MAP to missed approach holding altitude.
- DA/DH for precision approaches: The MAP is at DA — the altitude, not a geographic point.
- Non-precision MAP: A geographic fix; identified by navaid, waypoint, DME, or timing from FAF.
- Timing to MAP: Published in seconds at specific groundspeeds; use the column matching your expected groundspeed.
- Holding entry altitudes: Must be at or above the charted missed approach altitude before establishing the hold.
- Non-standard gradient notation: Appears in the notes/briefing strip area and sometimes in the profile view; it is a hard limitation, not a suggestion.
- Left-turn holds: Standard turns in holds are right; a left-turn hold is explicitly labeled "(LT)" or with an arrow showing left direction.
Memory Aid
Use the phrase "Track, Altitude, Fix" (TAF) to remember the three things to pre-brief from the missed approach depiction: the initial Track (heading or course to fly from the MAP), the Altitude to climb to before any turn, and the holding Fix with its inbound course and turn direction. Briefing all three before descending below the FAF means you can execute the procedure from memory at the busiest moment in the approach.
Common Test Traps
- Confusing DA with the MAP on a non-precision approach. For a VOR or NDB approach, the MAP is a geographic fix, not the MDA. You must continue to the MAP before beginning the missed approach, even if you reach MDA early and the runway is not in sight.
- Assuming a turn can begin immediately at the MAP. Many procedures require climbing to a specified altitude before initiating a turn. Beginning the turn early can violate obstacle clearance surfaces — and the FAA tests this directly.
- Ignoring non-standard climb gradients. A published gradient higher than 200 ft/NM is a legal and operational limitation. If your aircraft cannot meet it, the approach is not available to you.
- Reading only the text, not the plan view. The textual instruction may say "climbing right turn" but the plan view clarifies exactly where the turn intercepts the inbound holding course — a detail critical for situational awareness.
- Forgetting to identify the holding fix before commencing the approach. If the missed approach terminates at a VOR or NDB, the station must be identified and monitored before you begin the approach, so you can navigate directly to it during the missed approach without re-tuning under pressure.