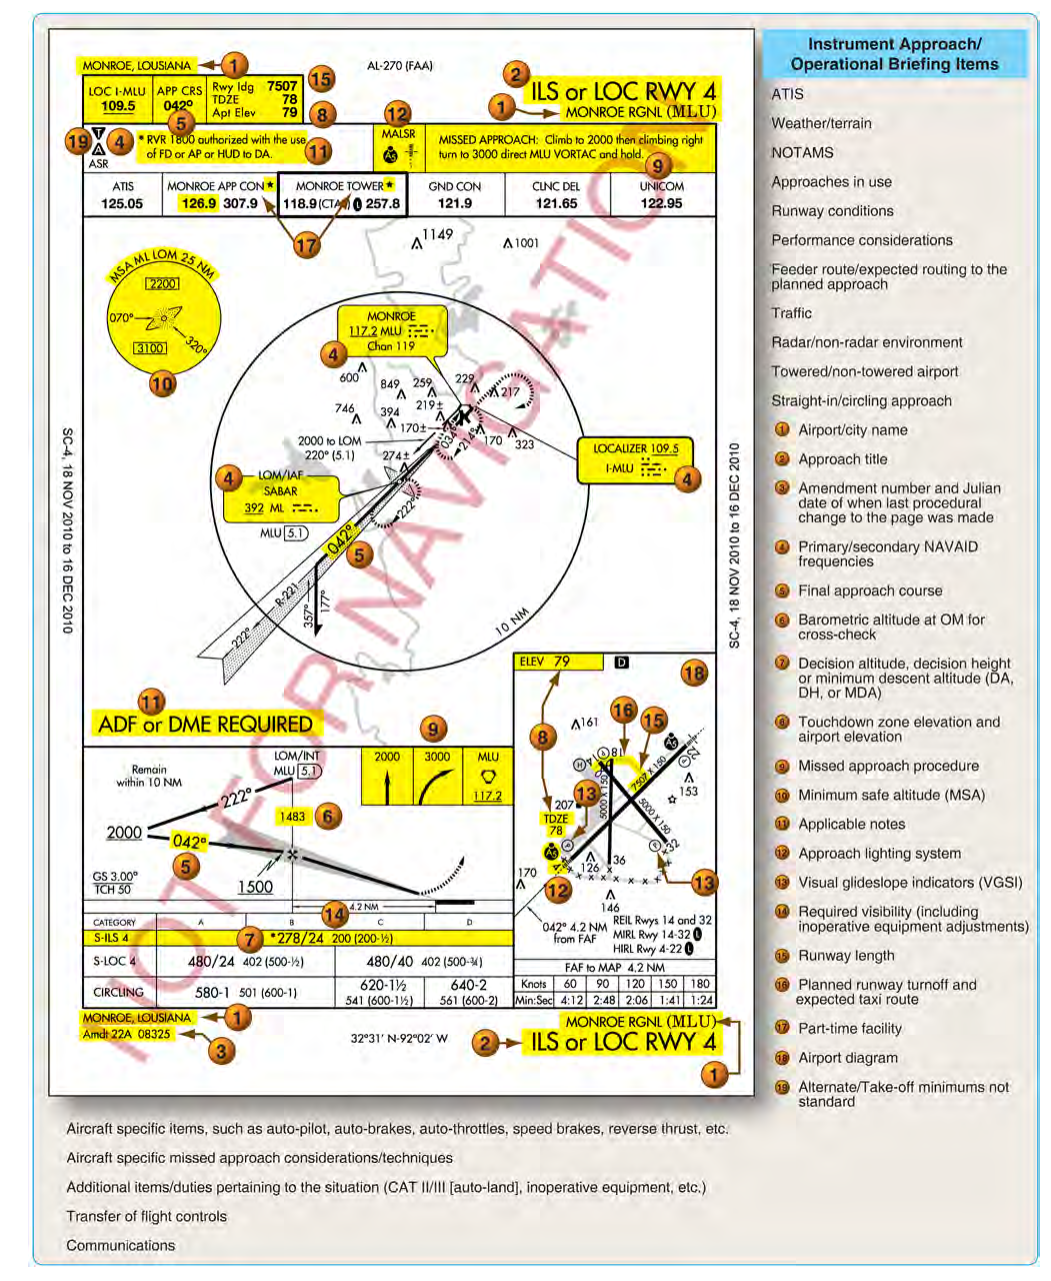
When you pull out an instrument approach procedure (IAP) chart for the first time, the top portion can look like a dense wall of boxes, frequencies, and abbreviations. This header region is actually divided into two distinct areas: the communications box and the briefing strip. Together they contain nearly everything you need to set up your avionics, understand the procedure's limitations, and comply with any special requirements — all before you ever descend toward the runway environment. Mastering how to read these two elements is not just an exam skill; it is a fundamental instrument pilot habit that keeps approaches safe and organized.
This article uses Jeppesen-style and FAA NACO (National Aeronautical Charting Office) chart conventions as described in the FAA Instrument Flying Handbook (FAA-H-8083-15) and the Instrument Procedures Handbook (FAA-H-8083-16). While layout details differ slightly between publishers, the underlying regulatory content is identical because all approach charts are built from FAA-approved procedures.
The Communications Box
The communications box appears in the upper-left corner of an approach chart. Its purpose is straightforward: give the pilot every frequency needed to fly the arrival, approach, and missed approach sequence without fumbling through a separate frequency guide. Listed frequencies typically include, in order of use:
- ATIS or AWOS/ASOS: The automated weather reporting frequency is listed first so you can get the current altimeter setting and field conditions before contacting approach control.
- Approach Control: The radar facility frequency (or frequencies, when different sectors apply) for receiving vectors and approach clearances.
- Tower: The local control frequency for landing clearance and traffic sequencing in the runway environment.
- Ground Control: Used after landing for taxi instructions.
- CTAF or Unicom: At non-towered airports, the Common Traffic Advisory Frequency replaces tower and ground, and it appears here instead.
- Clearance Delivery: Included when the airport has a separate clearance delivery position.
A critical detail: approach control frequencies sometimes differ depending on your direction of arrival. Charts may list multiple sectors labeled by compass direction (e.g., "North 124.0 / South 119.3"). You must choose the correct one based on your position relative to the airport, or ATC will tell you which to use in your clearance. Missing this distinction is a surprisingly common mistake during proficiency checks.
On FAA NACO charts, the communications box also identifies the approach control facility by name, which helps when flying into unfamiliar airspace where the controlling TRACON may serve multiple airports. Knowing the facility name lets you quickly confirm you are talking to the right controller.
The Briefing Strip
The briefing strip is the horizontal band that spans much of the top of the chart, sometimes called the "top band" or "header." It is designed so a pilot can read it quickly — almost like a checklist — before commencing the approach. The Instrument Procedures Handbook describes the briefing strip as a summary of the procedure's most critical planning data. Here is what each segment contains:
Airport and Procedure Identification
The airport name, city, state, and the specific procedure name (for example, "ILS OR LOC RWY 28L") appear prominently. The procedure name tells you the type of approach (ILS, VOR, RNAV/GPS, LDA, etc.), the primary navigation aid, and the runway it serves. When an airport has multiple procedures for the same runway, this title is the only way to confirm you have pulled the correct chart.
Navaid Information
The primary navaid — the ILS localizer frequency and identifier, the VOR frequency and identifier, or the RNAV channel and waypoint name — is listed along with its Morse code identifier. During the approach, you must identify the navaid aurally or visually to confirm you are tuned to the correct facility. Skipping identification is a regulatory violation and, more importantly, a safety hazard; a mistuned navaid can silently give plausible but wrong guidance.
Minimum Safe Altitude (MSA) Circle
The MSA (or in some references, Emergency Safe Altitude) is not technically inside the briefing strip but is closely associated with the top of the chart. It depicts a 25 nautical mile radius around a reference fix and segments it by compass bearing, listing the minimum obstruction clearance altitude in each sector. The MSA provides at least 1,000 feet of obstacle clearance within that radius and is intended for emergency use only — it does not guarantee navigation signal reception or ATC radar coverage.
Transition Altitudes and Initial Approach Fixes
Many charts list the procedure's transition altitude and, on RNAV procedures, the initial approach fix (IAF) names. This helps during pre-approach planning: you can confirm which fix you will be routed to and what altitude to expect on the transition. During actual ATC operations, you may be cleared "direct to the IAF" or via a published transition, and knowing these names from the briefing strip lets you load and verify your flight management system or GPS quickly.
Notes and Procedure Remarks
This is arguably the most safety-critical part of the briefing strip. Special notes here might include:
- Inoperative component tables: Instructions for how minimums change when certain components (like the glide slope or approach lighting system) are out of service.
- Visibility requirements: Non-standard visibility minimums, or notes that certain minimums apply only with specific lighting systems operative.
- Climb gradient requirements: A published missed approach climb gradient higher than the standard 200 ft/NM, which is critical for obstacle clearance on the missed approach segment — especially relevant in mountainous terrain.
- Alternate minimums: A note reading "NA" (not authorized) or a reference to non-standard alternate minimums means the airport cannot be used as an IFR alternate under standard rules, or that alternate minimums differ from the default 600-2 / 800-2 rule of thumb found in 14 CFR Part 91 alternate requirements.
- Takeoff minimums: Some charts note non-standard takeoff minimums or departure procedures that apply to that runway environment.
- DME or radar required: If the procedure requires DME or ATC radar to identify a fix, it is stated here. Without that equipment operative, the approach is not authorized.
Why These Elements Matter in Practice
The practical value of the briefing strip and communications box becomes obvious during high-workload approach sequences. Airline and military procedures have long required a formal "approach briefing" before descent precisely because skipping it causes missed information — wrong frequencies loaded, wrong minimums applied, missed climb gradient requirements. As a general aviation instrument pilot, you should adopt the same discipline. Brief the approach out loud (or silently but systematically) while still at cruise altitude, covering at minimum: procedure name and runway, primary navaid frequency and identifier, decision altitude or minimum descent altitude, required visibility, missed approach instructions, and any notes. The communications box tells you what to dial in; the briefing strip tells you the constraints you must respect.
A missed climb gradient note, for example, can have life-or-death consequences in a single-engine aircraft at a mountainous airport. If the missed approach requires 300 ft/NM climb gradient and your aircraft can only achieve 220 ft/NM at maximum gross weight on a hot day, you are not legally or safely authorized to commence that approach without a plan. The briefing strip is where you find that number.
Key Numbers and Rules
- The MSA circle guarantees 1,000 ft obstacle clearance within a 25 NM radius; it is for emergency use only.
- Standard missed approach climb gradient is 200 ft per nautical mile; any higher requirement is published in the notes.
- Standard IFR alternate minimums under 14 CFR Part 91 are precision: 600 ft ceiling / 2 SM visibility; non-precision: 800 ft ceiling / 2 SM visibility — but non-standard alternate minimums override these when noted on the chart.
- Navaid identification must be confirmed before using an approach — this is required practice per the Instrument Flying Handbook and is tested on the instrument rating practical test standards.
- "NA" in the alternate minimums note means the airport may not be filed as an IFR alternate under any circumstances (or only under specific conditions detailed in the TPP front matter).
Common Test Traps
- Confusing MSA with MDA: The Minimum Safe Altitude is an emergency-only tool and does not authorize an instrument approach descent. The MDA (Minimum Descent Altitude) is found in the minimums box at the bottom of the chart — not the MSA circle at the top.
- Ignoring the climb gradient note: Many exam questions describe a scenario where the pilot fails to check the published missed approach climb gradient, then asks whether the approach is legal or safe. Always check the notes.
- Assuming "NA" means the approach is unavailable: "NA" in the alternate minimums section means the airport cannot serve as an alternate, not that the approach itself is prohibited for a destination.
- Wrong frequency sector: When approach control lists multiple frequencies by direction, selecting the wrong sector can result in calling a frequency with no answer — or worse, getting unexpected instructions from a different sector. The test may present this as a situational awareness question.
- Skipping navaid identification: The exam regularly tests whether pilots know that tuning a frequency alone is insufficient — you must aurally or visually identify the navaid's Morse code or coded identifier before relying on its guidance.