No matter how well maintained an aircraft is, every pilot must be mentally and physically prepared for the day the engine goes quiet. A forced landing without engine power — sometimes called a "deadstick" landing — is one of the most demanding situations a pilot can face, yet it is also one of the most trainable. Pilots who have rehearsed the procedure systematically and understand the aerodynamics behind it consistently walk away from what could otherwise be fatal accidents. The FAA treats this as a core private-pilot emergency skill for exactly that reason.
Unlike a precautionary landing (where the engine is still running but deteriorating), a forced landing gives you a fixed, finite energy budget. Once the engine stops producing thrust, your glide performance, your decision-making speed, and your situational awareness determine the outcome. This article walks through every phase of the maneuver: the immediate cockpit actions, the glide, field selection, pattern planning, and the final approach and landing — plus the exam-focused numbers and common test traps.
The Aerodynamics of Unpowered Flight
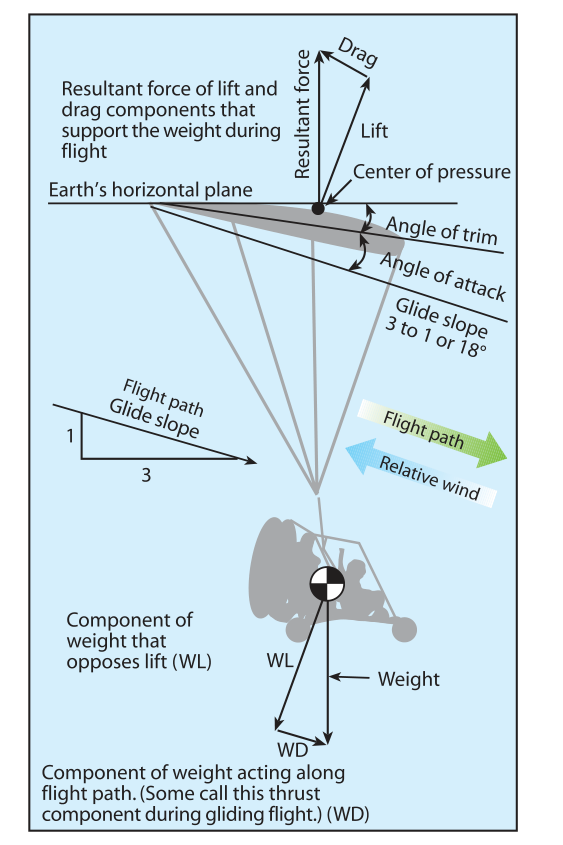
An aircraft does not simply fall when the engine stops — it glides. Lift continues as long as the wings move through the air at a sufficient angle of attack. The ratio of horizontal distance traveled to altitude lost is called the glide ratio. A typical training aircraft such as a Cessna 172 has a glide ratio of roughly 9:1 at its best-glide airspeed, meaning it travels approximately nine feet forward for every foot of altitude lost in still air. This ratio is fixed by the aircraft's aerodynamic design and is achieved at one specific airspeed: best-glide speed (VG), which is published in the Pilot's Operating Handbook (POH).
Flying faster than VG increases drag faster than it adds useful lift, shortening your glide range. Flying slower than VG brings you closer to a stall and also shortens the glide. In a headwind, you should fly slightly faster than VG (to cover ground before the wind pushes you back); in a tailwind, slightly slower. However, for most training scenarios and FAA knowledge-test questions, use the published VG as the target. Establishing this speed is the first priority the moment the engine fails.
Immediate Actions: The First 30 Seconds
Time and altitude are the same currency in a forced landing. The FAA's Airplane Flying Handbook (FAA-H-8083-3) recommends a swift, prioritized response:
- Establish best-glide speed immediately. Pitch for VG and trim. A nose-high attitude at the moment of engine failure can quickly lead to a stall; a nose-low attitude wastes precious altitude. Trim frees your hands and keeps the speed stable while you work through the checklist.
- Pick a landing area. Begin scanning for suitable terrain. You should always be mentally cataloguing landing options during every flight — open fields, straight road sections, airports within glide range. Now is when that habit pays off.
- Attempt a restart (if time and altitude permit). Run the engine-failure checklist from the POH: check fuel selector (switch tanks), mixture (rich), carburetor heat (on), magnetos (both), primer (in and locked), throttle (try different settings). Many engine failures are caused by fuel mismanagement and can be corrected quickly. Do not spend so much time on the restart that you neglect controlling the aircraft and selecting a field.
- Declare an emergency. Squawk 7700 on the transponder and transmit a MAYDAY call on the current frequency or 121.5 MHz. Give your position, altitude, aircraft type, and intentions. ATC can coordinate emergency services and clear airspace.
- Complete emergency checklist items. Per the POH, these typically include turning off fuel, magnetos, and the master switch at appropriate points to reduce fire risk — but note that electrical systems needed for communication and flaps should stay on until just before touchdown.
Field Selection: Choosing Your Landing Area
The ideal emergency landing field is large, flat, firm, unobstructed on the approach end, and oriented into the wind. In practice, you rarely get ideal — you get best available. Evaluate candidate fields in roughly this priority:
- Size and shape: A long, rectangular open field is better than a short triangular one. Give yourself margin; amateur estimation from altitude always makes fields look larger than they are.
- Surface: Short grass or firm dirt is best. Tall crops (corn, sorghum) can hide ditches and cause noseovers. Plowed fields are rough and can flip an aircraft. Standing water or mud can collapse the gear and pitch the aircraft over.
- Slope: Land uphill if possible — it shortens the ground roll. However, a steep upslope can cause loss of visibility over the nose on short final; weigh the trade-off.
- Obstacles: The approach end must be clear of trees, power lines, fences, and roads. Power lines are especially dangerous because they are nearly invisible from above and at low altitude.
- Wind: Landing into the wind reduces ground speed and shortens the roll-out. Use smoke, dust, vegetation movement, or water ripples to estimate wind direction if no ATIS or AWOS is available.
Once you have selected the best available field, commit to it. Changing your mind at low altitude in favor of a slightly better field is a leading cause of controlled-flight-into-terrain accidents during forced landings.
Flying the Approach: Pattern Planning
Without engine power you cannot go around — so precision matters. The Airplane Flying Handbook recommends planning a modified rectangular pattern that keeps the intended field within gliding distance at all times. A common technique is the high-key / low-key method:
- High-key point: Arrive over or abeam the approach end of your selected field at approximately 1,000 feet AGL (varies by aircraft and POH). From here, a 360-degree glide to touchdown should be feasible.
- Low-key point: On the downwind leg, opposite the touchdown point, at roughly 500–800 feet AGL. Adjust this point based on your energy state.
- Base leg: Turn base when the field is at roughly a 45-degree angle behind your wing. This is the phase where you fine-tune your energy using flaps and forward slips — the only tools you have to dissipate excess altitude.
- Final approach: Aim for the first one-third of the available field. Being long is far more dangerous than being slightly short of center. Fly a stabilized approach; do not carry excess speed because extra speed equals extra distance on the ground you may not have.
Flaps are your primary energy-management tool. Extend them progressively — do not deploy full flaps until landing is assured. Full flaps dramatically steepen the descent and shorten glide range; premature full-flap extension at high altitude can mean arriving far short of the field.
Final Approach and Touchdown
On short final, confirm the flaps are as needed, fly a normal approach attitude, and at the last moment before touchdown, complete the emergency shutdown items: mixture to idle-cutoff, fuel selector off, magnetos off, and master switch off (if no further electrical need). These steps reduce the risk of post-crash fire. Brakes should be set after touchdown, not before — locking the wheels during the flare produces a skid and reduced directional control.
If a collision with an obstacle is unavoidable, aim to hit the lightest, most yielding object (small tree branches, brush) rather than a solid fence post or structure. A controlled, slow-speed impact with a soft obstacle is far more survivable than a high-speed impact with a hard one.
Why This Matters
Engine failures are rare but not vanishingly so — fuel exhaustion, carburetor ice, and mechanical failure each claim aircraft every year. NTSB accident data consistently shows that outcome is strongly correlated with pilot preparation. Pilots who have practiced power-off 180-degree accuracy landings and simulated engine failures to a field land safely; those who have not often panic, fly too fast, attempt last-minute field changes, or allow the aircraft to stall on final. The FAA requires power-off 180 accuracy landings as part of the private-pilot practical test for exactly this reason.
Key Numbers and Rules
- Best-glide speed (VG): Published in Section 3 (Emergency Procedures) and Section 5 (Performance) of your POH — always use the aircraft-specific value.
- Glide ratio (typical trainer): Approximately 9:1 at VG in still air — roughly 1.5 miles of glide per 1,000 feet of altitude AGL.
- High-key altitude: Approximately 1,000 feet AGL over the intended field (exact value varies by aircraft).
- Emergency squawk code: 7700 on the transponder.
- Emergency frequency: 121.5 MHz (guard frequency monitored by ATC and many aircraft).
- Flap strategy: Delay full-flap extension until landing is assured; use partial flaps and slips for energy management on base.
- Wind correction on VG: Add a small increment in a headwind, reduce slightly in a tailwind, to optimize glide over ground.
Memory Aid
Many instructors teach the mnemonic "ABC" for the first three priorities in an engine failure:
- A — Airspeed: Immediately establish best-glide speed (VG) to maximize glide range.
- B — Best field: Identify and commit to the best available landing area within glide range.
- C — Checklist: Run the engine-restart and emergency checklist from the POH (in that order).
Some instructors expand this to "ABCD" with D — Declare (squawk 7700 and transmit a MAYDAY), ensuring communication is not forgotten. The mnemonic is a sequencing aid, not a substitute for thorough practice with your specific aircraft's POH procedures.
Common Test Traps
- Flying too fast after engine failure: Students often push the nose down instinctively, thinking speed helps. Speed above VG shortens glide range. The correct first action is to pitch for VG, not maximum speed.
- Deploying full flaps too early: Full flaps on a high base leg can leave you drastically short of the field. The FAA tests whether you know to delay full flaps until landing is assured.
- Confusing best-glide with best-angle or best-rate climb speed: VG maximizes glide distance. It is not the same as VX or VY, which apply to powered flight.
- Changing fields at low altitude: A common distractor question presents a scenario where a slightly better field appears. The correct answer is to commit to the original field once below a safe altitude — field changes at low altitude are a primary cause of forced-landing fatalities.
- Forgetting to attempt a restart: The FAA expects pilots to run the restart checklist if altitude permits. Omitting this step (leaving fuel selector on wrong tank, for example) is tested as a procedural error.